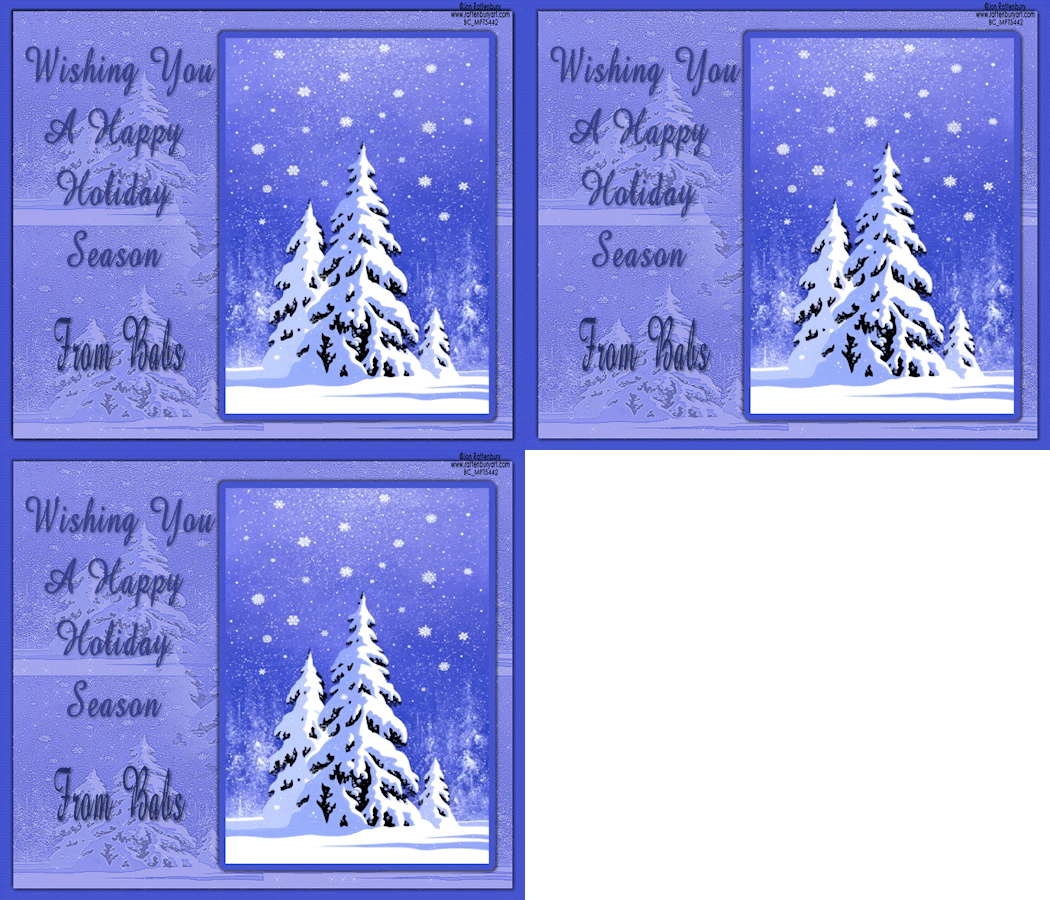
Showing posts with label PTU. Show all posts

Saturday, November 7, 2009

WISHING YOU ALL TUTORIAL 60


©SassynSimple Tutorials
DATE WRITTEN: Nov 7, 2009

THINGS NEEDED
Jasc Paintshop Pro or Corel Paint Program
You must have a good working knowledge of the programs I use.
Graphic: Jon Rattenbury is a PTU i got it at MyPSPTubes License MPT5442
PLUGINS: VM Natural/stardust
MY SUPPLIES: HERE

Let's Begin
The below steps must be done and will not be repeated.
We will use same drop shadow unless I state otherwise.
Always Close original image after you copy unless stated otherwise.
Always sharpen re-sized items one time.

1. Select and open your Tube
Using your dropper tool select your colors from image
left click/color/foreground a light color
right click/background color select a dark color
right click on your mouse

2. Open a new transparent image 700X600
Flood fill with your dark/background color

3. Layers palette/right click add a new raster Layer
Selections/Select all
Click on your Tube now Edit/copy
Edit/paste into selection
Selections select none

4. Effects/Plugins/Itatlian Picture In Picture Miscela 186

5. Effects/Edge Effects/Enhance more

6. Layers palette/right click add a new raster layer
flood fill it with your foreground color
layers palette take opacity down to 78
Now Right click on your filled layer Merge/merge down

7. Edit/copy
Edit/paste as new image
minimize this Image for now we will use it in our background

8. Back to your Original Image (merged)
Re-size this to 95%

layers palette right click rename this layer stardust

9. Still on merged Layer Effects/3D/drop shadow
Vertical and horizontal 2
Opacity 70
Blur 5.00
color black
Shadow on new layer not checked
Now Repeat drop shadow,Vertical/Horizontal to -2

10. Select your selections tool
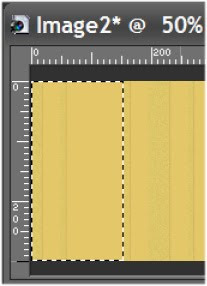
Start at 300 top ruller ruler mark draw out to 600 top ruler mark
Down to 550 Side ruler
(See Image below)
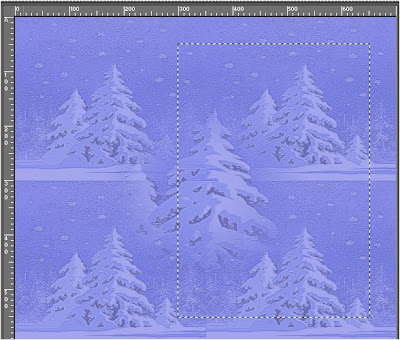
11. Layers palette/right click add a New Raster Layer
Edit/paste the selection from your image into selection into your image
Keep Selected

12. Selections/modify/Expand 9
Layers palette/right click add a new raster layer below the selection image
Right click to flood fill with your dark/background color
Selections/select none

13. Still on Dark Color selection Layer
Effects/3D/drop shadow
Vertical and horizontal -2
Opacity 70
Blur 5.00
color black
Shadow on new layer not checked
Now Repeat drop shadow. change Vertical/Horizontal to 2

14. Using Dropper Tool Select a really dark color from your image
left click/foreground color
right click/background color

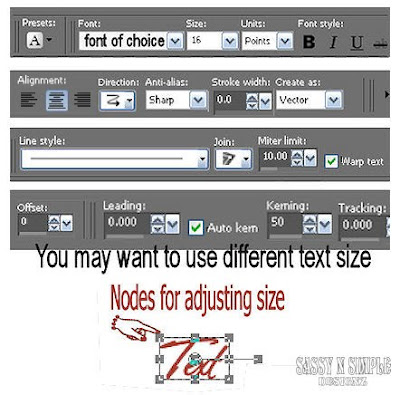
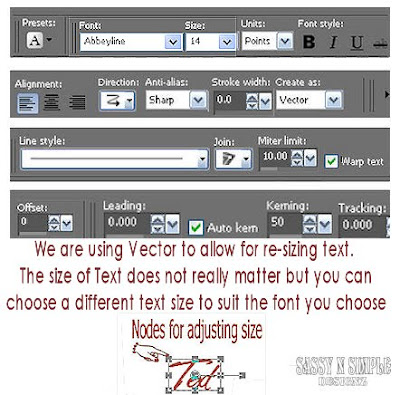
15. Select your Text Tool
(settings below)
Type out “Wishing you
Layers palette/right click convert to raster layer once you size it
repeat this for all the other words
Apply drop shadow


16. Layers palette/right click add a new raster layers
Add your watermark and Copyrights
Click the eye in the layers palette to close off bottom two layers
right click any open layer/merge/merge visible
Re-size your image so that your height is 450 width will adjust.


ANIMATION
Open your Animation Shop now. I will refer to it as A.S.

1. Layers palette/right click stardust layer/Duplicate it 2 times
Click back on original Stardust bottom layer
Under Selections Tab Selections/select all
Selections/float
Selections/defloat
You must keep it selected

2, Effects/Plugins/VM Natural Stardust
apply the setting below
Do not close this Layer
proceed to next step 3, Select the middle stardust layer
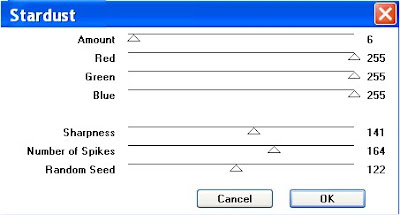
Apply the VM Natural Stardust change random seed to 132
Layers palette click the eye close this layer

4. Select the Top stardust layer
Apply the VM Natural Stardust change random seed to 142
Layers palette click the eye close this layer

5. Edit/Copy Merged
Take it to AS
right click anywhere in the workspace/ paste as new image

6. Back in PSP Click the eye to close the bottom star dust Layer
Open your middle Stardust layer Edit/copy merged
Take it to AS right click on first frame/ Paste/Paste after current frame

7. Back in PSP click the eye to close off the middle stardust layer
Open the top stardust Layer Edit/copy merged
Take it to AS right click on second frame. Paste/Paste after current frame

8. Now save your animation in a folder so that you know where it is.

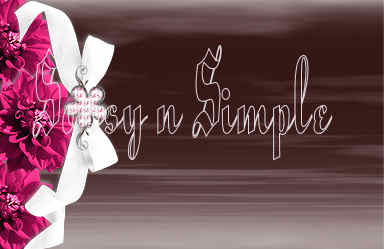
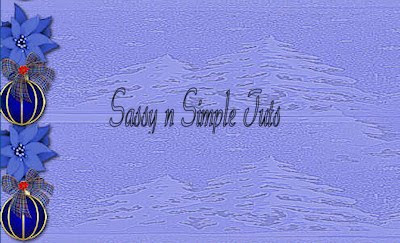
BACKGROUND

1. Open new transparent image. 1280x300.
or your desired width
Selection select all.
Open the Image I had you save Edit/copy
Edit/Paste into selection. Selections Select none

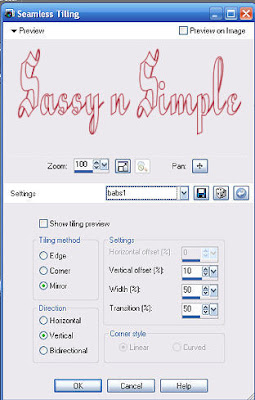
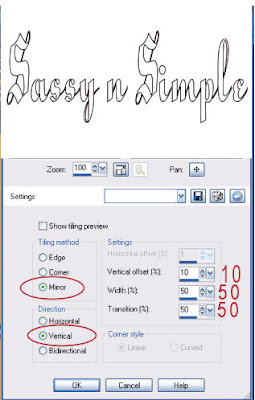
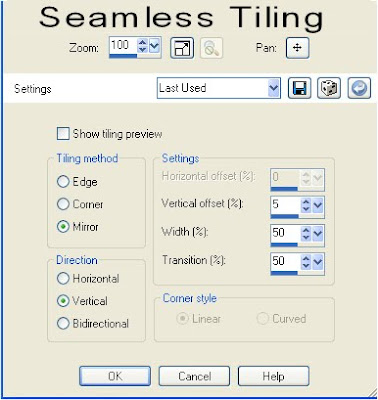
2. Effects/Image Effects/Seamless Tiling
(see settings below) 3. Select the BFD_CJ_Flower5 from my supplies, Edit/copy
Edit/paste as new layer into your image
Re-size it 25%
Adjust Hue/Saturation/colorize Hue 162 Saturation 143
Now apply your drop shadow
move it to the top left border of your image
Layers palette/right click/ Duplicate 1 time
move duplicate down leaving a space between them

4. Select the BFD_CJ_Ball10 from the supplies, Edit/copy,
Edit/paste as new layer into your image.
Re-size it 15%
Apply your drop shadow
Move it to the left border in between the flowers.
Layers palette/right click Duplicate 1 time
move the duplicate down to the bottom of your image
but spaced a little above the bottom.

5. Select the BFD_CJ_Bow from the supplies, Edit/copy,
Edit/paste as new layer into your image.
Re-size it 15%
Apply your drop shadow.
Move it to the left border over your first ball.
Layers palette/right click Duplicate 1 time and
move duplicate down over the other ball.
Save your Image File/Export/Jpeg Optimizer Value set at 30


If You use my tutorials in Stationary Please apply Credit Below

Tutorial by Babs C
HERE or HERE

You can copy and paste the above if that does not work use Links below
http://groups.yahoo.com/group/sassynsimple/
http://snsstats.blogspot.com/

My newer Stationary Tutorials are in Incredimail Letter form
in order to access them you must be a member of my group
Our PSP HideAway

©SassynSimple Tutorials

Sunday, October 25, 2009

SEASONS GREETINGS TUTORIAL 56

©SassynSimple Tutorials


DATE WRITTEN: Oct 24, 2009

THINGS NEEDED
Jasc Paintshop Pro or Corel Paint Program Settings may vary slightly.
You must have a good working knowledge of the programs I use.
TUBE: Silvia’s Posers FTU PU Cookie 42 found under posertuben/cookie HERE
KIT: Team Kissed Christmas Elegance Full Size PTU you can buy it HERE
FONT: Annabel Antique Script FTU found under calligraphy HERE

If you choose a different kit re-sizing may change.

Let's Begin
The below steps must be done and will not be repeated.
We will use same drop shadow unless I state otherwise.
Always Close original image after you copy unless stated otherwise.
Always sharpen re-sized items one time.

Open your tube minimize for now

1. Open a new transparent image 700X600
Selections/select all
Select Paper 1 from the kit Edit/copy
Edit/paste into selection. Selections/select none

2. Add a new raster Layer Selections/select all
Select Paper 2 from the kit Edit/copy
Edit/paste into selection. Selections/select none
Re-size 90%. All layers unchecked, smart size

3. Still on the same layer Effects/3D/drop shadow
Vertical and horizontal 1
Opacity 70
Blur 5.00
color black
Shadow on new layer not checked
Now go back and apply drop shadow again change the vertical and horizontal to -1

4. Select wreath 2 from the kit, Edit/copy
Edit/paste as new layer into your image
Re-size the Wreath 20%
Apply same Drop shadow change the vertical and horizontal back to 1
Place towards the right side of your image. Refer to my image

5. Select your magic wand tool
(settings below)
Click inside the wreath
Selections/modify/expand 8. Keep Selected

6. Add a new raster layer under our wreath
Select Paper 3 from the kit. Edit/copy
Edit/paste into selection
Selections/select none

7. Select your Tube I am using Cookie42
Re-size your tube as needed
I re-sized my Tube 35%
Apply same drop shadow
move to the left border of your Image
Refer to my image

8. Select Bell 3 from the kit, Edit/copy
Edit/paste as new layer into your image
Re-size the bell 10%
Apply same drop shadow
move to the right bottom corner of your image

9. Select Christmas Tree 3 from the kit, Edit/copy
Edit/paste as new layer into your image
Re-size it 10%
Apply same drop shadow
Place on the left side of your wreath

10. Select Gold WordArt 2 from the kit, Edit/copy
Edit/paste as new layer into your image
Re-size it 20%
Apply same drop shadow
Place at the top of your image centered

11. With your dropper tool
left click/foreground color
right click background color
choose a dark color from your image
I used the maroon color from my background

12. Select your Text tool Select your Font
I used Annabel Antique Script
(Text settings below)
Type our “From” using your nodes size it like you want
Layers palette/right click convert to raster layer
Apply same drop shadow. Do the same for your Name

13. Now apply your watermark and copyrights
layers palette right click any layer merge/merge visible
Re-size your image, all layers, smart size height 400 width will adjust

14 Save your image


BACKGROUND

1. Open new transparent image. 1280x300.
Selection select all.
Select paper striped paper 1 from the kit Edit/Copy
edit/paste into selection
Selections/ Select none

2. Layers palette/right click add a New Raster Layer
Select your selections tool
selection mode is Rectangle
Mode is add (shift)
Make your ruler viewable by clicking view click on ruler
Now starting at the top 150 line draw your rectangle
(see image below)
Keep selected

3. Select Stripe Paper 1 from the kit. Edit/copy
edit/paste into selection
Selections/select none
Right click on the layer merge/merge visible

4. Effects/Image Effects/Seamless tiling
(settings below)

5. Select Velvet Tie 2 from the kit
Re-size it so that width is 305 Edit/copy
Edit/paste as new layer into your image
Free rotate it 90 right
Apply same drop shadow
Move it to the left just over your striped border
Make sure to center it

6. Select Seal 2 from the kit Edit/copy
Edit/paste as new layer into your image
Re-size it 15%
Apply same drop shadow
Move it over on to your border at the bottom centered


7. Select Ball 1 from the kit, Edit/copy
Edit/paste as new layer into your image
Re-size it 10%. re-size it again at 70%
Apply same drop shadow
move it over onto your border just above the seal. Refer to my image

8. Select Ball 2 from the kit, Edit/copy
Edit/paste as new layer into your image
Re-size it 10%. re-size it again at 70%
Apply same drop shadow
move it over onto your border above ball 1 towards the right some


9. Select Poinsettia 2 from the kit, Edit/copy
Edit/paste as new layer into your image
Re-size it 15%
Apply same drop shadow
Move it to your border towards the top


10. Right click any layer in the layers palette merge/merge visible

Save your Image File/Export/Jpeg Optimizer Value set at 30

Thanks for trying my tutorial I hope you enjoyed it

If You use my tutorials in Stationary Please apply Credit Below

Tutorial by Babs C
HERE or HERE

You can copy and paste the above if that does not work use Links below
http://groups.yahoo.com/group/sassynsimple/
http://snsstats.blogspot.com/

My newer Stationary Tutorials are in Incredimail Letter form
in order to access them you must be a member of my group
Our PSP HideAway

©SassynSimple Tutorials

Sunday, October 11, 2009

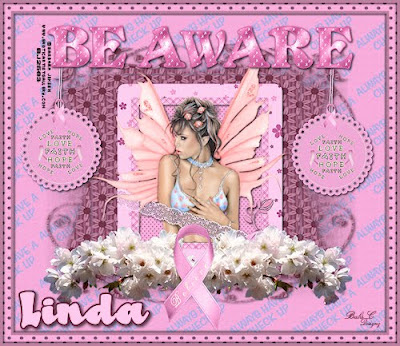
BE AWARE TUTORIAL 53


DATE WRITTEN: Oct 11, 2009

THINGS NEEDED
PAINTSHOP PRO X2 OR SIMILAR PROGRAM. My tutorials can be adapted to other versions some settings may vary slightly.
You must have a good working knowledge of the programs I use.
TUBE: Barbara Jensen you must buy it HERE
KIT: Linda’s Dream Designs and MediEvils Designs Cancer Awareness Full size kit purchase it HERE
MASK: Zunzzana-mask60 HERE
If you choose a different kit re-sizing may change if it is not a full size kit.

Let's Begin
The Following steps must be done but I will not repeat them each time.
We will use same drop shadow unless I state otherwise.
Always Close original image after you copy unless stated otherwise.
Always sharpen re-sized items one time.

Open you tube and the Zuzzanna-mask60 minimize for now

1. Open a new transparent image 700X650 Selections/select all. Select Paper 14 from the kit copy and paste into selection. Selections/select none

2. Select your dropper tool select a color from tube Left mouse click for foreground and right mouse click for background.

3. Select your text tool (settings below) Type out your Text Always Have A Check Up (note I put Check up on a Second Line) Using your nodes Size your Text. Rotate Text (settings below Found on the bottom of you PSP program. Objects/Align Center in Canvas. Convert to a Raster Layer


Rotation of Text
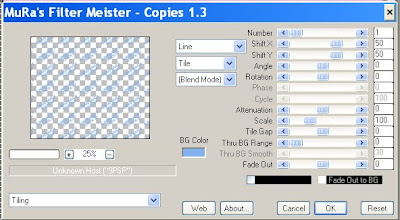
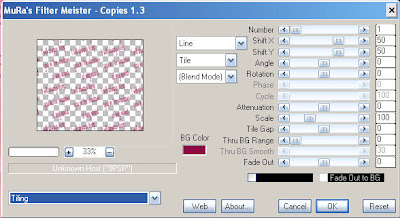
4. Effects/Mura’s Meister/Copies settings Below. In your layers Palette slide Opacity down to 65.


5. Add a New Raster layer. Selections/select all Select paper 13 from the Kit Edit./copy, Edit/paste into selection. Selections/select none


6. Select Zuzzanna-mask60 Image/rotate right (this is not free rotate) minimize it. Now Back to your Image Layers New Mask layer/from image Select Zuzzanna-mask60 in the drop down box Make sure source Luminance is checked and invert mask data is checked Click ok.

7. In your Layers palette with your mouse Right click on the white and
black mask in your layers palette, Select delete click yes, When it ask “Would you like this mask merged into the Layer below it” select yes. Right click top mask merge/merge group. Re-size the mask 85%.
Effects/3D/ Drop Shadow settings below.
Vertical and horizontal 2
Opacity 70
Blur 5.00
Color black

8. Select Frame 1 from the Kit Edit/copy, Edit/paste as new layer into your image. Re-size the Frame 15%. Apply your drop shadow.

9. Select your Selection Tool Draw out a rectangle That will be behind your frame. Make sure you start you selection right in the middle of your frame border at the Top Left Corner pulling the selection all the way across and down to your right corner. Keep Selected

10. Add a New Raster Layer below your Frame. Select Paper 4 From The Kit Edit/copy, Edit/paste into selection. Selections/ Select none.

11. Select your Tube Edit/copy, Edit/paste as new layer into your image under your frame. Re-size as needed. Duplicate your Tube. Right click This layer in your layer palette Arrange bring to top. Now with your eraser tool erase any parts that you do not want covering the bottom of the frame and ribbon. Click back on your Tube Layer under your frame and apply same drop shadow.

12. Select The Flower Branch 2 in the kit Edit/copy, Edit/paste as new layer into your image. Re-size it 25%, With your eraser tool erase the branch part. Apply Drop shadow.Arrange it at the bottom of the frame refer to my image Duplicate this layer 1 time. Image/ mirror the duplicated copy.

13. Select the Ribbon element from the Kit. Edit/copy, Edit/paste as new layer into your image. Re-size it 15%. Apply same drop shadow. Move it to the center of your Flowers.

14. Right Click on your Layers Palette and merge visible.

15. Select the Letters From the Apha folder To Spell out Be Aware. Re-size them 15%. Arrange them at the top of your image. Refer to my image. Apply drop shadow to each one.

16. Select the Tag element from The Kit. Edit/copy, Edit/paste as new layer into your image. Re-size it 15%. Apply same drop shadow. Move it to the Left side and place it right under Your B. Duplicate it and move the duplicate so that it is under your E. Do not mirror it.

17. Image/add border 5 symmetric checked. With your magic wand (settings below) Click on the border. Select your dropper tool and select a color from your image in your foreground color by left clicking your mouse Flood fill the border selection. Apply drop shadow. Go Back and apply drop shadow again but Change Vertical and Horizontal to -2. Selections/select none.

18. Image/add border 15 symmetric checked. Click on it with your magic wand Select Paper 7 from the kit Edit copy, Edit paste into selection. Selection/select none.

19. Image/add border 5 symmetric checked. With your magic wand (settings below) Click on the border. Select your dropper tool and select a color from your image in your foreground color by left clicking your mouse Flood fill the border selection. Apply drop shadow. Go Back and apply drop shadow again but Change Vertical and Horizontal to -2. Selections/select none.

20. Apply your watermark and copyrights. Re-size image so that width is no more than 500.

Make a folder and save your image in it.


BACKGROUND.

1. Open new transparent image. 1280x300. Selection select all. Select paper 14 from the kit Copy and paste into selection. Selections/ Select none.

2, Effects/Image Effects/seamless tiling use settings below.

3. Select the Ribbonette Element from The Kit Edit/copy, Edit/paste as new layer into your image. Re-size it 10%. You will need to re-size it once more at 40%. Apply same drop shadow. Move it to the left border. Duplicate it 2 times. Arrange the bottom layer at the top, The middle Layer at the bottom and Top layer in middle. Refer to my image

4. Merge Visible

Save your Image in the folder you made, by going to File/Export/Jpeg Optimizer Value set at 30

PLEASE PLACE CREDIT ON ALL STATS
Tutorial by Babs C
HERE or HERE

Just copy and paste into your Stationary
I want to Thank Simply Classy n Sassy Group Testers for testing the Tutorial
I hope you enjoyed this tutorial..

Tuesday, August 25, 2009

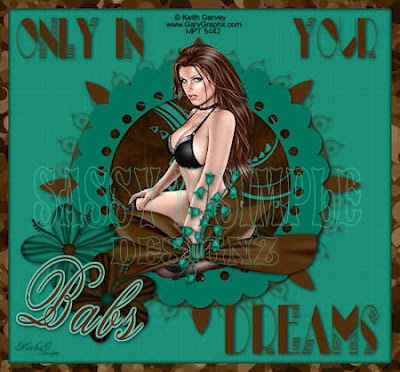
TUT 39 ONLY IN YOUR DREAMS.


DATE WRITTEN: Aug 25, 2009

THINGS NEEDED:
PAINTSHOP PRO X2 OR SIMILAR PROGRAM. You also need a good working knowledge of it.
TUBE: Keith Garvey you must purchase it at MY PSP TUBES
MASK: WSL_mask 315 HERE

KIT: HONORED SCRAPS IN DREAMS PTU TAGGER purchase HERE
Not all kits are same sizes. Re-sizing may be different


Let's Begin
Once you set your drop shadow it will stay..

Always Close original image after you copy.

Always sharpen re-sized items one time.

1. Open you tube and WSL_mask 315 minimize for now.
2. Open a new transparent image 700X650. Selections/select all. Select Paper 12 from the kit copy and paste into selection. Selections/select none

3. Add a New Raster Layer Selections Select all. Select Paper 11 from the kit Copy and paste into image. Selections/select none.


4. Under Layers on your tool bar select new mask layer/from image.
Select the wsl_mask 315 in the window. Make sure source Luminance is checked and invert mask data is unchecked. Click OK.

5. Right click on the mask layer with the mask icon on it. Select delete. Right click top mask merge/merge group. When it ask “Would you like this mask merged into the Layer below it” select yes. Re-size it 90%. Apply Drop shadow Vertical and horizontal set at 2, Opacity set at 65 and blur set at 8.00.


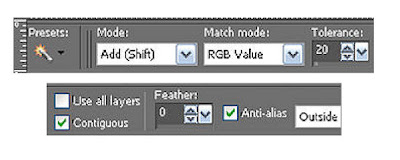
6. Select frame 5 from the kit copy and paste it into your image as a new layer. . Re-size it 60%.. Select your magic wand setting mode set to add/shift and match mode is RGB, Tolerance set to 20, Feather 0, anti-alias checked and Outside selected. Click inside the frame. Selections/modify expand 25.


7. Add a new raster layer below your frame. Select Paper 1 from the Kit Under edit on your tool bar copy and paste into Selection. Selections/select none. Go back and apply your drop shadow to your frame now.


8. Copy your tube and paste above your frame. Re-size if needed. Place in the center of your frame. Apply same Drop shadow.
9. Select Wrap 6 from the kit Copy and paste into your image as new layer. Re-size it 50%. Arrange it to the bottom of your frame. Using your warp tool push it so that it wraps around your frame. Apply same drop shadow.

10. Select Flowers 9 and 10 from the Kit copy and paste each into the image as a new layer. Re-size them 75%. Move them to left side of the frame towards the bottom. Apply same drop shadow to each layer.


11. Apply Text. I used the font Labyrinth Capital Font. And added my font for each side and bottom separately. Apply your drop same drop shadow.


12. Image/add border of 15. Select the border with your magic wand. Settings mode set add/shift and match mode is RGB, Tolerance set to 20, Feather 0, anti-alias checked and Outside selected.


13. Select Paper 7 from the kit in your foreground color under patterns. Angle o and scale 50. Flood fill the border with it. Apply drop same drop shadow. Go back and apply drop shadow again but this time change Vertical and Horizontal to -2. Selections/select none.


14. Apply your copyrights and watermark. Re-size your image so that it is 450 in width. Height will adjust. Save our image


BACKGROUND.


1. Open new transparent image. 1280x300. Selection select all. Select paper from the kit Copy and paste into selection. Selections/ Select none.


2. Apply seamless tiling see image below for settings.
3. Open daisy flower 1 and 2. Copy and paste each into your image as new layer. Re-size them both 30%. Move them to your left border so that they are slightly outside the image. Refer to my image. Apply same drop shadow to both.

4. Merge visible and Save your Image by clicking on file Export/jpeg optimizer value set at 30.
PLEASE PLACE CREDIT ON ALL STATS
Tutorial by Babs C
HERE or HERE

Just copy and paste into your Stationary
I want to Thank Simply Classy n Sassy Group Testers for testing the Tutorial
I hope you enjoyed this tutorial..

Friday, August 7, 2009

TUT 28 CHERISH ALWAYS


DATE WRITTEN: July, 27, 2009
SEE MY TOU/DISCLAIMER HERE
THINGS NEEDED
PAINTSHOP PRO 9 OR SIMILAR PROGRAM and a good knowlege of it.
TUBE: Is a Licensed tube by Jamie Kidd you can buy it at CILM
KIT: Linda's Dream Designs August Angel Chronicles Tagger PTU HERE
PLUGINS: MuRa's Copies
Not all kits are same sizes.
So if you choose another kit, your re-sizing may be different..

Let's Begin
Please Note as I will not repeat
Once you set your drop shadow it will stay..

Always Close original image after you copy.
Always sharpen re-sized items one time.

1.Open a New transparent image. 700x600. Select all. Select paper 11 from the kit copy and paste into selection. Selections/select none.

2. Open your tube copy and paste it into your image as new layer. Place it on the lower left corner. In the layers palette take opacity down to 30. Merge your layers.

3. Open frame 1 in the kit, copy and paste it into your Image as new layer. Apply drop shadow Vertical and Horizontal set at 2, Opacity set at 65. And blur set at 5.00. Place the frame up towards the top right hand corner. Again leave room to frame your image.

4. Add a new raster layer below your frame. Selections modify expand 3. With your magic wand click inside of you frame. Select paper 10 from the kit in your foreground color under patterns in your material palette. Flood fill the selection. Selections/select none.

5. Open your tube copy and paste it into your image as new layer. Re-size as needed so that it fits in your frame. Apply same drop shadow. Close off the background layer (bottom layer) and Merge Visible.

6. Open Bow 2 in the kit Copy and paste it into your image as new layer. Re-size it 45%. Free Rotate it 20.00 Left make sure rotate all layers is not checked an rotate single layer around canvas is not checked. Click ok. Apply your drop shadow and arrange over the bottom part of your frame.

7. Open charm 1 from the kit. Copy and paste into your image as new layer re-size it 75%. Apply your drop shadow and arrange it on the right side of you frame.

8. Open Flowers 1 and 3 from the kit Copy and paste both into your image on a new layer. Re-size them 35%. Apply your same drop shadow. Arrange them on the lower right side of you frame.

9. Click on your background Layer so that it is your active layer.

10 In your foreground and background Select a color from you image. Using your dropper tool. I used #8e0d46. Select a font and type out the back ground phrase. See my image. Size it like you want it then slightly rotate it to left. Convert it to a raster layer.

11. Effects/Plugin/MuRas Copies. See settings below. Click ok and apply. In your layers palette take opacity down to 50.

12. Type out your second phrase. Using the same font you used before. And the same foreground and back ground colors.

13. Place the text box up in the top left hand corner. Size it so that you can see the first phrase just below it. Once you are happy with the size convert it to a raster layer.

14. Add a new raster layer under your text. Click back on your text layer. Do the following under your selections tab.. A. select all, B. select float. C. Select defloat. D modify expand 2. Now select white in your foreground color and flood fill the selection on your new layer. Selections/select none. In your layers palette take the Opacity down to 50.

15. Using the same color and font that you used in the first text type our your name. Size it so that it does not cover any of the phrase that is under it. Convert to raster layer.

16. Add a New raster layer below the text you just typed.. Do the following under your selections tab.. A. select all, B. select float. C. Select defloat. D modify expand 2. Flood fill your selection on the new layer. Selections select none.

15, Select paper 1 from the kit. Select it in your foreground color background color closed off. Select your rectangle tool Set the line width to 25.00. Starting in your top left corner draw out a rectangle around the entire image. Convert to raster Layer. Apply drop shadow 2 vertical and horizontal 2, Opacity 65. And blur set at 5.00. Repeat your drop shadow but Change the Vertical and horizontal to -2.

16. Re-size your image so that the height is no more than 400, width will adjust. Add your copyright information and your watermark merge visible and save your image. I always use my jpeg optimizer with the value set 30.

BACKGROUND.

1, Open a new transparent image. 1000x250 Selections select all. Select paper 12 Copy and paste into selection. Selections/select none.

2. Effects/image effects/seamless tiling see settings below.

3. Open flower 1 in the kit Copy and paste into your image. Re-size it 20%.
Apply drop shadow Vertical and Horizontal set at 2, Opacity set at 65. And blur set at 5.00 I changed my drop shadow to a light gray since I am using darker colors. Duplicate your flower 2 times. Arrange to the left border. You want the top and bottom one to be half way out of the image. Only move the top flower slightly outside of your image.

4. Open Bow 1 Re-size your width so that it 250 so that I will be as wide as your image is in height. Copy it and paste into your image as new layer. Free rotate it right 90.00 Apply drop shadow and place over your flowers.

5. Merge visible Go to file/export jpeg optimizer value set at 30 and save your image.


PLEASE PLACE CREDIT ON ALL STATS
Tutorial by Babs C
HERE or HERE
Just copy and paste into your Stationary
I want to Thank Simply Classy n Sassy Group Testers for testing the Tutorial
I hope you enjoyed this tutorial..

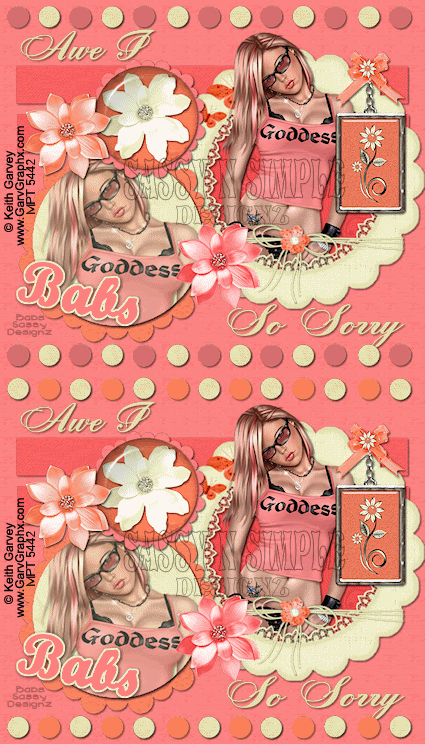
Tut 25 awe i so sorry


THE BACKGROUND IMAGE GOT LOST SORRY
DATE WRITTEN: JULY 18,2009
You need a working Knowledge of PSP to do this tutorial.
THINGS NEEDED
PAINTSHOP PRO 9 OR SIMILAR PROGRAM. Ylou must have a good working knowledge the programs.
TUBE: Keith Garvey is licensed tube purchase at MSP
KIT: Linda's Dream Designs Lusious Orange Dream Tagger 900x900 PTU purchase HERE
PLUGINS: Eye Candy 4000 Glass
MY SUPPLIES: Template HERE
Not all kits are same sizes.
So if you choose another kit, your re-sizing may be different..
Let's Begin
Please note as I will not repeat in each step..
Once you set your drop shadow it will stay..
Always Close original image after you copy.
Always sharpen re-sized items one time.

1 Open My Template included in my supplies. 800x700. Delete the Label layer and the large scallop layer. . Add a new raster layer Above the backing and delete the backing layer.

2. Select paper 7 From the kit or another paper you like. In your material palette select it under the pattern tab in your foreground and flood fill the new raster layer you added (bottom layer).

3. Click on the bottom line layer in your layers palette., select your magic wand and click on the Line. Select a new paper 10 or another paper from the kit you like. In your foreground color under patterns. flood fill the selections. Selections/select none. Apply drop shadow 2 vertical, 2 horizontal, Opacity 65 and blur 5.00

4. Click on the top rectangle layer in your layers palette and flood fill with the same paper. Selections/select none. Apply drop shadow.

6. Add a new raster layer above the small circle border. Choose paper 11 or another paper from the kit and flood fill the layer.

7. Now click on the small circle border in your layers palette. Selections Select all, Selections/float, Selections/defloat,. Selections/invert. fill and hit Now click back on the layer above the circle border you filled and hit delete on your keyboard. Selections/select none. Apply drop shadow. Delete the original circle border layer.

8. Click on the Large Circle Layer in your layers palette Select your magic wand and click inside of it. Selections/expand 1. Open paper 3 or another paper you like. Under Edit choose Copy and close it. Paste it into you seclecitons Selections/select none. Apply drop shadow.

9. Copy your Tube and paste into image. Apply drop shadow and arrange so that the top is above the circle. See my image. Re-size you tube if needed.. Do not close your original tube.

10. Select frame 3 from the kit. Copy and paste above your tube Layer. Apply Drop shadow.

11. With your selection tool draw around your tube that his hidden by your frame. Go to Edit and copy. Paste this above your frame layer. Make sure that you line it up so that it blends back in with the original tube. It might be easier to close of you frame layer so that you can line it properly. Selections/select none.

12. Click on the medium scallop layer in your layers palette., select your magic want and click inside of the scallop. Selections/expand 1 Select paper 12 or paper you like from the kit. Select it in your foreground color. and flood fill the selection. Selections/select none. Apply drop shadow .

12. Click on the medium Circle Layer in your layers palette Select your magic wand and click inside of it. Selections/expand 1. Open paper 2 or another paper you like. Under Edit copy your paper and close it. Under Edit choose paste into selection. Apply Drop shadow but keep selected.

14 Right click on the medium circle layer add new raster layer.

15. Click on your Tube With your selection tool Drag a rectangle around the top of your tube About to the waist area. Now go to edit and copy. Go back to your image and Go to edit and paste into selection. Selections/select none.. In your layer palettes change the opacity to 75.

15. Click on the small scallop layer, Select your magic wand and click inside of the scallop. Selections/expand 1. Select paper 6 or another paper from kit in your foreground color and flood fill. Selections/select none. Apply drop shadow.

16. Select small circle layer. Select your magic wand. And click inside the circle. Selections/expand 1 Select paper 1 under edit copy. Close paper. Under Edit paste into selections. Selections/select none. Apply drop shadow.

17. Open flower 2 or a flower from the kit you like. Copy and paste into image as a new layer. Re-size 50%. Arrange over the small circle layer. Apply drop shadow. Right click on the flower layer and merge/merge down into you small circle layer.

18. Make sure that your merged layer is selected. Effects/Plugins/Eye Candy 4000 see settings below.
19. Open flower 1 and 3 Copy and paste into your image as a new layer. Re-size 50%. Apply drop shadow. Arrange 1 at the bottom between the middle and large circle. Arrange the other one at the top left between the middle and small circle.

20. Open Charm 1 copy and paste into your image as a new layer. Re-size it 50%. Apply drop shadow. Then arrange It to the right side even with the top line.

21. Apply your Text. I used the zenith script foe mine. Remember to convert your text layer to a raster layer when you have the size you want.. Apply Drop shadow. You may want to move your frame up some in order to the text to fit under your frame.

22. Re-size your image so that it no more than 425 in width. Apply your watermark and copyrights.

23. Close your background layer and your small circles border. Merge visible.

ANIMATION
Open your Animation shop.
1. Select your circle border layer. Selections/select all, elections/float, selections/defloat. Keep selected.

2. Add a raster layer above your circle border layer. Select a color from your tube in your foreground color.Flood fill the selections on the empty layer starting with your Second Circle. Fill every other one. On the top and bottom. Keep selected. Rename this layer second frame. You do that by right clicking on it and select rename. if for some reason your version of psp will not let you fill every other circle you may have to take your eraser tool and erase the ones you do not need.


Save

3. Click back on your original circle border layer right click on it and add new raster layer. Now choose a second color from your tube in your foreground color. Flood fill the selections on the layer you just added starting with The first circle. rename this 1st frame. Again if you version of PsP will not let you fill every other one take your eraser tool and erase the ones you do not need.

4. Close off the circle filled layer you name 2nd frame. Now you see the original circle border layer and your colored circle layer where you colored starting with the first circle. Edit/copy merged. Paste this into animation shop as new animation.

5. Close off the circle filled layer you named frame 2. Edit/copy merged. Paste into your animation shop as new animation.

6. Close off the layer you named 1st frame. Copy merged and paste into animation shop after current frame. Edit/select all. Right click on the first frame. Select frame properties and change speed to 20.

7. Save your animation..

BACKGROUND

1. Open a new image transparent. 1000x200 Selections/select all. Select a paper Select Paper 7 from the kit or the paper you used for image background. Copy and paste into selection.

2. Add a new raster Layer. Make sure that your ruler is selected you do this under view. With your selection tool starting at the 150 mark on the top of your (click on view and select ruler) Draw a rectangle to the left border and the entire length of you image.

3. Select paper 5 from the kit or paper you like. Select in your foreground color under patterns tab in your material palette. Flood fill you new raster layer. Selections/select none.

4. Merge visible and Effects/image effects seamless tiling see setting below.

6. Open ribbon 3 . Re-size is 3o that your width is only 200. Copy and paste into your image as new layer. Free rotate 90 left. Make sure all layers is not checked. Apply drop shadow.Move it to the 150 ruler mark or even with your selection border you added.

7. Select Bouquet element 1 and copy and paste into your image as new layer. Re-size it 45%. Apply drop shadow.

9. Save your image by clicking file export/jpeg optimizer. Value set at 25.


PLEASE PLACE CREDIT ON ALL STATS
Tutorial by Babs C
HERE or HERE
Just copy and paste into your Stationary
I want to Thank Simply Classy n Sassy Group Testers for testing the Tutorial
I hope you enjoyed this tutorial..

Tut 16 SNS SUMMER FUN


NAME: Summer Fun Tutorial 16
DATE: June 24, 2009

THINGS NEEDED: Paintshop pro 9 or similar program and a good knowledge of the program
TUBE: DicVicBarnes Poser HERE
KIT: Summer Time Fun Tagger Lady Raven Scraps Tagger Kit 800x800 PTU HERE
PLUGINS: VM Natural Lakeside Reflections
Not all kits are same sizes.
So if you choose another kit, your re-sizing may be different..
Let's Begin
Please NOTE as I will not repeat in each step.
Once you set your drop shadow it will stay..
Always Close original image after you copy.
Always sharpen re-sized items one time.
Open your tube an minimize if for now.


1. Open a new transparent image. 600x700. Flood fill with a color from your Tube.

2. Open 3 different papers from the kit I used. papers 6, 13, 14. minimize them. 
Add three new raster layers.

3. Make your ruler viewable. this under View just click on ruler. 
Select your Selections tool. Starting at the 150 mark on top ruler 
and 100 mark on your side ruler 
draw out a rectangle to 450 on top and 600 on bottom.

4. Select starting with the bottom raster layer 
select one of the papers in your foreground under patterns in your material palette 
flood fill the selection. Change to your next paper and flood fill the middle layer.
 Then flood fill the top layer with your last paper. 
This one should be one that matches the colors in your tube. 
Selections select none.

5. Image/free rotate 20.00 right Click on your bottom layer you filled with a pattern. 
Click on your middle layer and Free rotate it left
 apply drop shadow. to all three layers. 
Close off your background and merge visible.


6. Open one of the lace ups I used 2. 
Copy and paste into you image as new layer
 re-size it 40% place to the right side. 
Apply drop shadow.  
Vertical and Horizontal set at 2, Opacity set at 70 and blur set at 8.00

7. Open your tube copy and paste into your image as new layer.
Re-size as needed.
 Apply drop shadow..

8. Open one of the bows I used 3. 
Copy and paste into your image as new layer 
 re-size it 30%. 
Apply drop shadow. 
Place on the left at the top of your rectangles.

9. Open a butterfly copy and paste into your image as new layer 
 re-size 15%. 
Image/free rotate 20.00 left. 
Place in the right hand corner.

10. Open three of the buttons copy and paste them into your image each as a new layer.
Then re-size them 80%. 
Apply your drop shadow. 
I used 2, 3, and 4 
arrange them on the bottom right hand side of your image.


11. Open one of the hearts I used. heart 2. Copy and paste into your image.
 Re-size it 30%. Free rotate it 20.00 left. 
place on the left side of your image. 
Apply drop shadow. 
Duplicate it and mirror your duplicate. 
move it so that it is under one of the buttons on the right.

12. Open the Metal heart copy and paste into your image.
 Re-size it 50%.
 Do not apply drop shadow. 
Move this so that it is over your heart.
 Duplicate
 image/mirror. 
Pull it so that is over the duplicated heart. 
 Click on the duplicated heart 
right click  in the palette merge/merge down.


13. Open one of the ties, I used tie 2. 
Copy and paste into your image as new layer.
 Re-size if needed. 
Apply drop shadow duplicate..
 place them over your hearts.


14. Select your rectangle tool. line width 20 or to your likening.
 foreground select a paper from the kit to use.
 background closed off. 
Now draw out your rectangle around image so that it is framed.

15. Re-size your image so that it is no more than 425 in length. 
Apply copyrights and watermark..

16. Apply your copyrights and watermark. 
Close of your background layer and merge visible.

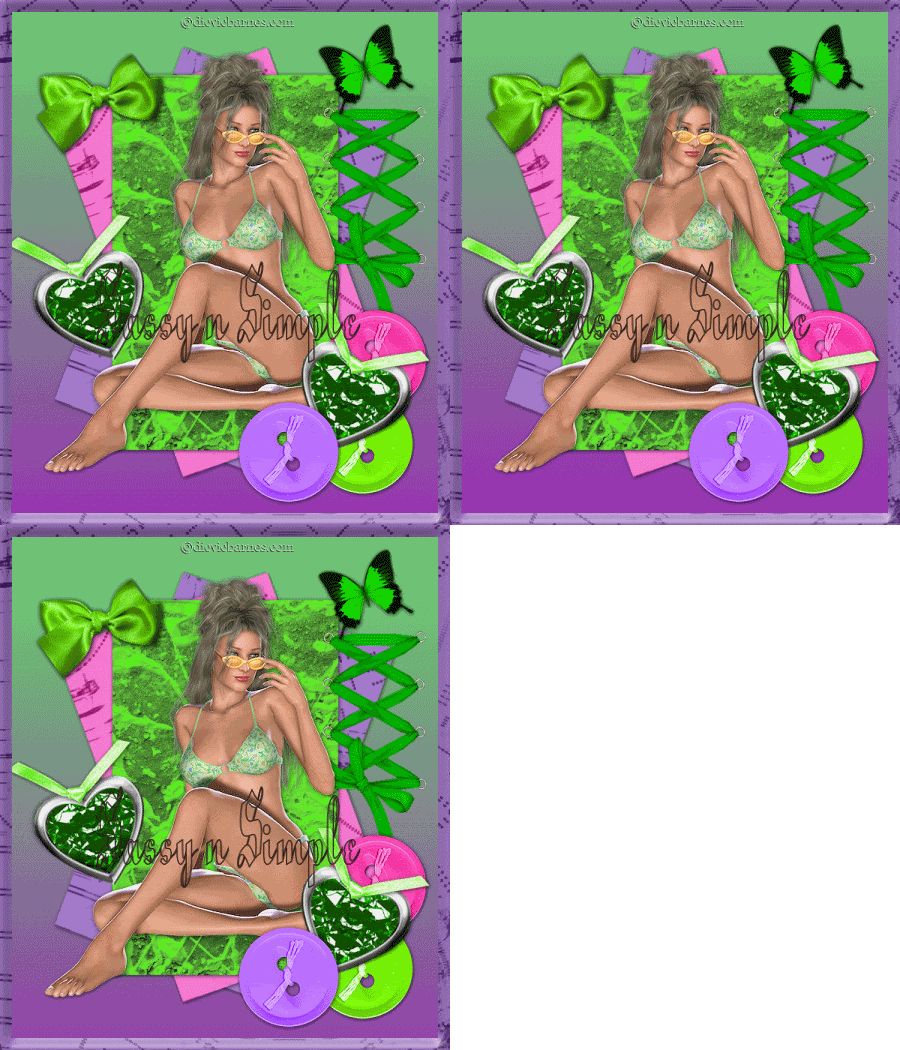
ANIMATION
1. Duplicate your back ground layer 2 times. Close of the 2 duplicates. 
Click on the original background layer (bottom).
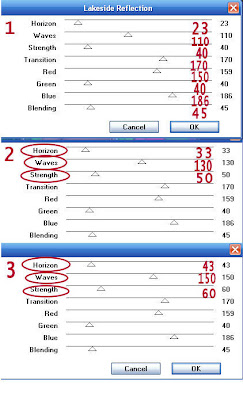
2. Effects/Plugins VM Natural Lakeside reflections. The settings for all three layers are below. 
After you do the bottom layer close it open the layer above it apply setting 2. 
do the same for the top background layer duplicate settings three. 
You only change the horizon, waves, and strenght in the top two layers.3. Close off the top two layers. 
Copy merged and paste into animation shop as new animation. 
Close bottom layer. open the layer above that. 
Copy merged and paste into animation shop after current frame.
 Close of this layer open top layer copy merged and paste into animation shop after current frame.
 Save your animation shop..


Background:

1. Open a new transparent image 1000x300 Floodfill with paper of your choice.

2. New raster layer. pick a color from your paper in your foreground.
 flood fill the raster layer
take opacity down to 69.

3. New Raster Layer. 
With your selection tool staring at the 150 top ruler line draw out a rectangle 
towards your left border and the entire length of the image.

4. Flood fill your selection with a paper from the kit.
 I scaled mine down 50%. 
Merge all Layers. 
Effects/image effects/seamless tiling see image below for settings.
5. Open two of the buttons copy and paste into image as new layers. 
 Re-size 50% 
apply same drop shadow.

6. Open one of the butterflies copy and paste into your image as new layer. 
re-size it 15%. 
Free rotate it 20.00 to the left.
 Apply drop shadow.

7. Open one of the hearts 
Re-size it 15% 
then copy and paste into your image as new layer. 
duplicate it place one at the top and one at the bottom
. Free rotate the top one 20.00 to the right 
 Free rotate the bottom 20.00 to the left. 
Apply same drop shadow. 
When you close out the original do not save changes.

8. Open the floral and Lace border.
 Re-size it so that the width is 300 copy and paste into your image as new layer..
 Free rotate 90.00 to the left
  move over on the edge of your border. 
apply same drop shadow.

9. Save image by clicking file export jpeg optimizer 25 compression.


PLEASE PLACE CREDIT ON ALL STATS
Tutorial by Babs C
HERE or HERE
Just copy and paste into your Stationary
I want to thank Simply Classy n Sassy Group Testers for testing the Tutorial
I hope you enjoyed the tutorial.