
DATE WRITTEN: July, 27, 2009
SEE MY TOU/DISCLAIMER HERETHINGS NEEDED
PAINTSHOP PRO 9 OR SIMILAR PROGRAM and a good knowlege of it.
TUBE: Is a Licensed tube by Jamie Kidd you can buy it at CILM
KIT: Linda's Dream Designs August Angel Chronicles Tagger PTU HERE
PLUGINS: MuRa's Copies
Not all kits are same sizes.
So if you choose another kit, your re-sizing may be different..
Let's Begin
Please Note as I will not repeat
Once you set your drop shadow it will stay..
Always Close original image after you copy.
Always sharpen re-sized items one time.
1.Open a New transparent image. 700x600. Select all. Select paper 11 from the kit copy and paste into selection. Selections/select none.
2. Open your tube copy and paste it into your image as new layer. Place it on the lower left corner. In the layers palette take opacity down to 30. Merge your layers.
3. Open frame 1 in the kit, copy and paste it into your Image as new layer. Apply drop shadow Vertical and Horizontal set at 2, Opacity set at 65. And blur set at 5.00. Place the frame up towards the top right hand corner. Again leave room to frame your image.
4. Add a new raster layer below your frame. Selections modify expand 3. With your magic wand click inside of you frame. Select paper 10 from the kit in your foreground color under patterns in your material palette. Flood fill the selection. Selections/select none.
5. Open your tube copy and paste it into your image as new layer. Re-size as needed so that it fits in your frame. Apply same drop shadow. Close off the background layer (bottom layer) and Merge Visible.
6. Open Bow 2 in the kit Copy and paste it into your image as new layer. Re-size it 45%. Free Rotate it 20.00 Left make sure rotate all layers is not checked an rotate single layer around canvas is not checked. Click ok. Apply your drop shadow and arrange over the bottom part of your frame.
7. Open charm 1 from the kit. Copy and paste into your image as new layer re-size it 75%. Apply your drop shadow and arrange it on the right side of you frame.
8. Open Flowers 1 and 3 from the kit Copy and paste both into your image on a new layer. Re-size them 35%. Apply your same drop shadow. Arrange them on the lower right side of you frame.
9. Click on your background Layer so that it is your active layer.
10 In your foreground and background Select a color from you image. Using your dropper tool. I used #8e0d46. Select a font and type out the back ground phrase. See my image. Size it like you want it then slightly rotate it to left. Convert it to a raster layer.
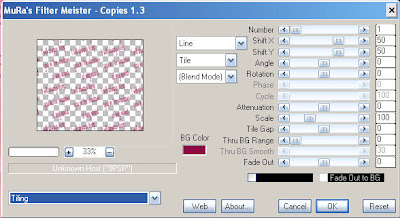
11. Effects/Plugin/MuRas Copies. See settings below. Click ok and apply. In your layers palette take opacity down to 50.

12. Type out your second phrase. Using the same font you used before. And the same foreground and back ground colors.
13. Place the text box up in the top left hand corner. Size it so that you can see the first phrase just below it. Once you are happy with the size convert it to a raster layer.
14. Add a new raster layer under your text. Click back on your text layer. Do the following under your selections tab.. A. select all, B. select float. C. Select defloat. D modify expand 2. Now select white in your foreground color and flood fill the selection on your new layer. Selections/select none. In your layers palette take the Opacity down to 50.
15. Using the same color and font that you used in the first text type our your name. Size it so that it does not cover any of the phrase that is under it. Convert to raster layer.
16. Add a New raster layer below the text you just typed.. Do the following under your selections tab.. A. select all, B. select float. C. Select defloat. D modify expand 2. Flood fill your selection on the new layer. Selections select none.
15, Select paper 1 from the kit. Select it in your foreground color background color closed off. Select your rectangle tool Set the line width to 25.00. Starting in your top left corner draw out a rectangle around the entire image. Convert to raster Layer. Apply drop shadow 2 vertical and horizontal 2, Opacity 65. And blur set at 5.00. Repeat your drop shadow but Change the Vertical and horizontal to -2.
16. Re-size your image so that the height is no more than 400, width will adjust. Add your copyright information and your watermark merge visible and save your image. I always use my jpeg optimizer with the value set 30.
BACKGROUND.
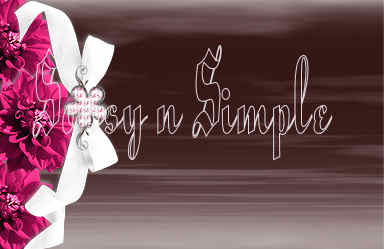
1, Open a new transparent image. 1000x250 Selections select all. Select paper 12 Copy and paste into selection. Selections/select none.
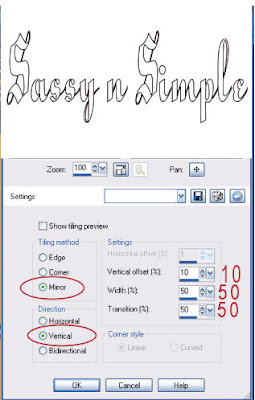
2. Effects/image effects/seamless tiling see settings below.

3. Open flower 1 in the kit Copy and paste into your image. Re-size it 20%.
Apply drop shadow Vertical and Horizontal set at 2, Opacity set at 65. And blur set at 5.00 I changed my drop shadow to a light gray since I am using darker colors. Duplicate your flower 2 times. Arrange to the left border. You want the top and bottom one to be half way out of the image. Only move the top flower slightly outside of your image.
4. Open Bow 1 Re-size your width so that it 250 so that I will be as wide as your image is in height. Copy it and paste into your image as new layer. Free rotate it right 90.00 Apply drop shadow and place over your flowers.
5. Merge visible Go to file/export jpeg optimizer value set at 30 and save your image.
Just copy and paste into your Stationary
I want to Thank Simply Classy n Sassy Group Testers for testing the Tutorial
I hope you enjoyed this tutorial..
I want to Thank Simply Classy n Sassy Group Testers for testing the Tutorial
I hope you enjoyed this tutorial..
