
 DATE WRITTEN: July 23, 2009
THINGS NEEDED
PAINTSHOP PRO 9 OR SIMILAR PROGRAM and a good knowledge of the program.
TUBE: Keith Garvey is a Licensed tube you can purchase it at MYPSPTUBES
KIT: Babs BitzyBeez Designz FTU Orange Blush HERE
PLUGINS: VM Stardust
Not all kits are same sizes.
So if you choose another kit, your re-sizing may be different..
Let's Begin
Please NOTE as I will not repeat in each step.
Once you set your drop shadow it will stay..
Always Close original image after you copy.
Always sharpen re-sized items one time.
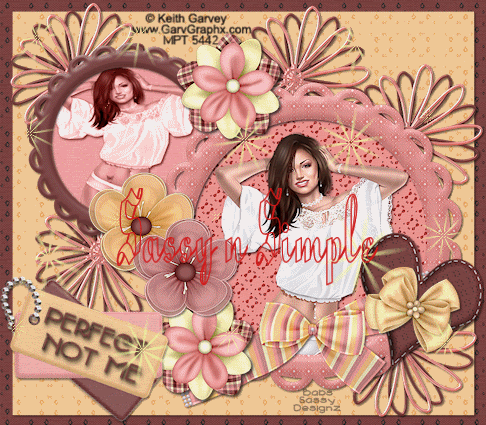
1. Open a new image transparent. 800x700. Select paper 5from the kit in your foreground color under your patterns tab in the material palette. Flood fill your image.
2. Add a new raster layer. Open paper 1. Select it in your foreground color and flood fill the layer. Re-size this layer 95%. Apply Drop shadow Vertical and Horizontal set at 2, Opacity set at 65. And blur set at 5,00.
3. Open Frame 4 Copy and paste it into your image as new layer. We will apply drop shadow on this later..
4. Open your tube copy and paste under your frame as new layer re-size as needed. Apply drop shadow
5. Add a new raster layer below your tube. Click back on your frame layer in you layers palette. With your magic wand tool Click inside the frame. Keep Selected.
6. Under selections on your tool bar, modify/expand 4.
7. Now Select paper 4 from the kit in your foreground color, angel 45 and scale of 50. Flood fill the selection on your new layer. Selections/select none. Now Click back on your frame and apply your drop shadow.
8. Close off your back ground layer and merge visible by right clicking on your layers palette under merge. Arrange your merged layer toward the bottom right.
9. Open Frame 3 copy and paste into your image as new layer. Re-size it 65%.Add a new raster layer under this frame.
10. With your magic wand Click inside your frame. Keep selection selected.
11.Copy your tube. Paste into selection. Keep selections selected.
12. Making sure your tube layer is selected. Change the blend on your layers palette to luminance (Legacy) see image below. Apply your dropshadow. Keep Selection selected.
 13. Go To selections click on modify and expand 4. Add a new raster layer below your tube layer. Select paper 14 in your foreground color angle 0 scale 50. Flood fill the selection. Selections/select none. Apply your drop shadow.
 14. Right Click on your tube layer and merge/merge down.(see image below ) Do the same for your Frame. Now arrange the merged layer up on left hand top and pull this layer below your large tube layer.

15. Open wrap 4 copy and paste into your image as new layer. Re-size it 60%. Image/free rotate Left 20.00. Make sure that all layers is not checked. Apply drop shadow. Arrange over your bottom frame towards the bottom. See my image.
16. Open wire flower 3. Copy and paste into your image as new layer Re-size it 50%. Arrange it to the bottom right towards the corner of large frame. Now in your layers palette drag this layer below your merged frame layers. Apply your drop shadow. Duplicate it 4 times and arrange them around frames. See my image.
17. Open flowers 1 and 4 Copy and paste into your image as new layer. Re-size to 40%. Apply your drop shadow and arrange at the bottom of your two frames where they meet..
18. Open Flower 12. Copy and paste into your image as new layer. Re-size it 40%. Apply your drop shadow. Arrange it at the top where your two frames meet. .Duplicate it 1 time and place this one on the edge of wrap on the left side.
19. Open Heart 3 Copy and paste into your image as new layer. Re-size it 50%. Free rotate it 20.00 right. Apply your drop shadow and arrange it over your right wrap end.
20. Open bow 9 Copy and paste into your image as new layer. Re-size it 35%. Rotate 20.00 right. Apply drop shadow and place directly over your heart.
21. Open Tag 3 Copy and paste into your image as new layer. Re-size it 65%. Free rotate right. 20.00.
Apply your drop shadow.
22. Apply your Text, watermark, and copyright info. now and Re-size so that your image is no more 425 in height. Or to your taste.
ANIMATION: Open your Animation Shop
1. Close of your two paper layers. (bottom two layers) Merge Visible.
2, Duplicate your merge layer 2 times.
3.Select the bottom merged layer. Effects/Plugins/VM Natural Stardust. See settings below.

4. Select The middle merged layer. Apply the Startdust again but change random seed to 160.
5. Select the top merged layer. Apply stardust again change random seed to 170.
6. Open your two bottom layers. Close of top and middle merged layers. Got to edit Copy merged and paste into Animation Shop as New Animation. Close off bottom merged layer.( I click on bottom layer for this so I do not have to keep changing layers)
7. Open middle merged Layer. Copy merged and paste into animation shop after current frame. You do this by right clicking on frame 1. Close middle layer open your top merged layer. And copy merged paste into animation shop after current layer. Right click on frame 2 for this.
8. With your first frame highlighted go to edit and select all then right click on the frame and select frame properties and change frame speed to 20
9. Save your animation now.
BACKGROUND.
1. Open a new image 1000x250. Selections/select all. Choose paper 1 copy and Paste into selection.
2. Apply seamless tiling see image below.

3. Open flower 11 copy and paste into image as new layer. Re-size is 35%. Apply drop shadow. Move the left border center it. But do not put completely on edge.. See my image.
4. Open Flower 1 copy and paste into image as new layer. Re-size it 20%. Apply drop shadow arrange at the top of flower 11.
5. Open heart 3 copy and paste into image as new layer. Re-size 25%. Free rotate Left 20.00 and apply drop shadow. Move to left border bottom of flower ll.
6. Open bow 7. Copy and paste into your image as new layer. Re-size it 20% and apply your drop shadow.
7. Merge all layers. Save File/export jpeg optimizer compression value set at 30.
Just copy and paste into your Stationary.
I would like to thank the Simply Classy n Sassy Group Testers for testing this Tutorial.
I hope you Enjoyed the Tutorial.
I would like to thank the Simply Classy n Sassy Group Testers for testing this Tutorial.
I hope you Enjoyed the Tutorial.