Sunday, August 30, 2009

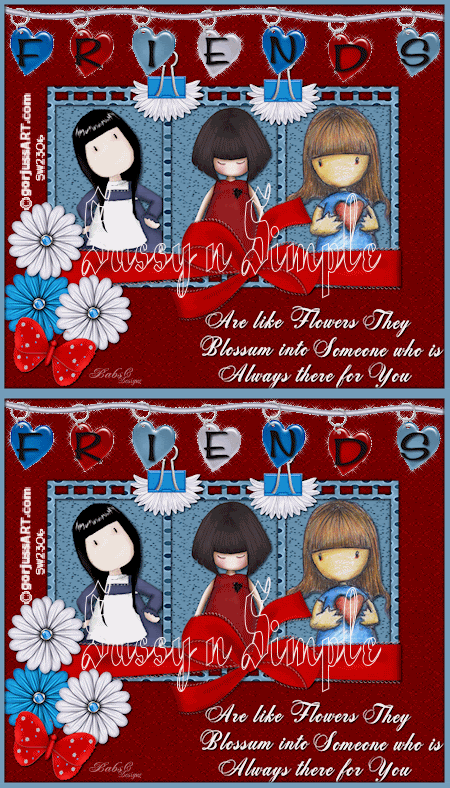
Friends Tutorial 41


DATE WRITTEN: Aug 30,2009

THINGS NEEDED
PAINTSHOP PRO X2 OR SIMILAR PROGRAM.
You also need a good working knowledge of it.
TUBE: You will need 3 Gorjuss Art you have to purchase them HERE
KIT: Fantasy Moments Irresistible HERE
PLUGINS: Xenoflex 2 constellations
MY SUPPLIES: HERE
Not all kits are same sizes. Re-sizing may be different

Let's Begin

Once you set your drop shadow it will stay..
Always Close original image after you copy.
Always sharpen re-sized items one time.

1. Open your tubes minimize for now. Open the sns_Friends_word art brush. Go to file/export/custom brush and put it into your brushes name it something that you can easily find.

2. Open a new transparent image 800X700 selections/select all. Select Paper 2 from the kit copy and paste into selection selections/select none.

3. Open the film strip from my supplies Copy and paste as new layer into your image. Click on it with your magic wand settings below. Select all/modify expand 1. Select paper 15 Copy and paste into selection. Selections select none.
Wand Settings
mode set add/shift and match mode is RGB,
Tolerance set to 20, Feather 0,
anti-alias checked and Outside selected.

4. With your magic wand click inside each rectangle window. Selections/modify expand 2. Add a New raster layer below your frame. Select Paper 23 from the Kit copy and paste into selection
. Selections/select none.

5. Click back on your frame Effects/3D drop shadow Vertical and Horizontal set at 2, Opacity 70 and blur 5.00. Go back and apply drop shadow again this time change vertical and horizontal to -2.

6, Copy and paste your tubes under your frame as new layers. Re-size if needed. Arrange them inside of your filmstrip windows. Erase any parts that are outside of the filmstrip. Apply Drop Shadow Vertical and Horizontal set at 2, Opacity 70 and blur 5.00.

7. Select element 65 wrap from the kit. Copy and paste into image as new layer. Re-size it 67%. Apply same drop shadow as before. Move it to the bottom of the film strip.

8. Select Element 31 from the kit copy and paste into image as new layer. Re-size it 30%. Duplicate it arrange them at the top of the filmstrip. Refer to my imageif you need to. Apply same drop shadow to both.

9. Select Flower elements 47 and 50 Copy and paste into your image as new layers. Re-size them 40%. Duplicate one of them. arrange them on the left bottom corner of filmstrip. Refer to my image if you need to. Apply same drop shadow as before.

10. Select Butterfly Element 45 from the kit. Copy and paste as new layer into image. Re-size it 30%. Apply same drop shadow as before. Arrange it near your flowers.

11. Add a new Raster Layer Click on your paint Brush Select the word art brush I had you export into your brushes. Set foreground and back ground colors to White. Apply your brush on the bottom right hand side of your image. Re-size the brush if you need to. You may have to click your mouse button a couple of times if you want it to look darker. I clicked mine 2 times.

12. Merge visible all layers.

13. Select Element 73 from the kit. Copy and paste into your image. Re-size 90%. Move one of the hearts outside of the image. So that only 7 hearts are visible in your image. Move it up to the top of image.

14. Select a Text Type out FRIENDS do each letter separately, convert each letter to a raster layer before starting your next letter. Place each letter on one of the hearts. Close off your Heart Layer and merged layer.
Merge visible. (only your Text layers should be seen)
Apply drop shadow same as before. Right click on your text layer in the layers palette merge down into your Hearts layer.

15. Select your rectangle tool. See settings below. Select a color from the image in your foreground color. Close off your background color and draw out rectangle around entire image. Apply drop same drop shadow as before. Go back and apply drop shadow again only this time change your Vertical and Horizontal to -2.


16. Apply your copyrights and watermark so they are under the hearts and frame layer. Once you apply them merge them down into your merged background layer. You should have 3 layers now your rectangle layer, hearts layer and merged background layer.

17. Re-size your image all layers checked so that width is 450, height will adjust.

ANIMATION

1. Duplicate your Heart Layer 2 times. Close off the top and middle heart layer.

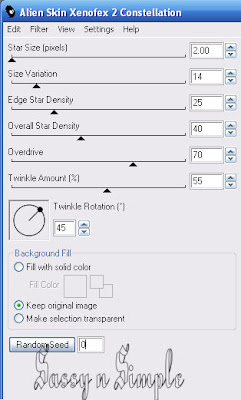
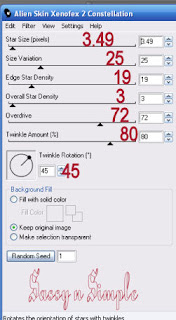
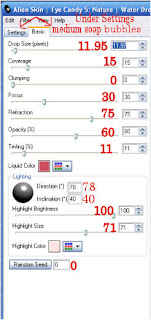
2. Select your bottom heart Layer. Effects/Plugins/Xenoflex 2 Constellations. Apply the settings below. Close this Layer.
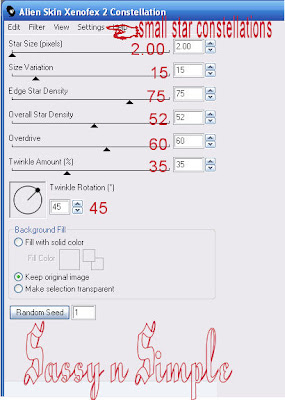
3, Select the middle heart Layer Apply the constellations again. Only this time click on the random seed button one time.

5. Open the top heart layer copy merged and paste into animation shop as new animation. You just right click anywhere inside the working area.

6. Close off the Middle heart layer. Open the bottom heart layer. Copy merged and paste into animation shop after current frame. Do this by right clicking on your first frame then cursor over paste and drop down menu will appear.

8. Save your animation..

BACKGROUND.

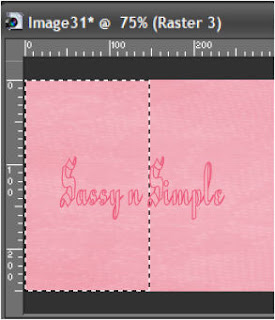
1. Open new transparent image. 1280x300. Selection select all. Select paper 2 from the kit Copy and paste into selection. Selections/ Select none.

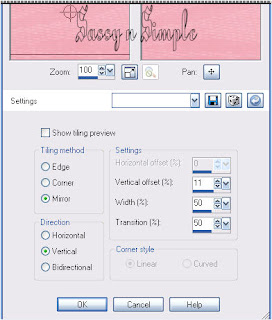
2, Apply Seamless tiling see settings below.
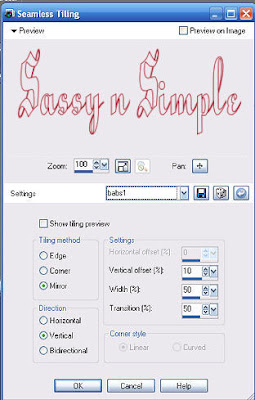
3. Select flowers 47, 49 and 50 From the Kit. Copy and paste the flowers into your image as new layers in this order 49, 50 then 47. Re-size them 20%. Then place them over to the left border of your image horizontally. Flower 47 should be placed in the middle and halfway outside the image. Apply drop shadow. Vertical and Horizontal set at 2, Opacity 70 and blur 5.00 Refer to my image if you need to.

4. Duplicate Flowers 49 and 47 Pull them down below the other flowers arrange flower 49 halfway outside the image. Refer to my image if you need to.

5. Select Element 6 beetle bug from the kit. Copy and paste into your image as a new layer. Re-size it 20% Apply same drop shadow. Duplicate it one time pull the over to the left border place them in front of the two flowers that are halfway out of your image. Refer to my image if you need to.

6. Merge visible and save your image by clicking on file/export/jpeg optimizer value set at 30.

PLEASE PLACE CREDIT ON ALL STATS
Tutorial by Babs C
HERE or HERE

Just copy and paste into your Stationary
I want to Thank Simply Classy n Sassy Group Testers for testing the Tutorial
I hope you enjoyed this tutorial..

Tuesday, August 25, 2009

TUT 39 ONLY IN YOUR DREAMS.


DATE WRITTEN: Aug 25, 2009

THINGS NEEDED:
PAINTSHOP PRO X2 OR SIMILAR PROGRAM. You also need a good working knowledge of it.
TUBE: Keith Garvey you must purchase it at MY PSP TUBES
MASK: WSL_mask 315 HERE

KIT: HONORED SCRAPS IN DREAMS PTU TAGGER purchase HERE
Not all kits are same sizes. Re-sizing may be different


Let's Begin
Once you set your drop shadow it will stay..

Always Close original image after you copy.

Always sharpen re-sized items one time.

1. Open you tube and WSL_mask 315 minimize for now.
2. Open a new transparent image 700X650. Selections/select all. Select Paper 12 from the kit copy and paste into selection. Selections/select none

3. Add a New Raster Layer Selections Select all. Select Paper 11 from the kit Copy and paste into image. Selections/select none.


4. Under Layers on your tool bar select new mask layer/from image.
Select the wsl_mask 315 in the window. Make sure source Luminance is checked and invert mask data is unchecked. Click OK.

5. Right click on the mask layer with the mask icon on it. Select delete. Right click top mask merge/merge group. When it ask “Would you like this mask merged into the Layer below it” select yes. Re-size it 90%. Apply Drop shadow Vertical and horizontal set at 2, Opacity set at 65 and blur set at 8.00.


6. Select frame 5 from the kit copy and paste it into your image as a new layer. . Re-size it 60%.. Select your magic wand setting mode set to add/shift and match mode is RGB, Tolerance set to 20, Feather 0, anti-alias checked and Outside selected. Click inside the frame. Selections/modify expand 25.


7. Add a new raster layer below your frame. Select Paper 1 from the Kit Under edit on your tool bar copy and paste into Selection. Selections/select none. Go back and apply your drop shadow to your frame now.


8. Copy your tube and paste above your frame. Re-size if needed. Place in the center of your frame. Apply same Drop shadow.
9. Select Wrap 6 from the kit Copy and paste into your image as new layer. Re-size it 50%. Arrange it to the bottom of your frame. Using your warp tool push it so that it wraps around your frame. Apply same drop shadow.

10. Select Flowers 9 and 10 from the Kit copy and paste each into the image as a new layer. Re-size them 75%. Move them to left side of the frame towards the bottom. Apply same drop shadow to each layer.


11. Apply Text. I used the font Labyrinth Capital Font. And added my font for each side and bottom separately. Apply your drop same drop shadow.


12. Image/add border of 15. Select the border with your magic wand. Settings mode set add/shift and match mode is RGB, Tolerance set to 20, Feather 0, anti-alias checked and Outside selected.


13. Select Paper 7 from the kit in your foreground color under patterns. Angle o and scale 50. Flood fill the border with it. Apply drop same drop shadow. Go back and apply drop shadow again but this time change Vertical and Horizontal to -2. Selections/select none.


14. Apply your copyrights and watermark. Re-size your image so that it is 450 in width. Height will adjust. Save our image


BACKGROUND.


1. Open new transparent image. 1280x300. Selection select all. Select paper from the kit Copy and paste into selection. Selections/ Select none.


2. Apply seamless tiling see image below for settings.
3. Open daisy flower 1 and 2. Copy and paste each into your image as new layer. Re-size them both 30%. Move them to your left border so that they are slightly outside the image. Refer to my image. Apply same drop shadow to both.

4. Merge visible and Save your Image by clicking on file Export/jpeg optimizer value set at 30.
PLEASE PLACE CREDIT ON ALL STATS
Tutorial by Babs C
HERE or HERE

Just copy and paste into your Stationary
I want to Thank Simply Classy n Sassy Group Testers for testing the Tutorial
I hope you enjoyed this tutorial..

Monday, August 24, 2009

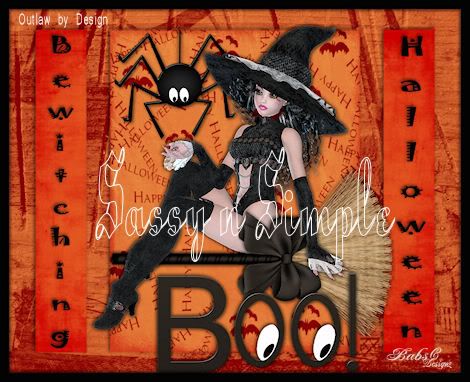
TUT 39 BEWITCHING HALLOWEEN


DATE WRITTEN: Aug 24, 2009

THINGS NEEDED
PAINTSHOP PRO 9 OR SIMILAR PROGRAM.
TUBE: Outlaw by Design Poser HERE
MASK: By by Me.. included in my supplies
KIT: Bel Vidotti Scraps Spooky HERE
MY SUPPLIES: HERENot all kits are same sizes. Re-sizing may be different

Let's Begin

Once you set your drop shadow it will stay..
Always Close original image after you copy.
Always sharpen re-sized items one time.

1. Open you tube and the mask 5_by NB in my supplies minimize for now.

2. Open a new transparent image 800X650Selections/select all. Select Paper 28 from the kit copy and paste into selection. Selections/select none

3. Add a new raster Layer. Select black color in your foreground color Flood fill the layer.

4. Under Layers on your tool bar select new mask layer/from image.
Select the mask BDD_Mask 9 from my supplies in the window. Make sure source Luminance is checked and invert mask data is checked. Click Ok.

5. With your Right mouse button click on the white and black mask it has a mask icon on it. Select delete. Right click top mask merge/merge group. When it ask “Would you like this mask merged into the Layer below it” select yes. Re-size your mask layer 90%.

6, With your magic wand click on the inner large rectangle. Selections/modify expand 1. Select paper 05 from the kit, Copy and paste into selection. Selections select none. See wand settings below.

7. With your magic wand click on the two outer rectangles same wand settings as before. Selections/modify expand 1. Select paper 01 from the kit copy and paste into selection. Selections Select none. Now apply drop shadow Vertical and Horizontal set at 2, Opacity 65 and blur 8.00. Now Merge visible.

8. Select the Spider 4 from the Kit copy and paste into image as new layer. Re-size it 60% move it so that it is on the right corner of the large rectangle. Apply same drop shadow.

9. Select the spider string from my supplies. Copy and paste it as new layer under your spider layer. Take your Eraser and remove any string that is below your spider. Apply same drop shadow. You do not need to re-size.

10. Select your poser/tube copy and paste into image as new layer Re-size it 40%. Arrange so that her hat is at the top of your large rectangle. And her foot is slightly outside of the rectangle. Refer to my image. Apply Same drop shadow.

11. Select broom 20 from the kit copy and paste into your image as new layer under your tube layer. Under image on your tool bar select free rotate 90 Right. Make sure rotate all layers is not checked an rotate single layer around canvas is not checked. and arrange it so that your poser looks as if she is sitting on it. Do not re-size.

12. With your selection tool draw out a square that will copy part of the bow from the broom you do not want it to cover her arm. Make sure your broom layer is selected and Under Edit select copy. Add a new layer above your tube. Under edit paste into selection. Selections/select none. If this does not work with the version you are using manually drag it into place with your mouse.

13. Now you need to go back and apply your drop shadow to your broom..

14, Open the Boo element 11 copy and paste into your image as new layer. Re-size it 80%. Move it so that it is on the bottom right side of your large rectangle refer to my image.

15. Now Select a Font I used Jokerman. Text tool settings below. Type out your words separately size them to fit into your outer rectangles boxes. Once happy with size and placement. Right click on your text layers and convert them a raster layer.

16. Select the frame from my supplies Copy and paste it into you image as new layer. Apply your drop shadow..

17. Apply your watermark and copyrights. Merge visible all layers. Re-size your image so that width 470 height will adjust. Save your image.


BACKGROUND.

1. Open new transparent image. 1280x300. Selections/select all. Select paper 14 from the kit Copy and paste into selection. Selections/ Select none.

2, Select the Border from my supplies copy and paste into your image as new layer move it to the left edge of your image. Click on it with your magic wand same settings as before is fine. Selections/Modify/expand 1. Keep Selected

3. Select Paper 1 from the kit. Select it in your materials palette under pattern angle 0 scale 50. Flood fill the selection. Selections/select none.

4. Merge visible. Effects/image effects/seamless tiling see settings below.

5. Select witch 21 copy and paste into your image as new layer. Re-size it 30%. Move over onto the border on the left side. Apply drop shadow. Vertical and Horizontal set at 2, Opacity 65 and blur 8.00.

6. Select the same font you used in the header. Type out Happy Halloween. Type each word separately. Re-size it to fit into the border area and Angle to the left. Refer to my image.

7. Merge visible Save your Image by going to file/export/jpeg Optimizer value set at 30.

PLEASE PLACE CREDIT ON ALL STATS
Tutorial by Babs C
HERE or HERE

Just copy and paste into your Stationary
I want to Thank Simply Classy n Sassy Group Testers for testing the Tutorial
I hope you enjoyed this tutorial..

Friday, August 21, 2009

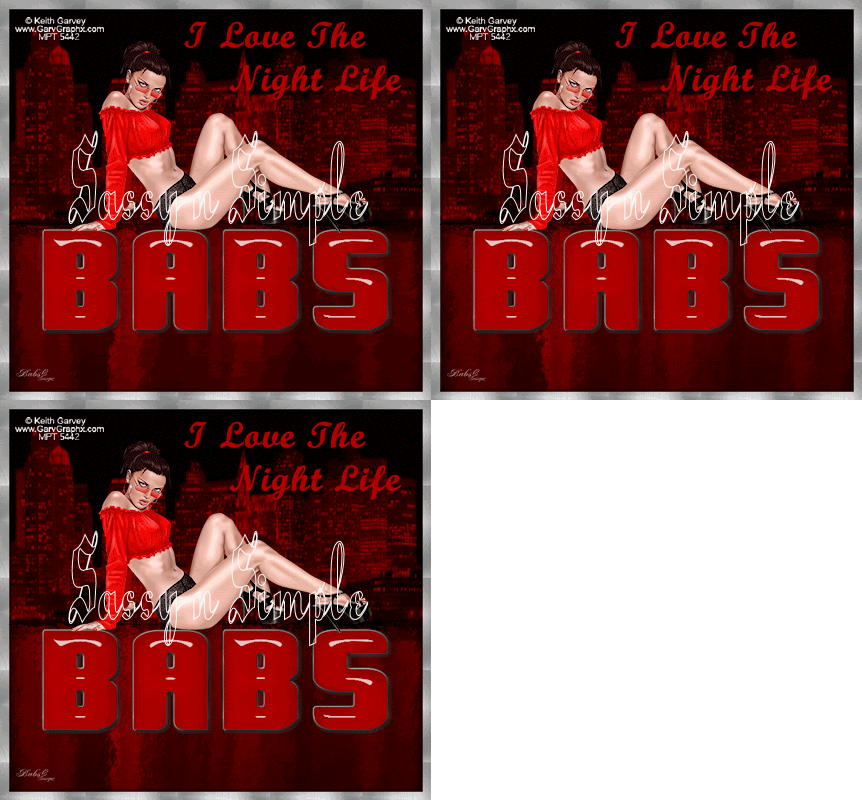
TUT 38 I LOVE THE NIGHT LIFE


DATE WRITTEN: August 21, 2009  
THINGS NEEDED PAINTSHOP PRO 9 OR SIMILAR PROGRAM. TUBE: Keith Garvey you must buy it at MY PSP TUBES PLUGINS: Eye Candy 5 Impact Glass, Eye Candy 4000 Jiggle, Tramages Gradient/Spokes Ratio Maker. MY SUPPLIES: HERE
Let's Begin
Once you set your drop shadow it will stay..
Always Close original image after you copy.

Always sharpen re-sized items one time.


First Open your tube a tube in a sitting position is best , In my supplies you downloaded open the frame, mask and silver pattern. Minimize all but your tube for now


1. Using your dropper tool, from your tube select two colors a darker color in your foreground color and another color (you will want this to be a lighter dark color than foreground color) in your background color. Minimize tube for now.
2. Open a new transparent image 700X650 flood fill your image with your background color. You do this by clicking your right mouse button.3. Add a new raster layer Flood fill this with your dark color you selected in your foreground color you can fill it by using your left mouse button.

4. Layers/new mask layer/from image. Select the mask BBD_mask skyline in the window. Make sure source Luminance is checked and invert mask data is checked


5. Now Right click on the dark mask layer in your layers palette it should have a little mask icon on it. Select Delete. When it ask “Would you like this mask merged into the Layer below”. it select yes. Now merge both layers. Go To Edit copy and paste as new image. Minimize the copy for now we will use it later.


6. Now select your selection tool. Draw a rectangle around the bottom the bottom part of you image that is the water reflection. Go to Edit copy and Then paste as new layer into your image. Line this up with where the original water reflections is. Selections Select none. Rename this water reflections by right clicking on it in your layers palette.
7. Now Copy and Paste your Tube into your image as a new layer. Re-size it if needed. Apply drop shadow Vertical and Horizontal 2, Opacity 65 and Blur set to 8.00. Place the tube so that the buildings are behind it.

8. Select a Fat Font. I am using Piazza. Type out your Name Size it so that you have some of your water reflections showing. Refer to my image.


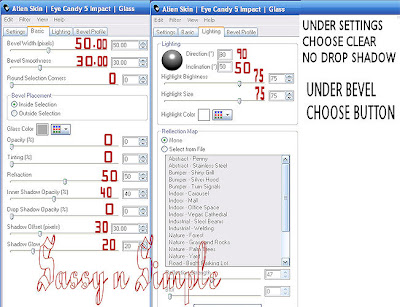
9. Go to Effects/Plugins/Eye Candy 5 Glass and apply settings below.
10. . Add a new raster below your font. Click back on your font Layer. Do the following under your selections tab.. A. select all, B. select float. C. Select defloat. D modify expand 2. Keep Selected.

11. Click back on your New Raster layer Flood fill the selection with the silver pattern I provided. You choose it under patterns in your material palette. Selections Select none. Apply your same drop shadow.


12. Now copy the frame that I included into the supplies and paste as new layer into you image. Click on it with your magic wand. When selected you will only see the ants on the enter side but it is selected. Flood fill with The silver pattern. Apply the same drop shadow. Go back and apply drop shadow again but change the Vertical and Horizontal to -2. Selections/select none.


13. Now Export the Custom Brush into your brushes by going to file Export, custom brush. Now Select the paint brush tool Find the brush and select it. Select a bright color from your tube in your foreground color by using your dropper tool. Apply The brush size to your liking I used my sized as is.


14. Apply your water mark and copyrights. Now close of your two bottom layers Merge visible. Re-size your image so that height is 400 width will adjust.. Open all of your layers back up.

ANIMATION

1. Duplicate the water reflections layer 2 times. You should now have a total of three water reflections. Close of the top two for now.

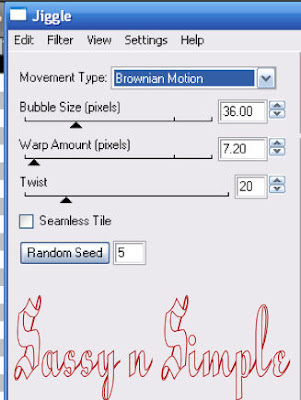
2. . Making sure your bottom water reflection layer is active. Go to Effects/Plugins/Eye Candy 4000 Jiggle apply the settings below. You will have to manually put in the 5 on the random seed. Close this layer.
3, Open the Middle layer water reflections (directly above the original) Apply the Eye Candy Jiggle again but change the random seed to 10 . Close of this layer.

4. Open the top water reflections copy Apply the Eye Candy Jiggle but change the random seed to 15. Close off this layer.


5. Open the bottom water reflections layer. Copy merged and paste into animation shop as new animation. Close off this layer.


6. Open the middle Water reflections layer. Copy merged and paste into animation shop after current frame. You do this by right clicking on first frame.


7. Open the bottom Water reflections layer. Copy merged and paste into animation shop after current frame.


8. Save your animation..


BACKGROUND.


1. Open new transparent image. 1280x300. Selection select all. Select the Copy of your Merged mask and background I had you make earlier. Copy and paste into selection. Selections/ Select none.


2. Under Adjust Blur/Gaussian blur radius set at 20.00.

3. Go to Effects/Plugins/ Tramages Gradient/Spokes Ratio Maker. Gradient/Spokes ratio set at 105

4. Effects/Edge Effects enhance.


5. Add a new raster Layer. Select a dark color from your image Flood fill and lower opacity to 57. Merge visible.


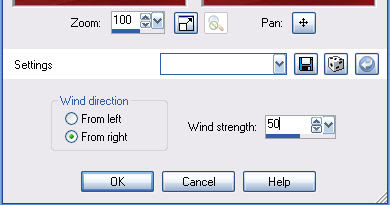
6. Open the border in the supplies I provided. Copy and paste the bottom border into your image as new layer. move this over to the left side of your image if you use your arrow tools on your keyboard, it will stay lined up. Select a Dark color from you header image in your foreground. Click on the border with your magic wand Go To Selections Modify expand 1. Now flood fill it. Selections/select none. Effects/Distortion/wind apply the settings below.

7. Select the border from my supplies I provided. This time Copy and paste the top border into your image as new layer. Move it to the left edge of your image over the other border you just added. Select a Dark color from you header image in your foreground. Click on the border with your magic wand Go To Selections Modify expand 1. Now flood fill it. Selections/select none.Apply the Wind Effects in Step 6 again only this time change the wind strength to 60.

8
. Now merge visible Effects/Image Effects/Seamless Tiling see settings below.Save your Image. By Going to File/Export/Jpeg Optimizer value set at 30.
PLEASE PLACE CREDIT ON ALL STATS
Tutorial by Babs C
HERE or HERE

Just copy and paste into your Stationary
I want to Thank Simply Classy n Sassy Group Testers for testing the Tutorial
I hope you enjoyed this tutorial..

Tuesday, August 18, 2009

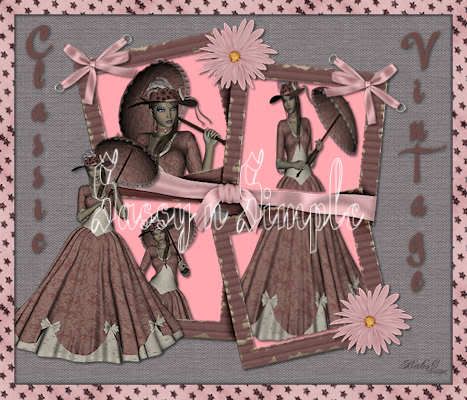
TUT 37 CLASSIC VINTAGE


DATE WRITTEN: Aug 18, 2009

THINGS NEEDED
PAINTSHOP PRO 9 OR SIMILAR PROGRAM.I use Corel X 2 A good working knowledge of the programs.
TUBE: Fantasy Moments Poser Victorian Lady HERE
KIT: Blue Dreams FTU Dreamer HERE


Not all kits are same sizes. Re-sizing may be different

Let's Begin
Please NOTE as I will not repeat in each step.
Once you set your drop shadow it will stay..
Always Close original image after you copy.
Always sharpen re-sized items one time.

1.Open your the Posers 2, 4, 7 and 9 minimize for now. Or tubes of your choice.

2. Open a new transparent image 700x600. Selections/select all. Select paper 3 from the kit copy and paste into selection. Selections/select none.

3. Select frame 4 from the kit. Copy and paste into your image. Re-size it 80%. Do not add drop shadow yet.
4. Add a new raster layer under your frame. Click back on your frame layer. Select your magic wand mode set add/shift and match mode is RGB, Tolerance set to 20, Feather 0, anti-alias checked and Outside selected. Click inside all of the windows on the frame. Selections/modify expand 3.
5. Now click back on the new raster Layer Select paper 2 from the kit and select it in your foreground color under patterns in your material palette. Now flood fill the selection. Selections/Select None.

6. Select Poser 4. Copy and paste into your image. Under your frame. Re-size it 20%. Arrange it so that it is the top left frame window. Apply drop shadow Vertical and Horizontal 2, Opacity 50 and blur 5.00,

7. Select Poser 2. Copy and paste into your image. Under your frame. Re-size it 20%. Arrange it so that it is the bottom left frame window. Apply same drop shadow.

8. Add a New raster layer under your frame. Click back on your frame. With your magic wand mode set add/shift and match mode is RGB, Tolerance set to 20, Feather 0, anti-alias checked and Outside selected. Click inside both right frame windows. Now click back new raster Layer.

9. Select Poser 9. Copy and paste into selection. Selections/select none. Apply same drop Shadow. Go Back now and apply the drop shadow to your frame.

10. Select Poser 7.
Re-size it 40%. Copy and paste it as new layer into your image above your frame layer. Apply same drop shadow.

11. Select Flower 1 from the kit. Copy and paste it into your image as new layer above your tube layer. Re-size it 40%. Duplicate it put one on the bottom right corner and the other At the top in middle of the frame. Apply same drop Shadow.

12. Select Ribbon 2 from the kit. Copy and Paste into your image as new layer. Re-size it 40%. Duplicate it. Mirror your duplicate. Move it to the Top left corner of frame. Under Image on your tool bar select free rotate Settings: Left, 20.00 make sure all layers and rotate single layer around canvas center is not checked. click OK. Apply same drop shadow.

13. Click back on your original Ribbon layer. Move the ribbon to the top Left frame corner. Under image on the tool bar Free rotate it right. Apply same drop shadow.

14. Select paper 6 from the kit. Select it in your foreground color by clicking on the materials palette under patterns. Angle O and scale 30. Close off your background layer. Settings for rectangle below. Now draw out your rectangle starting in the Left top corner and ending in your bottom right corner. this will put it around your entire image. Right click on the rectangle layer and convert it to a raster layer. Apply your drop shadow. Go back and apply drop shadow again. But this time change the Vertical and Horizontal settings to -2.


15. Now for text will need to use the Vertical Font setting you will want to apply the settings below to your font tool bar. I am only showing the parts you need to change below. Do this for both Words.
16. Now apply your copyrights and watermark. Merge visible. Re-size it so that your height is no more than 400.Width will adjust. Save your image.
BACKGROUND

1. Open a new transparent image 1280x300. Selections select all. Select paper 2 from the kit. Copy and paste into selection. Selections Select none.

2. Effects/Image Effects/Seamless Tiling. See settings b
elow.

3. Select flower 7 from the kit. Copy and paste into your image as new layer. Re-size it 30% Duplicate it 2 times. Move them to the left border. Apply the same drop shadow. You want the middle flower On top and pushed slightly outside of the image.

4. Select Flower 2 from the kit. Copy and paste it into your image as new layer above your background layer. Re-size it 40%. Move it to the left border in the center of your flowers. refer to my image. Apply your same drop shadow.

5. Select bow 5 from the kit. Copy and paste into your image as new layer above all layers it should be your top layer.Image/mirror. Re-size it 40% . Move it to the Left over your flowers Duplicate it one time. Image Free rotate one Left
Settings: 20.00 make sure all layers and rotate single layer around canvas center is not checked. click OK. Now Free rotate the other one Right. same settings. Apply same drop shadow to both.

6. Merge visible. Save your Image by clicking on File/Export/Jpeg Optimizer Value set at 30.


PLEASE PLACE CREDIT ON ALL STATS
Tutorial by Babs C
Just copy and paste into your Stationary
I want to Thank Simply Classy n Sassy Group Testers for testing the Tutorial
I hope you enjoyed this tutorial..

TERMS OF USE


Terms of Use

1. Do not claim my tutorial as your own

2. Do not translate, upload or place my tutorials on any other website or copy into emails.
***Exception to this is my Letter Form Tutorials Which are done in Incredimail.

3. Do not use my tutorials in Groups, Forums, etc that you charges a fee to access.

4. You must link to my blog when sharing my tutorials.

5. Group Owners are welcome to use my tutorials on my blogs provided they make sure their members follow my Terms of Use.
You must have permission to use my Tutorials that
are written in Incredimail Letter Form.

6. If any of my tutorials are used to create Stationary you must Place a credit in the footer of your Stationary.

Tutorial By: Babs C
HERE or HERE
Link the tutorials Back to my main blog site and to
the blog they are written on.

Thursday, August 13, 2009

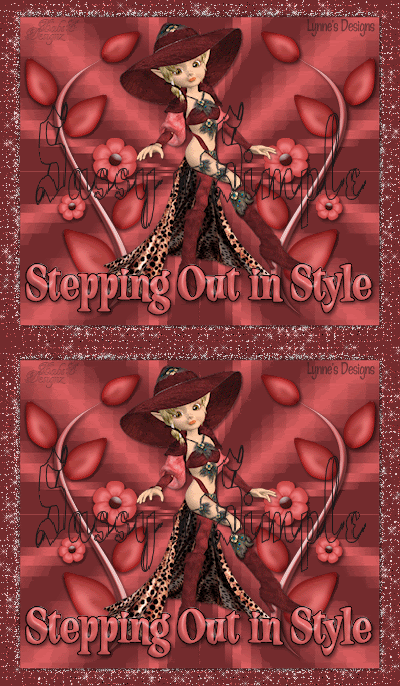
TUT 34 STEPPING OUT IN STYLE


DATE WRITTEN: August 13, 2009

THINGS NEEDED
PAINTSHOP PRO 9 OR SIMILAR PROGRAM.
TUBE: Lynne’s Designs PTU HERE
PLUGINS: Eye Candy 4000 Bevel Boss, Funhouse Emission Mirror, Xenoflex 2 constellations
MY SUPPLIES: HERE
Not all kits are same sizes. Re-sizing may be diffrent

Let's Begin

Once you set your drop shadow it will stay..
Always Close original image after you copy.
Always sharpen re-sized items one time.

1. Open a new transparent image. 700x600. Open your Tube and select a dark color from it in your foreground and a Light color in your background color.

2. Fill your Image with the dark color.

3. Now Select your foreground/background Gradient in your foreground color Angle 45 and repeats 4. Add a new raster layer and flood fill it.

4. Effects/Plugins/Funhouse Emission Mirror wavelength setting at 150 apply. Now Copy this and paste as new image and minimize for now. Back to your image. Re-size this Layer 90%.

5. Effects/3D/Drop Shadow Vertical and Horizontal set at 2 Opacity set at 50 and blur 5.00. Go back and reapply this drop shadow but change the Vertical and Horizontal to -2.

6, Open the floral png from my Supplies Copy and paste it into your image. Apply Drops shadow Vertical and Horizontal set at 2 Opacity set at 50 and blur 5.00 Duplicate it and mirror the duplicate. Right click on the duplicate merge/merge down. Apply drop shadow Vertical and Horizontal set at 2 Opacity set at 50 and blur 5.00

7. Copy and paste your tube in as new layer into your image apply same drop shadow.

8. Apply Text your Text. I used AS Jiggy Roman. Size it so that it is as wide as your image. Refer to my image.

9. Effects/Plugins/Eye Candy 4000 Bevel Boss. See settings below. Select Button as Bevel of choice. Apply
10. . Add a new Raster layer under your text. Now Click back on your Text Layer and do the following under Selections. A. Select all, B. Float, C. Defloat, D modify and expand 2.

11. Click back on the new layer you added Select Black in your foreground color and flood fill the selection. Selection/select none Click back on your text Layer Right click on the duplicate merge/merge down. Apply your same drop shadow.


12. Re-Size your image all layers checked so that the width is 400. Height will adjust.

13. Apply your copyrights and your watermark.

13. Close off your background layer and merge visible. Once merged you should have 2 layers.


ANIMATION

1. Duplicate your merged layer Close off the Duplicate copy for now name Copy of merged.

2. Click back on the bottom Original merged Layer. Effects/textures/mosaic antique. Apply the settings below.

3, Now Duplicate Your merged Mosaic Layer one time. Effects/Plugins./Xenoflex/Constellations Under settings select small star constellations and apply the settings below. Close off this layer

4. Click back on the bottom Mosaic Layer (named merged) Apply The Xenoflex Constellation only this time Click on your random seed button one time.

5. Open the top merged Layer you closed off This is your Tube layer in it original form.

6. Copy merged and paste into animation shop as new animation.

7. Close the bottom mosaic layer. Copy merged and paste into animation shop after current frame. You do this by right clicking on first frame.

8. Save your animation..

BACKGROUND.

1. Open new transparent image. 1280x250. Selections/Select all. Now open the image that you saved of the Funhouse Emission Image. Copy and paste into selection. Selections/select none

2, Add a new Raster Layer select a light color from your tube in your foreground color and flood fill the layer. . I used my same color as in my header. Lower Opacity to 40. Merge visible

3. Effects/image effects/seamless tiling use settings below.
4. Open the border from my supplies copy and paste into your image. With your magic wand click on it.

5. Add a New raster Layer. Select a dark color from your tube in your foreground and flood fill the selection on your new layer. Selections/select none. Delete the greyscale border.

6. Save your Image. By Clicking on File/Export/jpeg Optimizer value set at 30

PLEASE PLACE CREDIT ON ALL STATS
Tutorial by Babs C

Just copy and paste into your Stationary
I want to Thank Simply Classy n Sassy Group Testers for testing the Tutorial
I hope you enjoyed this tutorial..

Tuesday, August 11, 2009

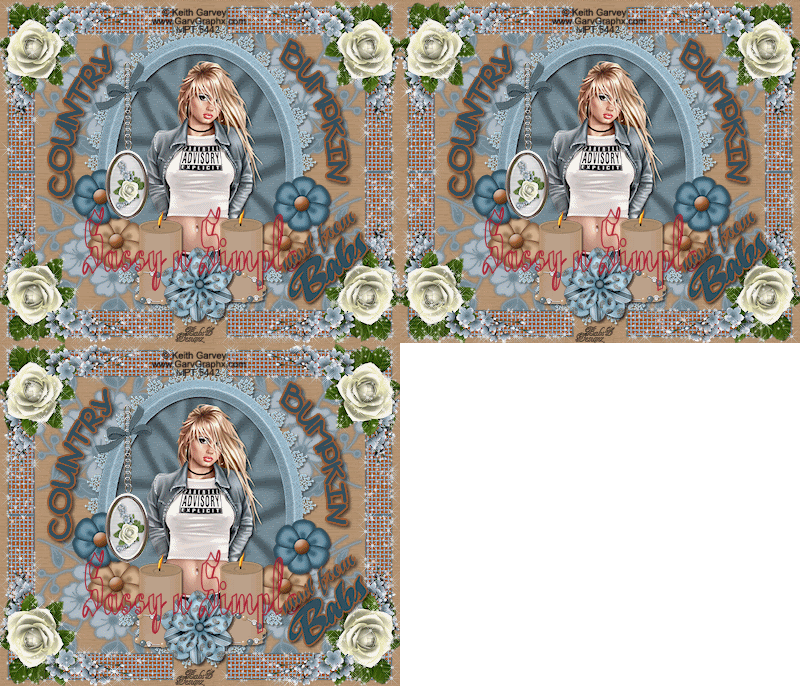
TUT 33 COUNTRY BUMPKIN


DATE WRITTEN: August 11, 2009

THINGS NEEDED
PAINTSHOP PRO 9 OR SIMILAR PROGRAM. And a good working knowledge of the program, plugins and animation shop

TUBE: Keith Garvey it is a licensed tube you must buy it at MyPsPTubes
KIT: Bitzy Beez Designz Bitz of Country Tagger FTU HERE
PLUGINS: Xenoflex Constellations
Not all kits are same sizes. Re-sizing may be different

Let's Begin

Once you set your drop shadow it will stay..
Always Close original image after you copy.
Always sharpen re-sized items one time.

1. Open a new transparent image. 700x600 Selections/select all. Open Paper 9 from the kit copy and paste into selection. Selections/select none

2. Select frame 2 from the kit. Copy and paste it into your image as new layer. Re-size it 70%.

3. Add a new raster layer below your frame. Now with your magic wand selected click back on your frame layer and click inside the frame. Selections/modify expand 4.

4. Select Paper from the kit 17 from the kit Copy and paste into selection into the new raster layer. Selections/Select none. Click back on your frame layer and apply drop shadow Vertical and Horizontal set at 2, Opacity 70 and blur set 5.00.

5. Copy your Tube add it into your image as new layer. Re-size as needed so that it fits in your frame. Apply same drop shadow.

6, Select Doodle 2 from the kit Copy and paste it as a new layer above your bottom background layer. Re-size the doodle 70%. Duplicate it and mirror the duplicate. Right click on the top doodle layer in your layers palette select merge/merge down.

7. Now Duplicate your merged Doodle Layer and flip the duplicate. You do this under image on your tool bar. Right click on your this layer in your layers palette and merge/merge down.

8. Select Flowers 6 and 10 from the kit copy each of them and paste them in your image as a new layer. Re-size them 30%. Apply your same drop shadow. Arrange them around the bottom of you frame. Refer to my image for placement.

9. Select Candle 1 from the kit Copy and paste into your image as new layer. Re-size it 60% . Apply your drop shadow. Duplicate your candle and place the in the center for the frame at the bottom but space them apart. Refer to my image.

10. Select Flower 10 from the kit copy and paste into your image as new layer. Re-size it 30%. Center this in between the candles. Apply your drop shadow.

11. Select Charm 1from the kit copy and paste it as new layer. Re-size the charm 60%. Apply your Drop shadow. Place it on the right side of your frame.

12. Select Corner 1 copy and paste into your image as new layer. Re-size it 60%. Apply your drop shadow. Now duplicate the corner. Mirror your duplicate place them close to the borders on the image In your layers palette right click on the duplicated corner merge/merge down.

13. Duplicate your merged corners Layer and flip the duplicated copy. Arrange them so they meet on the sides. Refer to my image for placements. Once you have them placed. Right click on the top duplicated layer merge/merge down.

14, Select your eclipse tool select the oval shape. Have the line width set on 4. Close off your background color. Draw out an oval that is about the size of your frame. Do not convert but move this over to the left side so that it is outside of the frame

15. Select your text tool now. Select a dark color from your image and your foreground and background colors. With your mouse move your cursor onto the oval until you see an A icon see image below. Then type out your text. Adjust your text by pulling on the text box nodes. Until you are happy with the placement and size of the text you want it all on the side of the the oval do not go across the top at all.

16. Now in the Layers palette you will see a plus line on the text Layer click on it Now you see a layer with text and layer with oval. Click on the eye next to your oval. Click back on the minus to close it back up and convert to raster layer.

17. Repeat Steps 14, 15 and 16. Only this time move the oval to right outside of your frame.

18. You can add the other text if you wish I just added that for my own personal use.

19. Close off your corner Layer. And merge visible. Re-size all layers so that the width is not more than 425. Height will adjust. Apply your watermark and credits now.


ANIMATION

1. Duplicate the corner Layer 2 times. Close the top and middle layers

2. Select your bottom corner layer. Effects/plugins/Xenoflex Constellations Apply the settings below.

3, Close off the bottom corner layer. Open your middle corner layer.. Make sure it is selected in your layers palette. Apply the constellations again this time though click on the random seed button one time. Close this layer.

4. Open the top corner layer. Apply the constellations again. Click the random seed button one time. Close off this layer.

6. Open the bottom corner layer Copy Merged and paste into your Animation Shop as new layer. You do this by right clicking anywhere in side the workspace. (I always select a different layer so I do not have to click each layer each time I want to copy. I just have to open each one.)


7. Now Close off the bottom corner layer and open the middle corner layer Copy merge and paste into Animation Shop after current Layer (right click first frame). Now close the middle open the Top corner layer copy merged and paste into animation shop after current frame.
I did not change my speed but if you wish to you can go to edit select all then right click on the first frame select frame properties and change to the speed you like.
Now save your image.


BACKGROUND.

1. Open new transparent image. 1280x250. Selection select all. Select paper from the kit Copy and paste into selection. Selections/ Select none. Duplicate it and merge visible. This is because the seamless tiling will not look right.

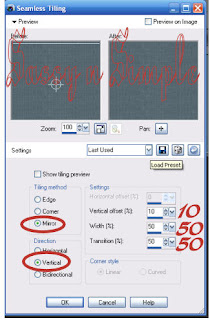
2. Merge the two layers. Effects/image effects seamless tiling see settings below.
3, Select Lace 2 from the elements folders copy and paste into image as new layer. Re-size it 80%. Move it to the left border move some outside the image. Refer to my image. Apply drop shadow Vertical and Horizontal set at 2, Opacity 70 and blur set 5.00.

4. Select Hope hanger 3 from the kit copy and paste into your image as new layer. Re-size it 25%. Apply same drop shadow and move onto the lace.

5. Select candle 1 copy and pasting your image as new layer. Re-size it 20%. Move it over onto the lace and apply drop shadow.

6. Select flowers 1 and 5 copy and paste into your image as new layer. Re-size them 15%. Move two behind your candle layer and the other above the candle. Apply same drop shadow. To move the flowers below candle just drag them down in your layers palette.

Now save your image by clicking on File/export/jpeg optimizer value set at 30.
PLEASE PLACE CREDIT ON ALL STATS
Tutorial by Babs C
Just copy and paste into your Stationary
I want to Thank Simply Classy n Sassy Group Testers for testing the Tutorial
I hope you enjoyed this tutorial..

Friday, August 7, 2009

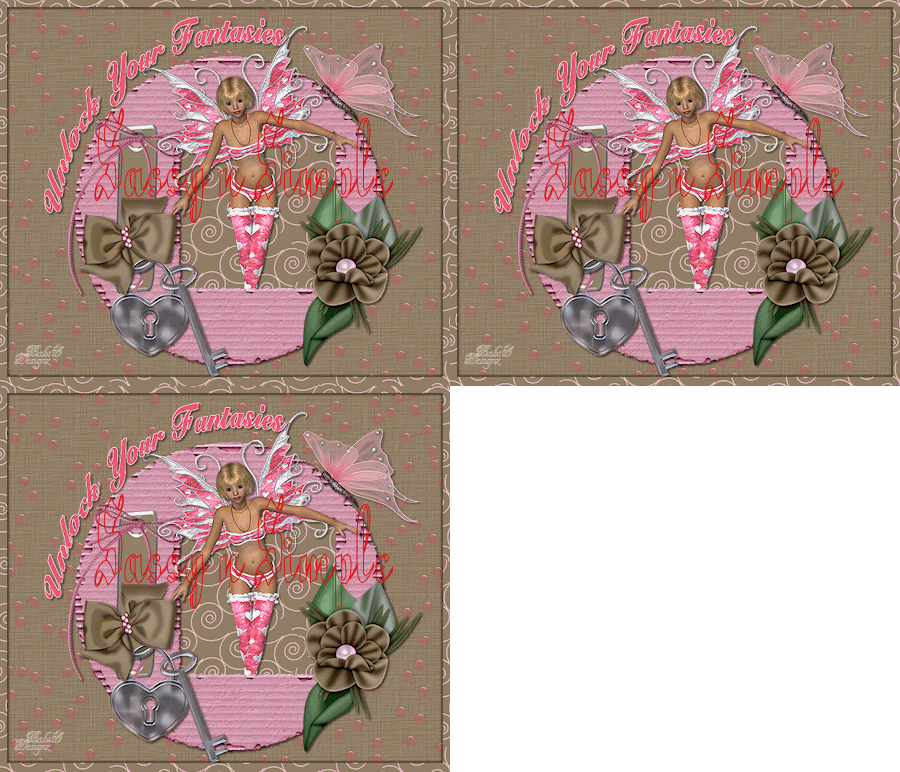
TUT 32 Unlock Your Fantasies

28023


DATE WRITTEN: Aug 8, 2009

SPECIAL NOTICE: Place the Credits below in footer on all stats using my Tuts.
Tutorial By:
Babs C
Tutorial Here or Here (links Below)
http://groups.yahoo.com/group/SimplyClassyNSassy/
http://groups.yahoo.com/group/ClassyNSassyStatsnStuff/

THINGS NEEDED
PAINTSHOP PRO 9 OR SIMILAR PROGRAM.
TUBE: Lynne's Designs Poser HERE
KIT: Blue dreams Precious FTU Tagger HERE
PLUGINS: Xenoflex 2 Water Drops
Not all kits are same sizes. if you choose a different kit your re-size will also be different.


Let's Begin
Please NOTE as I will not repeat in each step.
Once you set your drop shadow it will stay..
Always Close original image after you copy.
Always sharpen re-sized items one time.

1. Open a new transparent image. Selections/select all. Open paper 3 from the kit copy and paste into selection. Selections/select none

2. Select Frame 2 Copy and paste into your image as new layer. Re-size it 90%. Pull your frame down towards the bottom of your image. See my image.

3. Click inside the frame with your wand. Selections/ modify expand 3.

4. Add a new raster layer below your frame. Select paper 10 from the kit. Select it in your foreground color under patterns. Angle 0 and scale 50. Flood fill the selection. Selections/ Select none.

5. Click back on your frame. Go to Effects/3D/Drop Shadow Vertical and Horizontal set at 2. Opacity 70 and blur 5.00. Click ok.

6, Copy and paste your tube above your frame. Re-size as needed. Apply Drop shadow.

7. Click back on your frame. Select your freehand tool. Take and go around the part of the frame that you need to cover the bottom part of your tube. Once you have it all selected Go to edit and copy. Paste as new Layer above your Tube. Arrange it inside of the selection. Selections/select none.

8. Select flower 2 from the kit. Copy and paste into your image as new layer. Re-size it 70%. Apply your drop shadow. Place it on the right bottom side of your frame.

9. Select butterfly 6 from the kit copy and paste as new layer. Re-size it 40%. Apply your drop shadow. Place it on the top right hand side of your frame.

10. Select the lock and key from the kit. Copy and paste into your image as a new layer. Apply your drop shadow. Place on the left bottom of your frame.

11. Select bow 1 Copy and paste into your image as new layer. Re-size it 50%. Apply your drop shadow.

12. Select your eclipse tool line with 4. Background layer closed. Any foreground color will be fine. Draw a circle around frame. Do not convert it.

13. Select a color from your image in your foreground and background colors. Select your text tool I am using Balzac Text. Click on your circle near the top until you see the below image showing. Then type out your text.
Adjust your text by pulling out the rectangle Or pushing it in if needed. You want your text to be on the top left side of your frame.

14, Now that your text is sized. Click on the plus sign on the text layer. You will see your text layer and your circle layer. Click on the eye by the circle to close it. Now close by click on the - sign. Convert it to a raster layer. Apply your drop shadow to your text.

15. Select paper 10 from the kit in your foreground color. Close background color. Select your rectangle tool. Line with 20.00 draw out a rectangle starting at the top left corner and go to the far right hand corner. Convert to raster layer by right clicking on the layer in your layer palette.

16. Apply your drop shadow. Go back and apply your drop shadow again on this time change your vertical and horizontal to -2.

17. Re-size all layers so that the width is not more than 450 height will adjust. Go ahead and apply your copy right and watermarks. Then close background layer and merge visible.

ANIMATION

1. Duplicate your background layer 2 times.

2. Select the bottom background layer. Effects/plugins/Alien skin Xenoflex/water drops. See settings below.


3, Close bottom background layer and select the middle background layer. Apply the Water drops again this time change the random seed one time.

4. Close the middle background layer. Select the top background layer and once again apply the water drops. Change the random seed one time.

5. Close the top and middle background Layer. Copy merged and paste into animation shop as new animation.

6. Close the bottom background layer. Open the middle background layer. Copy merged and paste into animation shop after current frame. You do this by right clicking on first frame.

7. Close off the middle background layer. Open the top background layer Copy merged and paste into animation shop after current frame.

8. Save your animation..

BACKGROUND.

1. Open new transparent image. 1000x250. Selection select all. Select paper 7 from the kit Copy and paste into selection. Selections/ Select none.

2, Add a new raster layer. Select your selections tool and draw out a rectangle Starting at the 150 mark on the top ruler and draw it out to the left and the entire length of the image. See image below.

3. Merge the two layers. Effects/Image Effects seamless tiling see image below for settings.

4. Select paper 10 from the kit and select it in your foreground color under patterns. Flood fill your selection. Selections/select none.

5. Open the lace up copy and paste into your image. Re-size 30% Apply drop shadow. Vertical and Horizontal set at 2. Opacity 70 and blur 5.00. Click ok.

6. Select rose 1 from the kit Copy and paste into the image. Re-size it 30%. Image/free rotate 10.00 right. Duplicate it and mirror the duplicate. Place both on the Left border. Refer to my image. Apply drop shadow to both.

7. Select rose 2 from the kit. Copy and paste into the image. Re-size it 30%. Apply your Drop shadow place in the middle of the first two roses.

8. Select the lock & Key Copy and paste into your image as new layer. Re-size it. 20%. Apply drop shadow and place towards the bottom of your roses.

9. Select Bow 2 from the kit. Copy and paste into image as new layer. Re-size it 35%. Apply your drop shadow..

10 Merge visible. Save your image by going to file/export/jpeg optimizer value set at 30.

PLEASE PLACE CREDIT ON ALL STATS
Tutorial By:
Babs C
HERE or HERE
Just copy and paste into your Stationary
I want to thank Simply Classy n Sassy Group Testers for testing the Tutorial.
I hope you enjoyed the Tutorial.

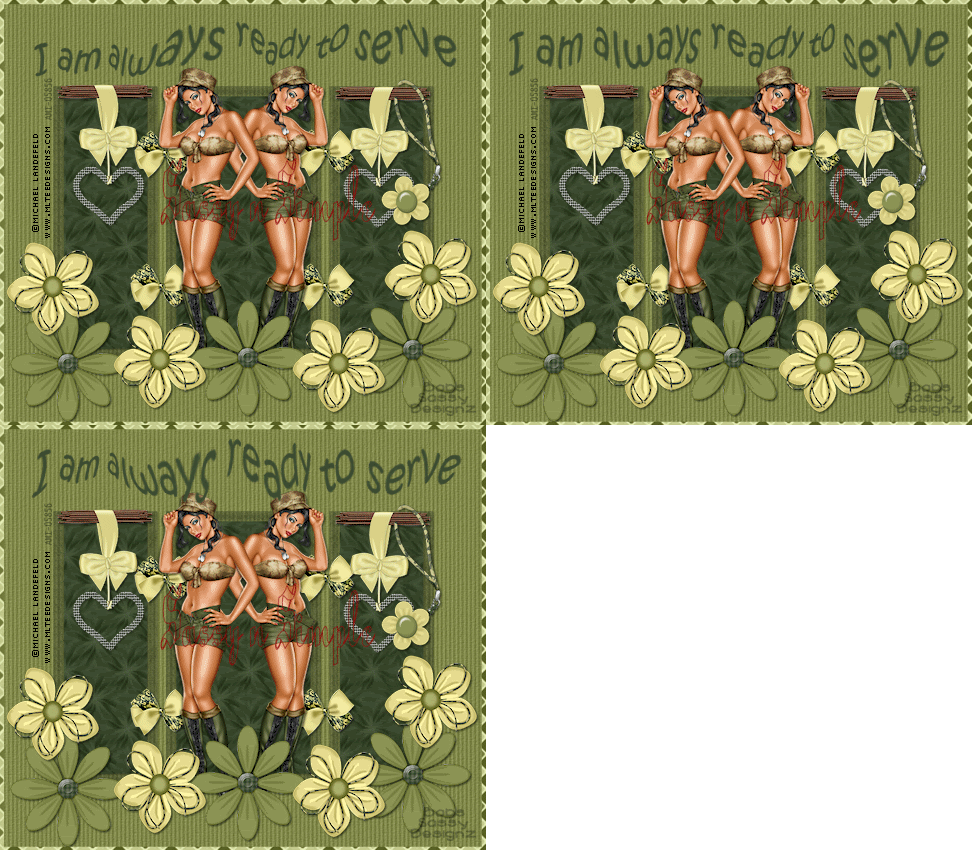
TUT 29 I AM READY TO SERVE


DATE WRITTEN: July 25, 2009
You need a good knowledge of PSP in order to do this tutorial.
THINGS NEEDED
PAINTSHOP PRO 9 OR SIMILAR PROGRAM.
TUBE: Michael LandeFeld is a licensed tube get it at CILM

KIT:
Fantasy Moments Camouflage FTU Tagger HERE
MASK: Babs BitzyBeez Designz HERE
PLUGINS:
MuRa's seamless, Eye Candy 4000

Not all kits are same sizes.
So if you choose another kit, your re-sizing may be different..
Let's Begin
Please NOTE as I will not repeat in each step.
Once you set your drop shadow it will stay..
Always Close original image after you copy.
Always sharpen re-sized items one time.

1. Open New Image 800x700. Under selections select all. Open paper 10 in the kit Copy and paste into selection.

2. Add a New Raster. Select paper 16 from the kit. Select it under your patterns tab in your material palette. Flood fill your layer.

3. Under Layers choose Layers/new mask layer/from image. Select the mask in the window. Make sure source Luminance is checked and invert mask data is checked. Click ok.


4. Right click on the black mask layer in your layers palette and select delete. When it ask “Would you like this mask merged into the layer below it.” Select yes. Right click top mask and merge visible. Apply Drop shadow Vertical and Horizontal set at 2, Opacity 65 and blur 5.00.


5. Open bow element 1 copy and paste into your image as new layer. Re-size it 20%. Apply drop shadow. Duplicate it 3 times and arrange in the middle of the frame. Two on each side where the spaces are. See my image.


6. Open your tube copy and paste into your image as new layer. Duplicate it 1 time mirror. Apply your drop shadow. Place in front of the center of your mask.


7. Open element 22 copy and paste into your image as new layer. Re-size it 35%. Duplicate it place one on each side of the mask at the top. Apply same drop shadow.

8. Open flower 31 Copy and paste into your image as new layer. Re-size it 35%. Apply your drop shadow and duplicate it 2 times arrange at the bottom of the mask. Leave a space between them.. See my image.

9. Open Flower 14 Copy and paste into your image as new layer. Re-size it 35%. Apply your drop shadow and duplicate it 3 times and arrange them around the bottom of the mask. Two should be on the outside and two inside between your first flower.


10.Open element 26 Copy and paste into your image as new layer. Re-size it 35%.
Apply your drop shadow. Move it over your Heart element on the right. Select your selection tool rectangle. Draw out a rectangle where you want to remove part of rope. Then hit delete. Selections Select none. See my image.

11. Now type out your text. Do not make it to small or large when sizing it It should be where there is a good space between the top and the mask.
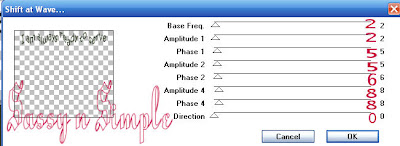
12. Effects/Plugins/MuRa’s Seamless/shift at wave. See settings below. Apply your drop shadow. 13. Apply your watermark and copyrights. Re-size the image so that height is no more than 425. Width will adjust.

14. Open paper 21 Select it in your foreground color under patterns in your material palette. Close background color. Select your rectangle tool line width set to 8.00. Draw out a rectangle around your image. Convert to raster layer.


15. Close off your text layer and merge visible.


ANIMATION
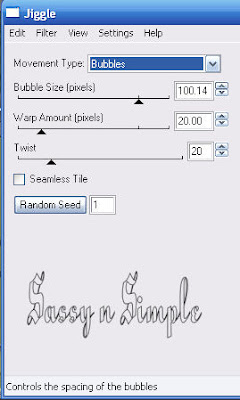
1. Duplicate your text Layer 2 times. Close off the two duplicated text layers. You should now have 3 text layers. Top, middle and bottom. 2. Select your bottom text layer. original layer) Effects/Plugins/Eye Candy 4000 Jiggle see settings below. 3. Close off the bottom text layer. Select the layer above the original text layer (middle text layer), Apply your Jiggle again this time click on the random seed button one time.

4. Close of your middle layer and open the top text layer. Apply your jiggle again, Click on the random seed button one time.


6. Close the top and middle layers of your text. Open your bottom text layer. Copy merged. I always click on my background layer this way I don’t have to keep clicking on the layers as I change them.


7. Close the bottom text layer. Open the middle text layer. Copy merged and paste into animation shop after current frame. Repeat this for the top layer. Remember to close off the middle layer though.


8. Click on the first frame then go to edit and select all. Right click on your frame and select frame properties now change the speed to 90. Save your animation.


BACKGROUND

1. Open a new transparent image 1000x250 Selections/select all. Select paper 10 from the Kit copy and paste into selections. Selections/select none.


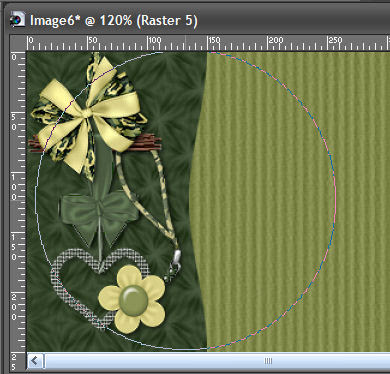
2. Add a new raster Layer. Make sure you have your ruler showing. Select your selection tool and draw out a rectangle starting at the 150 mark. Draw it out all the way to the left border and the entire length of the image. See image below. Keep selections selected
3. Select paper 16 from the kit in your foreground color under patterns. Flood fill the selection. Selections Select none.
4. Select your warp brush set the size to 250. Take and push in on your rectangle you just made so that it indented some.. See image. Apply your drop shadow.
5. Merge the two layers. Effects/image effects seamless tiling. apply seamless tiling see image below for settings.


Save

6. Open Element 24 from the kit, Copy and paste it into your image as new layer. Re-size it 25%. Apply drop shadow. Drop shadow Vertical and Horizontal set at 2, Opacity 65 and blur 5.00.

7, Open element 26 Copy and paste it into your image as new layer. Re-size it 25%. Move it to your left border. Apply your drop shadow.

8. Open element 43 bow. Copy and paste into your image as new layer. Re-size it 20% Apply your drop Shadow.

9, Save your image by going to file export/jpeg optimizer value set at 25.

PLEASE PLACE CREDIT ON ALL STATS
Tutorial by Babs C
Just copy and paste into your Stationary
I want to Thank Simply Classy n Sassy Group Testers for testing the Tutorial
I hope you enjoyed this tutorial..