

DATE WRITTEN: August 21, 2009
THINGS NEEDED PAINTSHOP PRO 9 OR SIMILAR PROGRAM. TUBE: Keith Garvey you must buy it at MY PSP TUBES PLUGINS: Eye Candy 5 Impact Glass, Eye Candy 4000 Jiggle, Tramages Gradient/Spokes Ratio Maker. MY SUPPLIES: HERE
Let's Begin
Once you set your drop shadow it will stay..
Always Close original image after you copy.
Always sharpen re-sized items one time.
First Open your tube a tube in a sitting position is best , In my supplies you downloaded open the frame, mask and silver pattern. Minimize all but your tube for now
1. Using your dropper tool, from your tube select two colors a darker color in your foreground color and another color (you will want this to be a lighter dark color than foreground color) in your background color. Minimize tube for now.2. Open a new transparent image 700X650 flood fill your image with your background color. You do this by clicking your right mouse button.3. Add a new raster layer Flood fill this with your dark color you selected in your foreground color you can fill it by using your left mouse button.
4. Layers/new mask layer/from image. Select the mask BBD_mask skyline in the window. Make sure source Luminance is checked and invert mask data is checked
5. Now Right click on the dark mask layer in your layers palette it should have a little mask icon on it. Select Delete. When it ask “Would you like this mask merged into the Layer below”. it select yes. Now merge both layers. Go To Edit copy and paste as new image. Minimize the copy for now we will use it later.
6. Now select your selection tool. Draw a rectangle around the bottom the bottom part of you image that is the water reflection. Go to Edit copy and Then paste as new layer into your image. Line this up with where the original water reflections is. Selections Select none. Rename this water reflections by right clicking on it in your layers palette.7. Now Copy and Paste your Tube into your image as a new layer. Re-size it if needed. Apply drop shadow Vertical and Horizontal 2, Opacity 65 and Blur set to 8.00. Place the tube so that the buildings are behind it.
8. Select a Fat Font. I am using Piazza. Type out your Name Size it so that you have some of your water reflections showing. Refer to my image.
9. Go to Effects/Plugins/Eye Candy 5 Glass and apply settings below.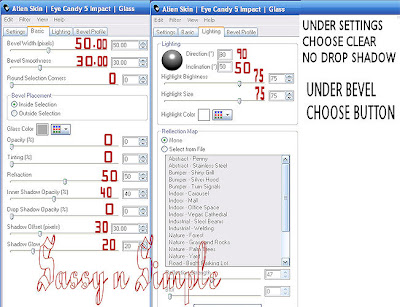 10. . Add a new raster below your font. Click back on your font Layer. Do the following under your selections tab.. A. select all, B. select float. C. Select defloat. D modify expand 2. Keep Selected.
11. Click back on your New Raster layer Flood fill the selection with the silver pattern I provided. You choose it under patterns in your material palette. Selections Select none. Apply your same drop shadow.
12. Now copy the frame that I included into the supplies and paste as new layer into you image. Click on it with your magic wand. When selected you will only see the ants on the enter side but it is selected. Flood fill with The silver pattern. Apply the same drop shadow. Go back and apply drop shadow again but change the Vertical and Horizontal to -2. Selections/select none.
13. Now Export the Custom Brush into your brushes by going to file Export, custom brush. Now Select the paint brush tool Find the brush and select it. Select a bright color from your tube in your foreground color by using your dropper tool. Apply The brush size to your liking I used my sized as is.
14. Apply your water mark and copyrights. Now close of your two bottom layers Merge visible. Re-size your image so that height is 400 width will adjust.. Open all of your layers back up.
Always Close original image after you copy.
Always sharpen re-sized items one time.
First Open your tube a tube in a sitting position is best , In my supplies you downloaded open the frame, mask and silver pattern. Minimize all but your tube for now
1. Using your dropper tool, from your tube select two colors a darker color in your foreground color and another color (you will want this to be a lighter dark color than foreground color) in your background color. Minimize tube for now.2. Open a new transparent image 700X650 flood fill your image with your background color. You do this by clicking your right mouse button.3. Add a new raster layer Flood fill this with your dark color you selected in your foreground color you can fill it by using your left mouse button.
4. Layers/new mask layer/from image. Select the mask BBD_mask skyline in the window. Make sure source Luminance is checked and invert mask data is checked
5. Now Right click on the dark mask layer in your layers palette it should have a little mask icon on it. Select Delete. When it ask “Would you like this mask merged into the Layer below”. it select yes. Now merge both layers. Go To Edit copy and paste as new image. Minimize the copy for now we will use it later.
6. Now select your selection tool. Draw a rectangle around the bottom the bottom part of you image that is the water reflection. Go to Edit copy and Then paste as new layer into your image. Line this up with where the original water reflections is. Selections Select none. Rename this water reflections by right clicking on it in your layers palette.7. Now Copy and Paste your Tube into your image as a new layer. Re-size it if needed. Apply drop shadow Vertical and Horizontal 2, Opacity 65 and Blur set to 8.00. Place the tube so that the buildings are behind it.
8. Select a Fat Font. I am using Piazza. Type out your Name Size it so that you have some of your water reflections showing. Refer to my image.
9. Go to Effects/Plugins/Eye Candy 5 Glass and apply settings below.
 10. . Add a new raster below your font. Click back on your font Layer. Do the following under your selections tab.. A. select all, B. select float. C. Select defloat. D modify expand 2. Keep Selected.
 11. Click back on your New Raster layer Flood fill the selection with the silver pattern I provided. You choose it under patterns in your material palette. Selections Select none. Apply your same drop shadow.
12. Now copy the frame that I included into the supplies and paste as new layer into you image. Click on it with your magic wand. When selected you will only see the ants on the enter side but it is selected. Flood fill with The silver pattern. Apply the same drop shadow. Go back and apply drop shadow again but change the Vertical and Horizontal to -2. Selections/select none.
13. Now Export the Custom Brush into your brushes by going to file Export, custom brush. Now Select the paint brush tool Find the brush and select it. Select a bright color from your tube in your foreground color by using your dropper tool. Apply The brush size to your liking I used my sized as is.
14. Apply your water mark and copyrights. Now close of your two bottom layers Merge visible. Re-size your image so that height is 400 width will adjust.. Open all of your layers back up.
ANIMATION
1. Duplicate the water reflections layer 2 times. You should now have a total of three water reflections. Close of the top two for now.
2. . Making sure your bottom water reflection layer is active. Go to Effects/Plugins/Eye Candy 4000 Jiggle apply the settings below. You will have to manually put in the 5 on the random seed. Close this layer.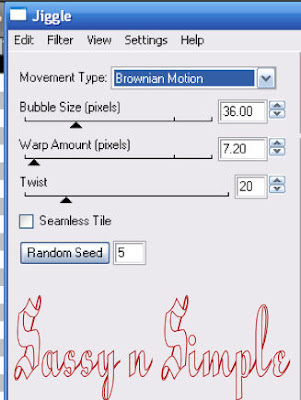 3, Open the Middle layer water reflections (directly above the original) Apply the Eye Candy Jiggle again but change the random seed to 10 . Close of this layer.
4. Open the top water reflections copy Apply the Eye Candy Jiggle but change the random seed to 15. Close off this layer.
5. Open the bottom water reflections layer. Copy merged and paste into animation shop as new animation. Close off this layer.
6. Open the middle Water reflections layer. Copy merged and paste into animation shop after current frame. You do this by right clicking on first frame.
7. Open the bottom Water reflections layer. Copy merged and paste into animation shop after current frame.
8. Save your animation..
BACKGROUND.
1. Open new transparent image. 1280x300. Selection select all. Select the Copy of your Merged mask and background I had you make earlier. Copy and paste into selection. Selections/ Select none.
2. Under Adjust Blur/Gaussian blur radius set at 20.00.
2. . Making sure your bottom water reflection layer is active. Go to Effects/Plugins/Eye Candy 4000 Jiggle apply the settings below. You will have to manually put in the 5 on the random seed. Close this layer.
 3, Open the Middle layer water reflections (directly above the original) Apply the Eye Candy Jiggle again but change the random seed to 10 . Close of this layer.
 4. Open the top water reflections copy Apply the Eye Candy Jiggle but change the random seed to 15. Close off this layer.
5. Open the bottom water reflections layer. Copy merged and paste into animation shop as new animation. Close off this layer.
6. Open the middle Water reflections layer. Copy merged and paste into animation shop after current frame. You do this by right clicking on first frame.
7. Open the bottom Water reflections layer. Copy merged and paste into animation shop after current frame.
8. Save your animation..
BACKGROUND.
1. Open new transparent image. 1280x300. Selection select all. Select the Copy of your Merged mask and background I had you make earlier. Copy and paste into selection. Selections/ Select none.
2. Under Adjust Blur/Gaussian blur radius set at 20.00.
3. Go to Effects/Plugins/ Tramages Gradient/Spokes Ratio Maker. Gradient/Spokes ratio set at 105
4. Effects/Edge Effects enhance.
5. Add a new raster Layer. Select a dark color from your image Flood fill and lower opacity to 57. Merge visible.
6. Open the border in the supplies I provided. Copy and paste the bottom border into your image as new layer. move this over to the left side of your image if you use your arrow tools on your keyboard, it will stay lined up. Select a Dark color from you header image in your foreground. Click on the border with your magic wand Go To Selections Modify expand 1. Now flood fill it. Selections/select none. Effects/Distortion/wind apply the settings below.

7. Select the border from my supplies I provided. This time Copy and paste the top border into your image as new layer. Move it to the left edge of your image over the other border you just added. Select a Dark color from you header image in your foreground. Click on the border with your magic wand Go To Selections Modify expand 1. Now flood fill it. Selections/select none.Apply the Wind Effects in Step 6 again only this time change the wind strength to 60.
8. Now merge visible Effects/Image Effects/Seamless Tiling see settings below.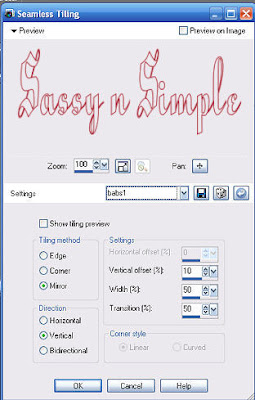 Save your Image. By Going to File/Export/Jpeg Optimizer value set at 30.
8. Now merge visible Effects/Image Effects/Seamless Tiling see settings below.
 Save your Image. By Going to File/Export/Jpeg Optimizer value set at 30.