
DATE WRITTEN: Aug 24, 2009
THINGS NEEDED
PAINTSHOP PRO 9 OR SIMILAR PROGRAM.
TUBE: Outlaw by Design Poser HERE
MASK: By by Me.. included in my supplies
KIT: Bel Vidotti Scraps Spooky HERE
MY SUPPLIES: HERENot all kits are same sizes. Re-sizing may be different
Let's Begin
Once you set your drop shadow it will stay..
Always Close original image after you copy.
Always sharpen re-sized items one time.
1. Open you tube and the mask 5_by NB in my supplies minimize for now.
2. Open a new transparent image 800X650Selections/select all. Select Paper 28 from the kit copy and paste into selection. Selections/select none
3. Add a new raster Layer. Select black color in your foreground color Flood fill the layer.
4. Under Layers on your tool bar select new mask layer/from image.
Select the mask BDD_Mask 9 from my supplies in the window. Make sure source Luminance is checked and invert mask data is checked. Click Ok.
5. With your Right mouse button click on the white and black mask it has a mask icon on it. Select delete. Right click top mask merge/merge group. When it ask “Would you like this mask merged into the Layer below it” select yes. Re-size your mask layer 90%.
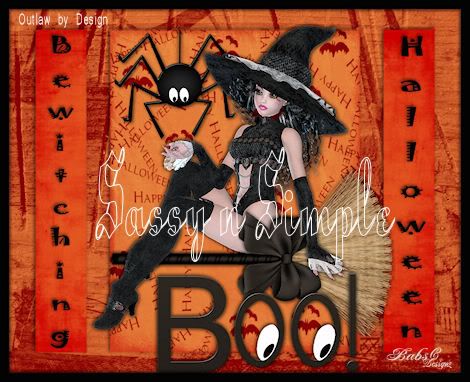
6, With your magic wand click on the inner large rectangle. Selections/modify expand 1. Select paper 05 from the kit, Copy and paste into selection. Selections select none. See wand settings below.
7. With your magic wand click on the two outer rectangles same wand
 settings as before. Selections/modify expand 1. Select paper 01 from the kit copy and paste into selection. Selections Select none. Now apply drop shadow Vertical and Horizontal set at 2, Opacity 65 and blur 8.00. Now Merge visible.
8. Select the Spider 4 from the Kit copy and paste into image as new layer. Re-size it 60% move it so that it is on the right corner of the large rectangle. Apply same drop shadow.
9. Select the spider string from my supplies. Copy and paste it as new layer under your spider layer. Take your Eraser and remove any string that is below your spider. Apply same drop shadow. You do not need to re-size.
10. Select your poser/tube copy and paste into image as new layer Re-size it 40%. Arrange so that her hat is at the top of your large rectangle. And her foot is slightly outside of the rectangle. Refer to my image. Apply Same drop shadow.
11. Select broom 20 from the kit copy and paste into your image as new layer under your tube layer. Under image on your tool bar select free rotate 90 Right. Make sure rotate all layers is not checked an rotate single layer around canvas is not checked. and arrange it so that your poser looks as if she is sitting on it. Do not re-size.
12. With your selection tool draw out a square that will copy part of the bow from the broom you do not want it to cover her arm. Make sure your broom layer is selected and Under Edit select copy. Add a new layer above your tube. Under edit paste into selection. Selections/select none. If this does not work with the version you are using manually drag it into place with your mouse.
13. Now you need to go back and apply your drop shadow to your broom..
14, Open the Boo element 11 copy and paste into your image as new layer. Re-size it 80%. Move it so that it is on the bottom right side of your large rectangle refer to my image.
15. Now Select a Font I used Jokerman. Text tool settings below. Type out your words separately size them to fit into your outer rectangles boxes. Once happy with size and placement. Right click on your text layers and convert them a raster layer.

16. Select the frame from my supplies Copy and paste it into you image as new layer. Apply your drop shadow..
17. Apply your watermark and copyrights. Merge visible all layers. Re-size your image so that width 470 height will adjust. Save your image.
BACKGROUND.
1. Open new transparent image. 1280x300. Selections/select all. Select paper 14 from the kit Copy and paste into selection. Selections/ Select none.
2, Select the Border from my supplies copy and paste into your image as new layer move it to the left edge of your image. Click on it with your magic wand same settings as before is fine. Selections/Modify/expand 1. Keep Selected
3. Select Paper 1 from the kit. Select it in your materials palette under pattern angle 0 scale 50. Flood fill the selection. Selections/select none.
4. Merge visible. Effects/image effects/seamless tiling see settings below.

5. Select witch 21 copy and paste into your image as new layer. Re-size it 30%. Move over onto the border on the left side. Apply drop shadow. Vertical and Horizontal set at 2, Opacity 65 and blur 8.00.
6. Select the same font you used in the header. Type out Happy Halloween. Type each word separately. Re-size it to fit into the border area and Angle to the left. Refer to my image.
7. Merge visible Save your Image by going to file/export/jpeg Optimizer value set at 30.
Just copy and paste into your Stationary
I want to Thank Simply Classy n Sassy Group Testers for testing the Tutorial
I hope you enjoyed this tutorial..
I want to Thank Simply Classy n Sassy Group Testers for testing the Tutorial
I hope you enjoyed this tutorial..