Showing posts with label CHRISTMAS. Show all posts

Monday, November 28, 2011

WINTER WONDERLAND

©SassynSimple Tutorials
By Babs C
Name: WINTER WONDERLAND
Written: NOV 28, 2011


PROGRAMS YOU WILL NEED
You are responsible for providing the items needed to do my tutorials.
You need a good working knowledge of the programs I use.
Paintshop or Corel Program

ITEMS YOU WILL NEED
TUBE: Of your Choice, I used the artwork of Fourxs Designs PTU you must buy it at PTE I have a license for it
KIT: Nanly Designs FTU Blue Christmas Here
MASK: of Your choice I used my mask BBD_2011 Mask 83 Here
FONT: Of your choice

THINGS YOU NEED TO KNOW AND DO
Settings may differ slightly depending on Program and Kit used
Close original after you copy it unless I state otherwise.
RE-SIZE only one layer and sharpen once if needed
Left click and right click refers to mouse buttons.
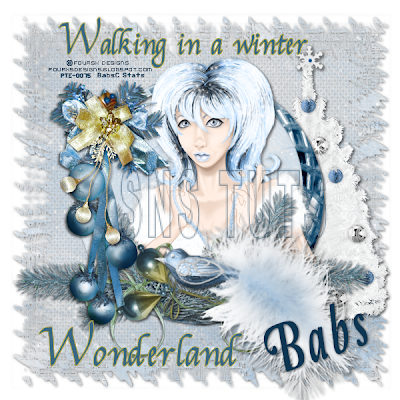
Refer to my image for placement of items.


HEADER

1. Open your tube and mask Minimize them for now.

2. Open a new transparent Image 600x600
Selections/select all
Select Paper 03 from the Kit
Re-size it all layers 25%
Edit/copy Edit/paste into selection on your image
Selections/select none
Minimize paper we will use it 2 more times

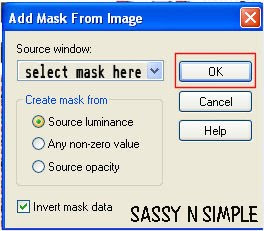
3. Layers/new mask layer/from image
Select BBD_2011_Mask 83 in window
(settings below)
Click Ok
Layers palette/right click/merge/merge group
Now re-size mask 105%

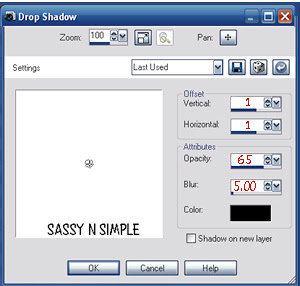
4. Effects/3D/Drop shadow
(settings below)
Click ok
5. Select Element 30 (tree) Edit/copy
Edit/paste as new layer into image
Re-size it 20% one layer
Adjust/sharpness/sharpen
Apply same drop shadow
Move to the right side of image do not go off mask

6. Select Element 04 (frame) from the kit
Edit/copy, edit/paste as new layer into image
Re-size it 30%
Adjust/sharpness/sharpen
Apply same drop shadow
Leave centered in image

7. Select magic wand (settings below)
Click inside the frame window
Selections/modify/expand 11
Keep selected


8. Layers palette/right click raster 1(tree)/add new raster layer
Bring up paper 03 Edit/copy
Edit/paste into selection on your image
Selections/select none
Minimize paper again

9. Select your tube Edit/copy
Edit/paste as new layer into your image above frame
Re-size as needed I re-sized mine 75%
Apply same drop shadow
Center it in frame If to much overlaps the frames bottom erase it

10. Select Element 38 (pine branch) edit/copy
Edit/paste as new layer into image
Re-size it 20% then re-size it again 85%
Adjust/sharpness/sharpen
Apply same drop shadow
Move to right bottom side of the frame

11. Layers palette/right click/duplicate branch 1 time
Image mirror

12. Open Element 23 (baubles) edit/copy
Edit/paste as new layer into image
Re-size it 15% then again 85%
Adjust/sharpness/sharpen

13. Image/free rotate 115 right
Apply drop shadow
Place at bottom slightly to left of the center

14. Select Element 20 (ball cluster) Edit/copy
Edit/paste as new layer into image
Re-size 20% Adjust/sharpness/sharpen
Image/mirror
Apply same drop shadow
Move to the left side of frame

15. Select element 37 from the kit Edit/copy
Edit/paste as new layer into your image
Re-size 15% Adjust/sharpness/sharpen
Apply same drop shadow
Move on top of blue balls

16. Select Element 29 (ball cluster) Edit/copy
Edit/paste as new layer into image
Re-size 20% re-size again 90 %
Image/free rotate 20.00 right
Adjust/sharpness/sharpen
Apply same drop shadow
Move to the bottom of frame slightly to the right of center

17. Apply your text at this time

18. Add a new raster layer apply copyrights and watermarks

19. Layers/palette right click any layer/merge/merge visible
Save your image in png format


BACKGROUND


1. Open a new transparent image 1600x300
Selections/select all
Pull up paper 3 Edit undo re-size
Using your selection tool (settings below)
Draw a rectangle we only want the blue of the paper
Avoiding the white edges
Edit/copy Edit/paste into selection on your image
Selections/select none
2. Effects /image effects/seamless tiling
default settings

3. Select Element 20 (ball cluster) edit copy
Edit/paste as new layer into your image
Re-size 15%
Adjust/sharpness/sharpen
Apply same drop shadow
Move to left border centering it

4. Select Element 37 edit/copy
Edit/paste as new layer into image
Re-size 15% then re-size 85%
Adjust/sharpness/sharpen
Apply same drop shadow
Move on top of blue balls

5. Layers/palette right click/merge/merge visible

6. Now lets save our image go to File/export/jpeg optimizer value set at 30

7. Save your image now
File/export/jpeg optimizer value 30

Thanks for Trying my Tutorial I hope you Enjoyed it.


I want to thank Marsha and Ruth for testing my tutorials.

If You use my tutorials Please include a credit and Link back to
My groups in your footer
http://groups.yahoo.com/group/sassynsimple/
http://groups.yahoo.com/group/ourpsphideaway/

My Tutorial Site is
http://sassynsimple.blogspot.com/
I also have some exclusive stationary Tutorials that I only share in My Groups
HERE or HERE

©SassynSimple Tutorials

Saturday, November 28, 2009

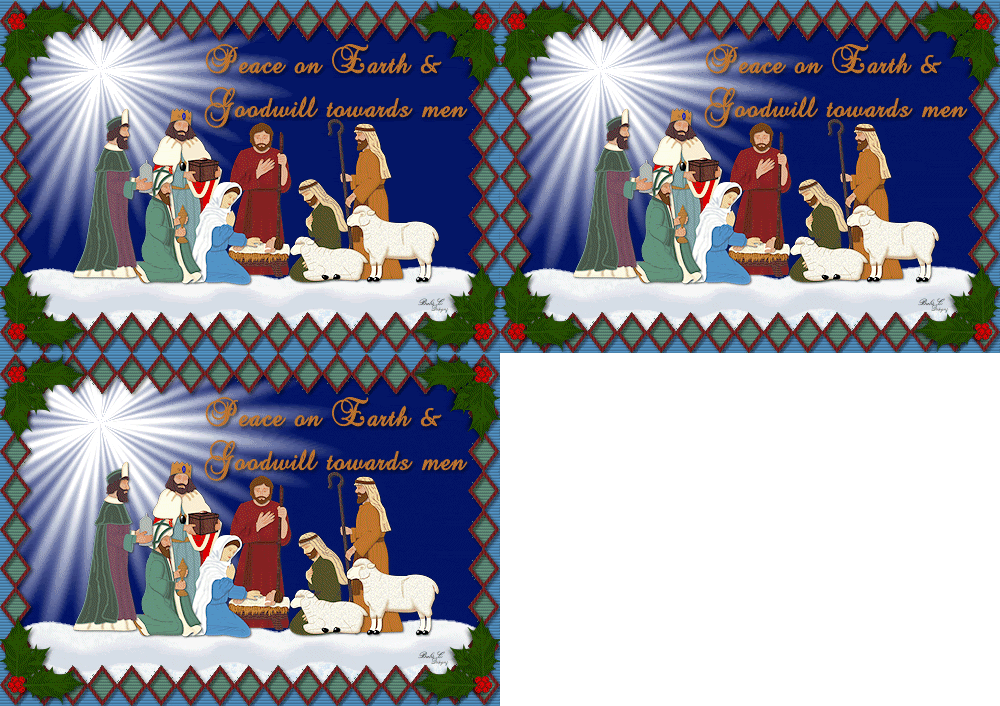
PEACE ON EARTH TUTORIAL 64


©SassynSimple Tutorials
DATE WRITTEN: Nov 28, 2009

THINGS NEEDED
Jasc Paintshop Pro or Corel Paint Program Settings may vary slightly.
You must have a good working knowledge of the programs I use.
KIT: Ali FTU Christmas in July HERE
PLUGINS: VM Natural Sparkle. Eye Candy 5 Nature snowdrift
MY SUPPLIES: HERE
If you choose a different kit re-sizing may change.

Let's Begin
A few things you need to know and will not repeated.
We will use same drop shadow unless I state otherwise.
Always Close original image after you copy unless stated otherwise.
Always sharpen re-sized items one time.

1. Select the sns_diamond frame template and the sns_Peace On Earth Brush. From my supplies. Export the Brush into your brushes. Click Here if you do not how to export the brush Step 12.

2. Select the background Layer in your template
in your foreground select #5793c7
Flood fill the background layer.


3. Effects/textures effects//blinds
(settings below)


4. Select your frame back layer in your layers palette
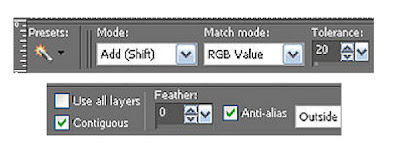
Select your magic wand tool
(settings below)
Click any where on the rectangle and this will select it.
Select #033765 as your color in your foreground
. Now flood fill the selection. Selections/select none.
5. Select your snowborder layer
In your Foreground color select #d1e3f3 as your color.
Click on it with your magic wand .
Now flood fill the selection with your color.
Selections/select none.


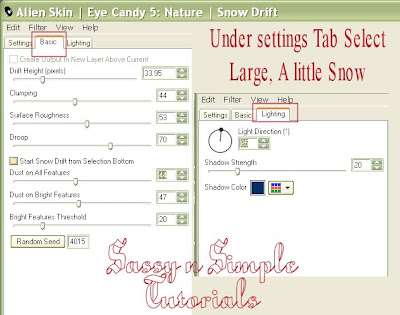
6. Effects/Plugins/Eye Candy 5 Nature/Snowdrift
(settings Below)
Click OK


7. Select the Nativity Scene, Edit/copy,
Edit/paste as new layer into your image.
Re-size it 50%
Center in your image.


8. Still on tube layer Effects/3D/drop shadow
Vertical and horizontal 2
Opacity 70
Blur 5.00
color black
Shadow on new layer not checked

9. Select the diamondback layer.
Under selections tab do all of the following..

A. select all,
B. select float.
C. Select defloat. (keep selected

10. In your foreground color put #66937f
Flood fill the selection. Keep Selected


11. Effects/Texture Effects/ Blinds
same settings as before.
Selections/select none


12. Select the diamond border layer.
under selections tab do all of the following..

A. select all,
B. select float.
C. Select defloat. (keep Selected)

13. In your foreground color put in #8f2726.
flood fill the selection.
Effects/Texture Effects/Blinds this time uncheck horizontal.
Selections/select none.
Apply same drop shadow.


14. Add a new raster Layer.
Select your brush tool
Find the sns_Peace On Earth Brush size 256.
Select #c0762d color in your foreground color.
Apply the brush by left clicking your mouse '
you may want to click mouse several times to get it darker enough.
Apply Same drop shadow.


15. Select the holly leaf elemet from the kit Edit/copy,
Edit/paste as new layer into your image.
Re-size it 15%
Apply your drop shadow.
Move it to your bottom left corner of your Image
Layers palette/right click Duplicate it 1 time
image/mirror.
Right click Duplicate merge/merge down.
Layers palette/right click Duplicate merged holly layer 1 time
Image/flip


16. Apply your Watermark.
Close off background and Frameback layer
Layers palette/right click any open layer/merge/Merge visible.
Open back up the other layers.


ANIMATION
Open your animation shop and minimize for now I will refer to it as A.S.

1. In Psp Duplicate your frame back layer 2 times.

2. Starting with your bottom Frame back layer
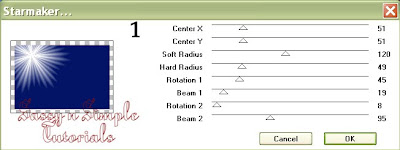
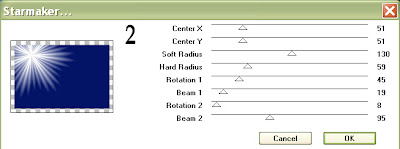
Effects/Plugins/Vm/Natural/Star maker
(settings below).


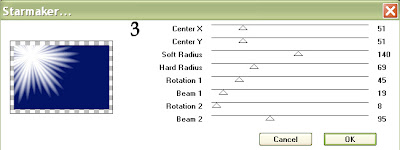
3,. Select the middle frame back layer layer
Effects/Plugins/Vm/Star maker
(settings below).
In layers palette click on the eye and close off this
layer.

4. Select the top frame back layer layer
Effects/Plugins/Vm/Star maker
(settings below).
In layers palette click on the eye and close off this layer.

5. Edit/Copy merged.
Take it to A.S.
right click anywhere in the workspace paste as new animation.


6. Back in PSP click the eye to cloose off the bottom frame back layer.
Open the middle frame back layer.
Edit/copy Merged.
Take it to A.S. right click first frame paste/paste after current frame.


7. Back in PSP close off the middle frame back layer.
Open the top frame back layer.
Edit/copy merged.
Take it to A.S. right click frame paste/paste after current frame.


8. Save your animation I did not change my display time. If you need to know Optimization settings click HERE

BACKGROUND.

1. Open new transparent image. 1280x300. Select #5793c7 color in your foreground color. Flood fill your image.

2. Effects/Texture Effects/Blinds
Same settings as in Step 3 in the header make sure you check horizontal back. Click Ok


3. Add a new raster layer.
Selections/Select All.
Select your nativity tube
Re-size it 50% all layers Edit/Copy,
Edit/paste into selection.
Selections/Select none.


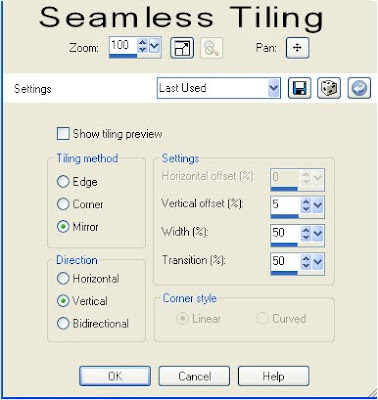
4. Effects/Image Effects/Seamless Tiling Default settings.
In layers palette change the blend to soft light.
Reduce the opacity to 75 or to your likening.


5. Right click in your layers palette Merge/merge visible.
I did not use seamless tiling.


6. Select the sns_background border from supplies.
Select the Diamond Back Edit/copy,
Edit/paste as new layer into your image.
Move it to the Left border of your image.
Make sure to keep it centered.


7. Under selections tab do all of the following..
A. select all,
B. select float.
C. Select defloat.

8. Select color #66937f in your foreground color
flood fill the selection

Effects/Texture Effects/Blinds same settings as before.
Selections/select none


9. Now Select the diamond frame Edit/copy,
Edit/paste as new layer into your image.
Move it to the Left border of your image.
Make sure to keep it centered over your Diamond back.


10. Under selections tab do all of the following..
A. select all,
B. select float.
C. Select defloat.

11. Select color #8f2726 in your foreground color
flood fill the selection

Effects/Texture Effects/Blinds same settings as before.
But uncheck Horizontal. Selections/select none
Apply same drop shadow.


12. Close off your merged layer

Right click on any visible layer in layers palette merge/merge visible. Now duplicate your merged border move it over beside the other Layer.
Space slightly apart..
Merge Visible again and Apply same drop shadow.


13. Layers palette Open back up your closed layer.
Layers palette/Right click merge Visible.


Save your Image in the folder you made, by going to File/Export/Jpeg Optimizer Value set at 30


Thanks for trying my tutorial I hope you enjoyed it

If You use my tutorials in Stationary Please apply Credit Below

Tutorial by Babs C
HERE or HERE

You can copy and paste the above if that does not work use Links below
http://groups.yahoo.com/group/sassynsimple/
http://snsstats.blogspot.com/

My newer Stationary Tutorials are in Incredimail Letter form
in order to access them you must be a member of my group
Our PSP HideAway

©SassynSimple Tutorials
Wednesday, November 18, 2009

WISHING YOU TUTORIAL 62


©SassynSimple Tutorials
DATE WRITTEN: Nov 18. 2009

THINGS NEEDED
Jasc Paintshop Pro or Corel Paint Program Settings may vary slightly.
You must have a good working knowledge of the programs I use.
TUBE: NONE
KIT: Ithas FTU CollaKit Christmas Red-Green HERE
FONT: Font of your choice
PLUGINS: Vanderlee snow HERE
If you choose a different kit re-sizing may change.

Let's Begin
A few things you need to know and will not repeated.
We will use same drop shadow unless I state otherwise.
Always Close original image after you copy unless stated otherwise.
Always sharpen re-sized items one time.

HEADER

1. Open a new Transparent Image 500x400 Selections/Select All. In Gerdas Kit Select Paper 6 Gerda Kit. Edit/copy, Edit/Paste into Selection. Selections/select none.

2. Right click in Layers/add new layer. Selections/Select All. In Gerda’s Kit Select Frame 2, Kit Edit/copy, Edit/paste into selection. Selections/Select none.

3. Still on Frame Layer Effects/3D/drop shadow (settings Below). Now go back and apply the drop shadow again Change Vertical and Horizontal to -2
Vertical and horizontal 2
Opacity 70
Blur 5.00
color black
Shadow on new layer not checked

4. In Yvonne’s Kit Select Tree 3, Edit/copy, Edit/paste as new layer into your image. Re-size it 50% Apply Drop shadow but change Vertical and horizontal back to 2. Center in frame window.

5. In Syliva’s Kit select snowman element 01, Edit/copy, Edit/paste as new layer into your image. Re-size it 40%. Apply Same drop shadow. Place it on the right side of your tree.

6. In Patrick’s Kit select Bow 3A, Edit/copy, Edit/paste as new layer into your image. Re-size it 30%. Apply Drop shadow. Place it on the Left Top Corner over the frame. Duplicate it 1 time, Image/mirror. Right Click duplicate in layers palette Merge/merge down

7. Still on merged Bow Layer Duplicate 1 time. Image/flip.

8. Open the Gold Pattern included in the Kit. Select it under Patterns in your foreground/background Color. Angle 0 Scale 50

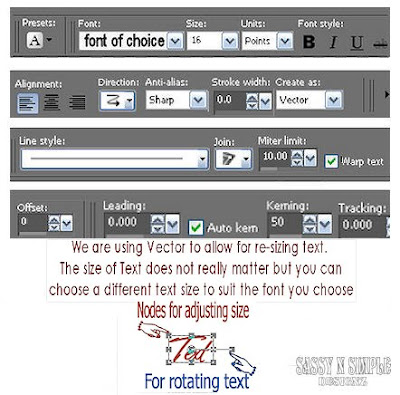
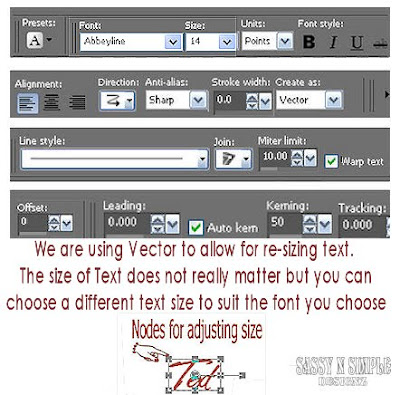
9. Select your Text Tool Font of Choice. I used Shrewsbury Titling (settings Below). Type out your Text. I typed out my two lines separate. With your nodes Size your Text. Right Click Text layer convert to raster. Apply Same drop shadow. Move it to the top Centered in Frame.

10. Name is optional Use same steps as in 9. To Rotate Use the rotate Bar Rotate Left. Move it to the Left bottom corner of your Image.

11. Then do the following Steps Toolbar under selections tab do all of the following..
A. select all,
B. select float.
C. Select defloat. D modify expand 2 Keep Selected.

12. Add a raster Layer under your Text Layer. Select the dark Green from frame in left click/foreground color. Flood fill the selection. Selections/Select none. Apply same drop shadow.

13. Add your watermark Close off Background Layer Merge Visible. Open your background layer back up and click on it to select it.

ANIMATION
(Open your Animation Shop I will refer to it as A.S.)

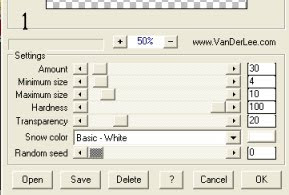
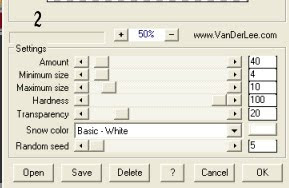
1. Back In PSP Add a New Raster Layer above your Image layer. Effects/Plugins/Vanderlee Snow (settings Below). Click Ok. Adjust/blur Motion Blur Angle 180 Strength 8.00. Keep this Layer Open.

2, Add a New Raster Layer Effects/Plugins/Vanderlee Snow (settings Below). Click Ok. Adjust/blur Motion Blur Angle 180 Strength 10.00. In Layers Palette click the eye and close this layer.


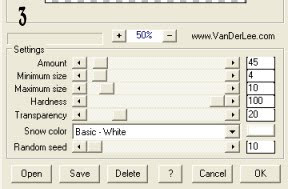
3, Add a New Raster Layer Effects/Plugins/Vanderlee Snow (settings Below). Click ok Adjust/blur Motion Blur Angle 180 Strength 12.00. In Layers Palette click the eye and close this layer.

4. Edit/Copy Merged, Take it to A.S. Right click in workspace paste as new animation.

5. Back in PSP. Close bottom Snow Layer, Open the Middle Snow Layer. Edit/copy merged. Take it to A.S. Right click first frame Paste/paste after current Frame.

6. Back I PSP Close the Middle Snow Layer. Open the Top Snow Layer. Edit/copy merged. Take it to A.S. Right Click frame/paste after current frame.

7. Still in A,S. Edit/Select All Now Right Click your First Frame/ Frame Properties Change display time to 20.

8. Save your Animation.

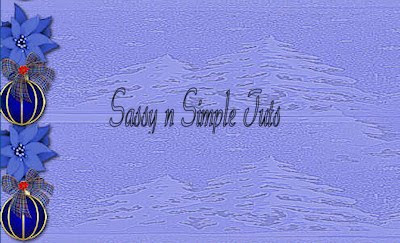
BACKGROUND

1. Open new transparent image. 1280x300. Selections/Select All. From Suzi kit Select paper 2. Edit/copy, Edit/Paste into Selection. Selections/select none. Effects/Edge Effects/Enhance More.

2, Add a New Raster Layer In your foreground Color use #6f101e. Flood fill the layer. In layers palette take Opacity down to 71. Right Click in layers palette merge/merge visible.

3. Effects/Image Effects/Seamless tiling (settings below)

4. In Yvonne’s Kit select Paper 5, Edit/copy, Edit/paste as new layer into your image. Re-size it 43%. Move it to the Left Border try to keep centered. Apply same drop border. I click on mover tool the use the arrow buttons on keyboard this keep image lined.

5, Merge Visible and apply step 3 again. Re-size it all layers/smart size 101. This keeps the line out of background

6. In Patrick’s Kit select Bow 3A Edit/copy, Edit/paste as new layer into your image. Re-size it 25.% move it over on to your Border. Apply Drop shadow. Duplicate Move them apart so that they are in the inward curves of the border.

Save your Image in the folder you made, by going to File/Export/Jpeg Optimizer Value set at 30

Thanks for trying my tutorial I hope you enjoyed it

If You use my tutorials in Stationary Please apply Credit Below

Tutorial by Babs C
HERE or HERE

You can copy and paste the above if that does not work use Links below
http://groups.yahoo.com/group/sassynsimple/
http://snsstats.blogspot.com/

My newer Stationary Tutorials are in Incredimail Letter form
in order to access them you must be a member of my group
Our PSP HideAway

©SassynSimple Tutorials

Wednesday, November 11, 2009

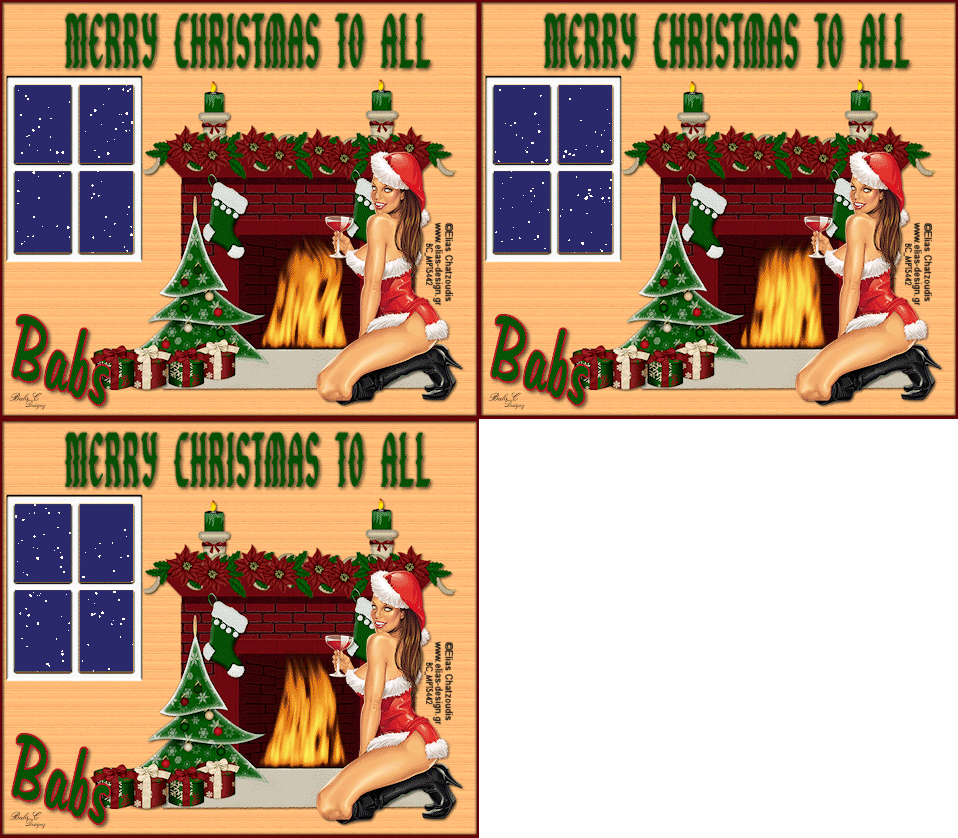
MERRY CHRISTIMAS TO ALL TUT 61


©SassynSimple Tutorials
DATE WRITTEN: Nov 11, 2009

THINGS NEEDED
Jasc Paintshop Pro or Corel Paint Program Settings may vary slightly.
You must have a good working knowledge of the programs I use.
TUBE: Elias Chatzoudis I have a License you must buy it at MYPSPTUBES
KIT: Simply Sensational FTU  Tis The Season HERE
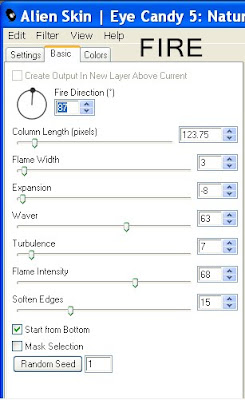
PLUGINS: Eye Candy 5 Nature Fire
MY SUPPLIES: HERE
If you choose a different kit re-sizing may change.

Let's Begin
The below steps must be done and will not be repeated.
We will use same drop shadow unless I state otherwise.
Always Close original image after you copy unless stated otherwise.
Always sharpen re-sized items one time.


1. Open a new Transparent Raster Image 800x700
Select your Foreground color use #2a2b6c
Flood fill your image


2. Select your Tube
Using your dropper tool left click/foreground color
Select a color from it that would look good as a wall
I used the skin color in my tube


3.Layers palette/right click add a new Raster layer
flood fill with your foreground color
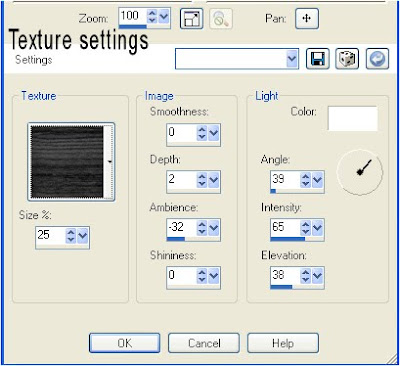
Effects/Texture Effects/Texture Wood Grain
(Apply Settings Below)


4. Select the window Template from my Supplies. Edit/copy
Edit/paste as new layer into your image
See my image for placemen
t
Under selections tab do all of the following
A. select all,
B. select float.
C. Select defloat.
D modify expand 2 (Keep Selected)

5. Select White in your foreground color
flood fill the Selection
Selections Select none


6. Select your magic wand
(settings below)
click inside each window until all are selected.
Click on you Wall Layer (raster Layer 2)
Edit/Clear
Selections/select none
7. Select Fireplace 2from the kit, Edit/copy
Edit/paste as new layer into your image
Re-size it 90% See my image for placement
Effects/3D/drop shadow

Vertical and horizontal 2
Opacity 70
Blur 5.00
color black
Shadow on new layer not checked

8. Select Stocking 1 from the kit, Edit/copy,
Edit/paste as new layer into your image.
Re-size 30%
Apply Drop shadow
Move so that it looks like it is hanging on the left side of fireplace below garland. Duplicate it Once move the other one over to the right side of fireplace.


9. Select Candle 4 Edit/copy, Edit/paste as new layer into your image below fireplace. Re-size it 30%. Apply drop shadow
move it to left side of fireplace so it looks as if sitting on it
Layers palette/right click Duplicate it 1 time
move it to the right side


10. Select Box 7 and 8 from the kit, Edit/copy
Edit/paste Each one as new layer into your image
Re-size 30%
Place them on the left side of your Christmas Tree
Apply same drop shadow to both


11. Layers palette click the eye to close your background
right click any open l layer/merge/ merge Visible


12. Select your Tube, Edit/copy
Edit/paste as new layer into your image
Re-size as needed. I re-sized mine 85%
. Apply drop shadow place it so that it is in front of fireplace


13. Using Dropper tool Select a color from image
left click/foreground color
right click/background color.
Click on your merged layer so text will be above it


14. Add your Text you want now

15. Open the Frame from my Supplies Edit/copy,
Edit/paste as new layer into your image.
Click on it with your magic wand tool.
Using your dropper select a color from image
Left click/foreground color
flood fill the selection.
Selections/ Select none
Apply your Drop shadow
Apply drop shadow again, Change vertical and horizontal to -2


16. Add a new raster layer apply your copyrights and watermark
Re-size all layers/smart size width 480 height will adjust


17 Select your selection your tool draw out a rectangle in the middle of your fireplace where the fire should be
Keep it Selected


18. Layers palette/right click add a new Raster Layer above merged layer
Effects/Eye Candy/Nature/Fire (Settings below) Keep selected.


19. Repeat step 18 two more times.
Each time Hit the random seed button Once.
You should have 3 Layers of Fire Now.
Selections Select none.
Rename your layers starting with Bottom layer going up.. Fire 1, Fire 2, Fire 3. You just right click on each layer click rename.
Layers palette click the eye close Fire 2 and 3


20.Layers palette/right click duplicate background layer 2 times
You Should have 3 layers now.


ANIMATION
Open Animation Shop

1. Open the snow-dizz animation in my supplies.
Click on First frame right click/copy.
Take it to PSP right click in workspace/paste as new image
Select it under patterns in your material palette
flood fill the original bottom Background Layer.
Close out the snowdizz animation you pasted in PSP
Select no when the window pops


2, Back in AS Click frame 2 right click/Copy
Take it to PsP right click in workspace/paste as new image
Find it in your Patterns.
Click on copy of (middle) background Image
In patterns find the new snowdizz select it
flood fill with your foreground pattern.
Click the eye to close off your middle background Layer.
Close out the image you pasted in PSP.
Select no when the window pops up


3, Back in AS Click right click frame 3 CopyTake it to PsP right click in workspace/paste as new image
Find it in your Patterns
Click on the top background Image
flood fill with the snow dizz
Layer palette click eye to close Close middle background Layer
Close out the frame you pasted
Select no when the window pops up
In animation Shop close the snow animation now


4. Back in PSP you should have only the fire 1 layer open
Bottom Background layer open. Edit/copy Merged
Take it to AS right click any where in work space paste as new animation


5. IN PSP Close Fire 1 and bottom background layer
Open Fire 2 and middle Background Layer
Edit/copy Merged
Take it to AS right click first frame Paste/paste after current frame


6. Back in PSP click the eye close fire 2 and middle background Layer
Open Fire 3 and top background Layer
Edit/copy merged. In AS right click first frame Paste/paste after current frame.


7. Now in AS click first Frame Edit/select all
Right click frame/frame properties change display time to 20


8. Save your Animation..


BACKGROUND

1. Open new transparent image. 1280x300.
Selection select all. Select paper 1 from the kit Edit/Copy
edit/paste into selection
Selections/ Select none


2, Layers palette/right click raster 1 add a new Raster Layer
With your selection Tool Draw out a rectangle
Starting at the Top 150 mark. Go all the way to the Left Border and entire length of Image


3. Select Paper 18 from the Kit Edit/copy
Edit/Paste into selection
Selections/select none
Apply drop shadowo change the Vertical and Horizontal Back to 2


4. Merge Visible. Effects/Image Effects/Seamless Tiling
(settings below)


4. Select Flower 1 from the Kit Edit/copy
Edit/paste as new layer into your image


5. Select bauble 2 and 4 from the Kit
Edit/copy each one
Edit/paste as new layer into your image.
Re-size 30%.
Apply your drop shadow.
Move them to the left Border
Place one that top and one a the bottom


Save your Image File/Export/Jpeg Optimizer Value set at 30

Thanks for trying my tutorial I hope you enjoyed it

If You use my tutorials in Stationary Please apply Credit Below

Tutorial by Babs C
HERE or HERE

You can copy and paste the above if that does not work use Links below
http://groups.yahoo.com/group/sassynsimple/
http://snsstats.blogspot.com/

My newer Stationary Tutorials are in Incredimail Letter form
in order to access them you must be a member of my group
Our PSP HideAway

©SassynSimple Tutorials

Saturday, November 7, 2009

WISHING YOU ALL TUTORIAL 60


©SassynSimple Tutorials
DATE WRITTEN: Nov 7, 2009

THINGS NEEDED
Jasc Paintshop Pro or Corel Paint Program
You must have a good working knowledge of the programs I use.
Graphic: Jon Rattenbury is a PTU i got it at MyPSPTubes License MPT5442
PLUGINS: VM Natural/stardust
MY SUPPLIES: HERE

Let's Begin
The below steps must be done and will not be repeated.
We will use same drop shadow unless I state otherwise.
Always Close original image after you copy unless stated otherwise.
Always sharpen re-sized items one time.

1. Select and open your Tube
Using your dropper tool select your colors from image
left click/color/foreground a light color
right click/background color select a dark color
right click on your mouse

2. Open a new transparent image 700X600
Flood fill with your dark/background color

3. Layers palette/right click add a new raster Layer
Selections/Select all
Click on your Tube now Edit/copy
Edit/paste into selection
Selections select none

4. Effects/Plugins/Itatlian Picture In Picture Miscela 186

5. Effects/Edge Effects/Enhance more

6. Layers palette/right click add a new raster layer
flood fill it with your foreground color
layers palette take opacity down to 78
Now Right click on your filled layer Merge/merge down

7. Edit/copy
Edit/paste as new image
minimize this Image for now we will use it in our background

8. Back to your Original Image (merged)
Re-size this to 95%

layers palette right click rename this layer stardust

9. Still on merged Layer Effects/3D/drop shadow
Vertical and horizontal 2
Opacity 70
Blur 5.00
color black
Shadow on new layer not checked
Now Repeat drop shadow,Vertical/Horizontal to -2

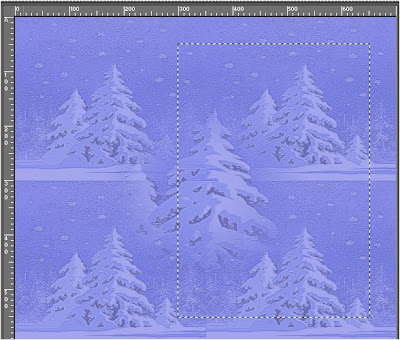
10. Select your selections tool
Start at 300 top ruller ruler mark draw out to 600 top ruler mark
Down to 550 Side ruler
(See Image below)

11. Layers palette/right click add a New Raster Layer
Edit/paste the selection from your image into selection into your image
Keep Selected

12. Selections/modify/Expand 9
Layers palette/right click add a new raster layer below the selection image
Right click to flood fill with your dark/background color
Selections/select none

13. Still on Dark Color selection Layer
Effects/3D/drop shadow
Vertical and horizontal -2
Opacity 70
Blur 5.00
color black
Shadow on new layer not checked
Now Repeat drop shadow. change Vertical/Horizontal to 2

14. Using Dropper Tool Select a really dark color from your image
left click/foreground color
right click/background color

15. Select your Text Tool
(settings below)
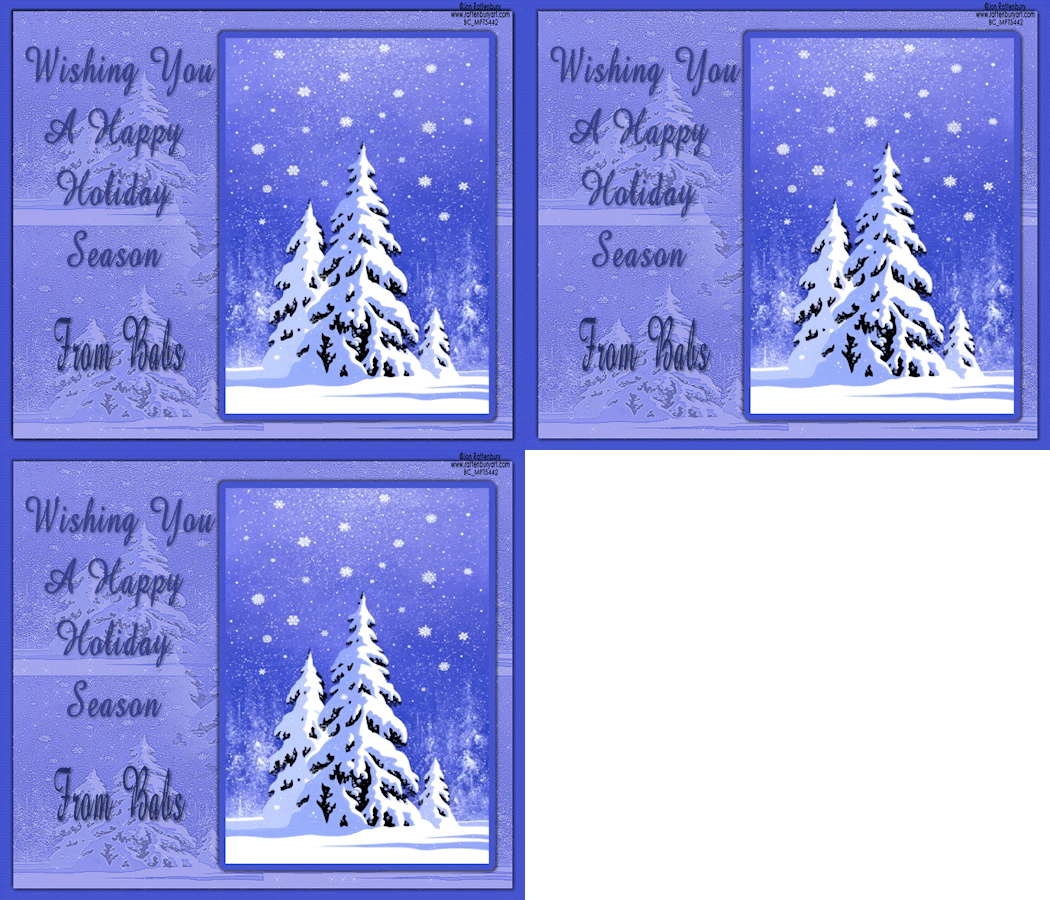
Type out “Wishing you
Layers palette/right click convert to raster layer once you size it
repeat this for all the other words
Apply drop shadow


16. Layers palette/right click add a new raster layers
Add your watermark and Copyrights
Click the eye in the layers palette to close off bottom two layers
right click any open layer/merge/merge visible
Re-size your image so that your height is 450 width will adjust.


ANIMATION
Open your Animation Shop now. I will refer to it as A.S.

1. Layers palette/right click stardust layer/Duplicate it 2 times
Click back on original Stardust bottom layer
Under Selections Tab Selections/select all
Selections/float
Selections/defloat
You must keep it selected

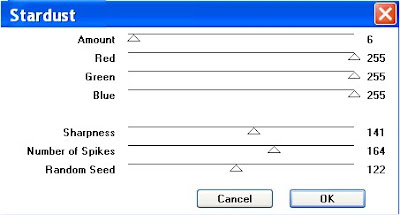
2, Effects/Plugins/VM Natural Stardust
apply the setting below
Do not close this Layer
proceed to next step 3, Select the middle stardust layer
Apply the VM Natural Stardust change random seed to 132
Layers palette click the eye close this layer

4. Select the Top stardust layer
Apply the VM Natural Stardust change random seed to 142
Layers palette click the eye close this layer

5. Edit/Copy Merged
Take it to AS
right click anywhere in the workspace/ paste as new image

6. Back in PSP Click the eye to close the bottom star dust Layer
Open your middle Stardust layer Edit/copy merged
Take it to AS right click on first frame/ Paste/Paste after current frame

7. Back in PSP click the eye to close off the middle stardust layer
Open the top stardust Layer Edit/copy merged
Take it to AS right click on second frame. Paste/Paste after current frame

8. Now save your animation in a folder so that you know where it is.

BACKGROUND

1. Open new transparent image. 1280x300.
or your desired width
Selection select all.
Open the Image I had you save Edit/copy
Edit/Paste into selection. Selections Select none

2. Effects/Image Effects/Seamless Tiling
(see settings below) 3. Select the BFD_CJ_Flower5 from my supplies, Edit/copy
Edit/paste as new layer into your image
Re-size it 25%
Adjust Hue/Saturation/colorize Hue 162 Saturation 143
Now apply your drop shadow
move it to the top left border of your image
Layers palette/right click/ Duplicate 1 time
move duplicate down leaving a space between them

4. Select the BFD_CJ_Ball10 from the supplies, Edit/copy,
Edit/paste as new layer into your image.
Re-size it 15%
Apply your drop shadow
Move it to the left border in between the flowers.
Layers palette/right click Duplicate 1 time
move the duplicate down to the bottom of your image
but spaced a little above the bottom.

5. Select the BFD_CJ_Bow from the supplies, Edit/copy,
Edit/paste as new layer into your image.
Re-size it 15%
Apply your drop shadow.
Move it to the left border over your first ball.
Layers palette/right click Duplicate 1 time and
move duplicate down over the other ball.
Save your Image File/Export/Jpeg Optimizer Value set at 30


If You use my tutorials in Stationary Please apply Credit Below

Tutorial by Babs C
HERE or HERE

You can copy and paste the above if that does not work use Links below
http://groups.yahoo.com/group/sassynsimple/
http://snsstats.blogspot.com/

My newer Stationary Tutorials are in Incredimail Letter form
in order to access them you must be a member of my group
Our PSP HideAway

©SassynSimple Tutorials