


©SassynSimple Tutorials
DATE WRITTEN: Nov 28, 2009
THINGS NEEDED
Jasc Paintshop Pro or Corel Paint Program Settings may vary slightly.
You must have a good working knowledge of the programs I use.
KIT: Ali FTU Christmas in July HERE
PLUGINS: VM Natural Sparkle. Eye Candy 5 Nature snowdrift
MY SUPPLIES: HERE
If you choose a different kit re-sizing may change.
Let's Begin
A few things you need to know and will not repeated.
We will use same drop shadow unless I state otherwise.
Always Close original image after you copy unless stated otherwise.
Always sharpen re-sized items one time.
1. Select the sns_diamond frame template and the sns_Peace On Earth Brush. From my supplies. Export the Brush into your brushes. Click Here if you do not how to export the brush Step 12.
2. Select the background Layer in your template
in your foreground select #5793c7
Flood fill the background layer.
3. Effects/textures effects//blinds
(settings below)

4. Select your frame back layer in your layers palette
Select your magic wand tool
(settings below)
Click any where on the rectangle and this will select it.
Select #033765 as your color in your foreground
. Now flood fill the selection. Selections/select none.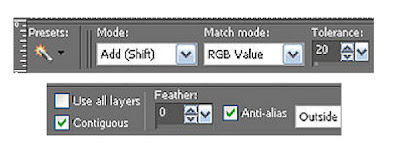
Select your magic wand tool
(settings below)
Click any where on the rectangle and this will select it.
Select #033765 as your color in your foreground
. Now flood fill the selection. Selections/select none.

5. Select your snowborder layer
In your Foreground color select #d1e3f3 as your color.
Click on it with your magic wand .
Now flood fill the selection with your color.
Selections/select none.
6. Effects/Plugins/Eye Candy 5 Nature/Snowdrift
(settings Below)
Click OK
In your Foreground color select #d1e3f3 as your color.
Click on it with your magic wand .
Now flood fill the selection with your color.
Selections/select none.
6. Effects/Plugins/Eye Candy 5 Nature/Snowdrift
(settings Below)
Click OK

7. Select the Nativity Scene, Edit/copy,
Edit/paste as new layer into your image.
Re-size it 50%
Center in your image.
8. Still on tube layer Effects/3D/drop shadow
Vertical and horizontal 2
Opacity 70
Blur 5.00
color black
Shadow on new layer not checked
9. Select the diamondback layer.
Under selections tab do all of the following..
A. select all,
B. select float.
C. Select defloat. (keep selected
10. In your foreground color put #66937f
Flood fill the selection. Keep Selected
11. Effects/Texture Effects/ Blinds
same settings as before.
Selections/select none
12. Select the diamond border layer.
under selections tab do all of the following..
A. select all,
B. select float.
C. Select defloat. (keep Selected)
13. In your foreground color put in #8f2726.
flood fill the selection.
Effects/Texture Effects/Blinds this time uncheck horizontal.
Selections/select none.
Apply same drop shadow.
14. Add a new raster Layer.
Select your brush tool
Find the sns_Peace On Earth Brush size 256.
Select #c0762d color in your foreground color.
Apply the brush by left clicking your mouse '
you may want to click mouse several times to get it darker enough.
Apply Same drop shadow.
15. Select the holly leaf elemet from the kit Edit/copy,
Edit/paste as new layer into your image.
Re-size it 15%
Apply your drop shadow.
Move it to your bottom left corner of your Image
Layers palette/right click Duplicate it 1 time
image/mirror.
Right click Duplicate merge/merge down.
Layers palette/right click Duplicate merged holly layer 1 time
Image/flip
16. Apply your Watermark.
Close off background and Frameback layer
Layers palette/right click any open layer/merge/Merge visible.
Open back up the other layers.
ANIMATION
Open your animation shop and minimize for now I will refer to it as A.S.
1. In Psp Duplicate your frame back layer 2 times.
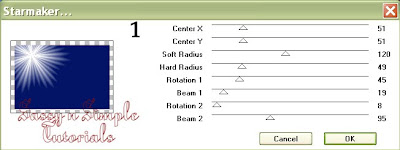
2. Starting with your bottom Frame back layer
Effects/Plugins/Vm/Natural/Star maker
(settings below).
Edit/paste as new layer into your image.
Re-size it 50%
Center in your image.
8. Still on tube layer Effects/3D/drop shadow
Vertical and horizontal 2
Opacity 70
Blur 5.00
color black
Shadow on new layer not checked
9. Select the diamondback layer.
Under selections tab do all of the following..
A. select all,
B. select float.
C. Select defloat. (keep selected
10. In your foreground color put #66937f
Flood fill the selection. Keep Selected
11. Effects/Texture Effects/ Blinds
same settings as before.
Selections/select none
12. Select the diamond border layer.
under selections tab do all of the following..
A. select all,
B. select float.
C. Select defloat. (keep Selected)
13. In your foreground color put in #8f2726.
flood fill the selection.
Effects/Texture Effects/Blinds this time uncheck horizontal.
Selections/select none.
Apply same drop shadow.
14. Add a new raster Layer.
Select your brush tool
Find the sns_Peace On Earth Brush size 256.
Select #c0762d color in your foreground color.
Apply the brush by left clicking your mouse '
you may want to click mouse several times to get it darker enough.
Apply Same drop shadow.
15. Select the holly leaf elemet from the kit Edit/copy,
Edit/paste as new layer into your image.
Re-size it 15%
Apply your drop shadow.
Move it to your bottom left corner of your Image
Layers palette/right click Duplicate it 1 time
image/mirror.
Right click Duplicate merge/merge down.
Layers palette/right click Duplicate merged holly layer 1 time
Image/flip
16. Apply your Watermark.
Close off background and Frameback layer
Layers palette/right click any open layer/merge/Merge visible.
Open back up the other layers.
ANIMATION
Open your animation shop and minimize for now I will refer to it as A.S.
1. In Psp Duplicate your frame back layer 2 times.
2. Starting with your bottom Frame back layer
Effects/Plugins/Vm/Natural/Star maker
(settings below).

3,. Select the middle frame back layer layer
Effects/Plugins/Vm/Star maker
(settings below).
In layers palette click on the eye and close off this layer.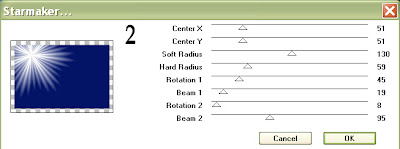
Effects/Plugins/Vm/Star maker
(settings below).
In layers palette click on the eye and close off this layer.

4. Select the top frame back layer layer
Effects/Plugins/Vm/Star maker
(settings below).
In layers palette click on the eye and close off this layer.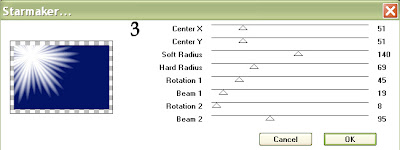
Effects/Plugins/Vm/Star maker
(settings below).
In layers palette click on the eye and close off this layer.

5. Edit/Copy merged.
Take it to A.S.
right click anywhere in the workspace paste as new animation.
6. Back in PSP click the eye to cloose off the bottom frame back layer.
Open the middle frame back layer.
Edit/copy Merged.
Take it to A.S. right click first frame paste/paste after current frame.
7. Back in PSP close off the middle frame back layer.
Open the top frame back layer.
Edit/copy merged.
Take it to A.S. right click frame paste/paste after current frame.
8. Save your animation I did not change my display time. If you need to know Optimization settings click HERE
BACKGROUND.
1. Open new transparent image. 1280x300. Select #5793c7 color in your foreground color. Flood fill your image.
2. Effects/Texture Effects/Blinds
Same settings as in Step 3 in the header make sure you check horizontal back. Click Ok
3. Add a new raster layer.
Selections/Select All.
Select your nativity tube
Re-size it 50% all layers Edit/Copy,
Edit/paste into selection.
Selections/Select none.
4. Effects/Image Effects/Seamless Tiling Default settings.
In layers palette change the blend to soft light.
Reduce the opacity to 75 or to your likening.
5. Right click in your layers palette Merge/merge visible.
I did not use seamless tiling.
6. Select the sns_background border from supplies.
Select the Diamond Back Edit/copy,
Edit/paste as new layer into your image.
Move it to the Left border of your image.
Make sure to keep it centered.
7. Under selections tab do all of the following..
A. select all,
B. select float.
C. Select defloat.
8. Select color #66937f in your foreground color
flood fill the selection
Effects/Texture Effects/Blinds same settings as before.
Selections/select none
9. Now Select the diamond frame Edit/copy,
Edit/paste as new layer into your image.
Move it to the Left border of your image.
Make sure to keep it centered over your Diamond back.
10. Under selections tab do all of the following..
A. select all,
B. select float.
C. Select defloat.
11. Select color #8f2726 in your foreground color
flood fill the selection
Effects/Texture Effects/Blinds same settings as before.
But uncheck Horizontal. Selections/select none
Apply same drop shadow.
12. Close off your merged layer
Right click on any visible layer in layers palette merge/merge visible. Now duplicate your merged border move it over beside the other Layer.
Space slightly apart..
Merge Visible again and Apply same drop shadow.
13. Layers palette Open back up your closed layer.
Layers palette/Right click merge Visible.
Save your Image in the folder you made, by going to File/Export/Jpeg Optimizer Value set at 30
Thanks for trying my tutorial I hope you enjoyed it
If You use my tutorials in Stationary Please apply Credit Below
Tutorial by Babs C
HERE or HERE
You can copy and paste the above if that does not work use Links below
http://groups.yahoo.com/group/sassynsimple/
http://snsstats.blogspot.com/
My newer Stationary Tutorials are in Incredimail Letter form
in order to access them you must be a member of my group
Our PSP HideAway
©SassynSimple Tutorials