
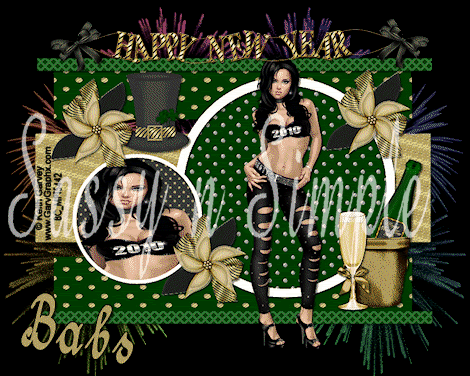

©SassynSimple Tutorials
DATE WRITTEN: De4c 22, 2009
THINGS NEEDED
Jasc Paintshop Pro or Corel Paint Program Settings may vary slightly.
You must have a good working knowledge of the programs I use.
TUBE: Keith Garvey I have a license you must buy it at MPT
KIT: Fantasy Moments FTU Happy New Year HERE
PLUGINS: Unplugged Effects Disco Lights
FONT: of your Choice
MY SUPPLIES: HERE
If you choose a different kit re-sizing may change.
Let's Begin
A few things you need to know and will not repeated.
We will use same drop shadow unless I state otherwise.
Always Close original image after you copy unless stated otherwise.
Always sharpen re-sized items one time.
1. Open BBD_Template_16.
Delete My Logo layer.
Tubes you need a regular tube and a close up tube
2. Select the background Layer.
foreground color select Black.
Flood fill your image.
3. Select the Fireworks element 28 from the kit, Edit/copy,
Edit/paste as new layer into your image.
Re-size 80%.
Move to the right side of your image.
4. Still on Fireworks Layer
layers Palette Right click/ duplicate 1 time.
Image/mirror your duplicate.
Right click again merge/merge down.
Both fireworks should be merged now.
Right click/rename it fireworks.
5. Select Line 1. With your magic wand
(settings below)
click on the line.
Selections/modify/expand 1.
Select Paper 18 from the kit Edit/copy,
Edit/paste into selection.
Selections Select none.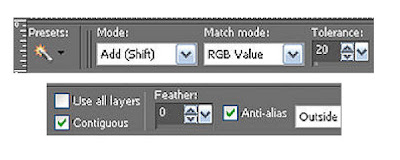 6. Still on line 1 layer. Effects/3D/drop shadow
Vertical and horizontal 2
Opacity 70
Blur 5.00
color black
Shadow on new layer not checked
7. Select Lines 2.
With your magic wand click on both lines.
Selections/modify/expand 1.
Select Paper 2 from the kit Edit/copy,
Edit/paste into selection.
Selections Select none.
Apply same drop shadow.
8. Select Paper 16 from the kit.
Select the paper under patterns in materials palette
In Foreground color
Angle 0 Scale 30.
9. Click on Lines 3 select both lines with your magic wand.
Selections/modify/Expand 1.
Select Paper 2 from the kit, edit/copy
Edit/paste into selection.
Selections/Select None.
Apply same drop shadow.
8. Click on the Large Circle layer.
Using your magic wand click on the circle.
Selections/modify/Expand 1.
Select paper 4 from the kit, edit/copy,
edit/paste into selection.
Selections/select none.
Apply same drop shadow.
10. Select the large Circle Frame Layer.
Apply same drop shadow.
11. Select your Regular Tube, Edit/copy,
Edit/paste as new layer into your image.
Re-size if needed. I did not re-size
Place the tube in the center over your Large Circle.
Apply same drop shadow.
12. With your magic wand click on the small Circle.
Selections/modify/Expand 1.
Select Paper 1 from the kit, edit/copy,
edit/paste into Selection.
Keep Selected.
13. Add a new raster layer above your small circle Layer.
Select your close up tube, Edit/copy,
Edit/paste into selection.
Selections/Select none.
Apply same drop shadow.
14. Click on the small Circle frame. Apply same drop shadow.
15. Select Happy New year element 19, Edit/copy,
Edit/paste as new layer into your image.
Re-size it 50%.
Apply same drop shadow.
Move to the top of your image.
16. Select bucket element 35 from the kit, Edit/copy,
Edit/paste as new layer into your image.
Re-size it 40%.
Apply same drop shadow.
Place on the right side of your large circle.
17. Select glass element 77 from the kit, Edit/copy,
Edit/paste as new layer into your image.
Re-size it 20%.
Apply same drop shadow
place by your bucket.
18. Select hat element 54, Edit/copy,
Edit/paste as new layer into your image.
Re-size it 30%.
Apply same drop shadow.
Place it on the left side of large circle.
19. Select flower bow element 70 from the kit, Edit/copy,
Edit/paste as new layer into your image.
Re-size it 30%.
Apply same drop shadow
Layers palette right click /Duplicate it 2 times
arrange them to your liking.
20. Close off your background layer and fireworks layers.
In layers palette right click any open layer merge/merge visible.
Re-size 90%.
21. Layers palette right click add a new raster layer
apply your watermarks and copyrights.
Re-size all layers/smart size so that width is 470.
Open your background and fireworks layers back up.
22. Putting your name on the stat is optional.
ANIMATION
Open Animation shop minimize for now.
1. Duplicate your fireworks Layer 2 times.
2. Starting with Top fireworks Layer copy 2
Effects/Plugins/Unplugged Effects/Disco Lights
(settings below).
Click Ok.
In layers palette click the eye to close off this layer.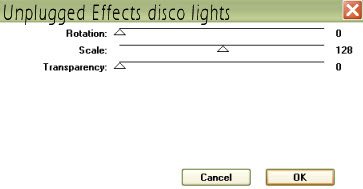
3. Select the Middle (copy of fireworks) Layers.
Apply the disco Lights again but change the rotation to 45.
Click OK.
In layers palette close off this layer by clicking the eye.
4. Select the bottom (fireworks) Layer.
Apply the disco Lights again.
Change the rotation to 90. Click Ok.
5. Edit/copy/copy merged.
Take it to Animation Shop
right click anywhere in the workspace paste as new animation.
6. Back in PSP Close the bottom fire works layer.
Open the middle fireworks layer. Edit/copy/copy merged
Take it to Animation Shop
right click first frame/paste/paste after current frame.
7. Back in PSP Close the middle fire works layer.
Open the top fireworks layer. Edit/copy/copy merged..
Take it to Animation Shop
right click second frame/paste/paste after current frame.
8. I did not change the display time.
Save your animation in a folder where you can find it.
BACKGROUND.
1. Open new transparent image. 1280x200.
Select the color black in your foreground color and flood fill your image.
2. Effects/Image Effects/Seamless tiling
(settings below)

3. Select Flower Elements 58, 59, 60 from the kit. Edit/Copy,
Edit/Paste each one into your image.
Re-size them 15%.
Apply your same drop shadow to each one.
Arrange them in Left top corner of our image
The white one should be in the corner and the other two below it.
4. Once happy with arrangement
layers palette click the eye to close off your background layer.
Merge/merge visible.
Duplicate 1 time Image/flip.
5. Select flower bow element 68, Edit/copy,
Edit/paste as new layer into your image.
Re-size it 30%.
Apply same drop shadow.
Move it over in the center of the other flowers.
6. Select Happy new year banner 19.
Using your selection tool
draw a rectangle around just the happy new year. Edit/copy,
Edit/paste as a new image.
Now resize it so that width is 300.
7. Still on the Happy new banner image you just re-sized, Edit/copy,
Edit/paste as new layer into your image.
Image/Free rotate 90 Left
Uncheck the following boxes
Rotate all layers
Rotate single layer around canvas
Arrange it next to your flowers.
Save your Image in the folder you made
by going to File/Export/Jpeg Optimizer Value set at 30
DATE WRITTEN: De4c 22, 2009
THINGS NEEDED
Jasc Paintshop Pro or Corel Paint Program Settings may vary slightly.
You must have a good working knowledge of the programs I use.
TUBE: Keith Garvey I have a license you must buy it at MPT
KIT: Fantasy Moments FTU Happy New Year HERE
PLUGINS: Unplugged Effects Disco Lights
FONT: of your Choice
MY SUPPLIES: HERE
If you choose a different kit re-sizing may change.
Let's Begin
A few things you need to know and will not repeated.
We will use same drop shadow unless I state otherwise.
Always Close original image after you copy unless stated otherwise.
Always sharpen re-sized items one time.
1. Open BBD_Template_16.
Delete My Logo layer.
Tubes you need a regular tube and a close up tube
2. Select the background Layer.
foreground color select Black.
Flood fill your image.
3. Select the Fireworks element 28 from the kit, Edit/copy,
Edit/paste as new layer into your image.
Re-size 80%.
Move to the right side of your image.
4. Still on Fireworks Layer
layers Palette Right click/ duplicate 1 time.
Image/mirror your duplicate.
Right click again merge/merge down.
Both fireworks should be merged now.
Right click/rename it fireworks.
5. Select Line 1. With your magic wand
(settings below)
click on the line.
Selections/modify/expand 1.
Select Paper 18 from the kit Edit/copy,
Edit/paste into selection.
Selections Select none.
 6. Still on line 1 layer. Effects/3D/drop shadow
 Vertical and horizontal 2
Opacity 70
Blur 5.00
color black
Shadow on new layer not checked
7. Select Lines 2.
With your magic wand click on both lines.
Selections/modify/expand 1.
Select Paper 2 from the kit Edit/copy,
Edit/paste into selection.
Selections Select none.
Apply same drop shadow.
8. Select Paper 16 from the kit.
Select the paper under patterns in materials palette
In Foreground color
Angle 0 Scale 30.
9. Click on Lines 3 select both lines with your magic wand.
Selections/modify/Expand 1.
Select Paper 2 from the kit, edit/copy
Edit/paste into selection.
Selections/Select None.
Apply same drop shadow.
8. Click on the Large Circle layer.
Using your magic wand click on the circle.
Selections/modify/Expand 1.
Select paper 4 from the kit, edit/copy,
edit/paste into selection.
Selections/select none.
Apply same drop shadow.
10. Select the large Circle Frame Layer.
Apply same drop shadow.
11. Select your Regular Tube, Edit/copy,
Edit/paste as new layer into your image.
Re-size if needed. I did not re-size
Place the tube in the center over your Large Circle.
Apply same drop shadow.
12. With your magic wand click on the small Circle.
Selections/modify/Expand 1.
Select Paper 1 from the kit, edit/copy,
edit/paste into Selection.
Keep Selected.
13. Add a new raster layer above your small circle Layer.
Select your close up tube, Edit/copy,
Edit/paste into selection.
Selections/Select none.
Apply same drop shadow.
14. Click on the small Circle frame. Apply same drop shadow.
15. Select Happy New year element 19, Edit/copy,
Edit/paste as new layer into your image.
Re-size it 50%.
Apply same drop shadow.
Move to the top of your image.
16. Select bucket element 35 from the kit, Edit/copy,
Edit/paste as new layer into your image.
Re-size it 40%.
Apply same drop shadow.
Place on the right side of your large circle.
17. Select glass element 77 from the kit, Edit/copy,
Edit/paste as new layer into your image.
Re-size it 20%.
Apply same drop shadow
place by your bucket.
18. Select hat element 54, Edit/copy,
Edit/paste as new layer into your image.
Re-size it 30%.
Apply same drop shadow.
Place it on the left side of large circle.
19. Select flower bow element 70 from the kit, Edit/copy,
Edit/paste as new layer into your image.
Re-size it 30%.
Apply same drop shadow
Layers palette right click /Duplicate it 2 times
arrange them to your liking.
20. Close off your background layer and fireworks layers.
In layers palette right click any open layer merge/merge visible.
Re-size 90%.
21. Layers palette right click add a new raster layer
apply your watermarks and copyrights.
Re-size all layers/smart size so that width is 470.
Open your background and fireworks layers back up.
22. Putting your name on the stat is optional.
ANIMATION
Open Animation shop minimize for now.
1. Duplicate your fireworks Layer 2 times.
2. Starting with Top fireworks Layer copy 2
Effects/Plugins/Unplugged Effects/Disco Lights
(settings below).
Click Ok.
In layers palette click the eye to close off this layer.

3. Select the Middle (copy of fireworks) Layers.
Apply the disco Lights again but change the rotation to 45.
Click OK.
In layers palette close off this layer by clicking the eye.
4. Select the bottom (fireworks) Layer.
Apply the disco Lights again.
Change the rotation to 90. Click Ok.
5. Edit/copy/copy merged.
Take it to Animation Shop
right click anywhere in the workspace paste as new animation.
6. Back in PSP Close the bottom fire works layer.
Open the middle fireworks layer. Edit/copy/copy merged
Take it to Animation Shop
right click first frame/paste/paste after current frame.
7. Back in PSP Close the middle fire works layer.
Open the top fireworks layer. Edit/copy/copy merged..
Take it to Animation Shop
right click second frame/paste/paste after current frame.
8. I did not change the display time.
Save your animation in a folder where you can find it.
BACKGROUND.
1. Open new transparent image. 1280x200.
Select the color black in your foreground color and flood fill your image.
2. Effects/Image Effects/Seamless tiling
(settings below)

3. Select Flower Elements 58, 59, 60 from the kit. Edit/Copy,
Edit/Paste each one into your image.
Re-size them 15%.
Apply your same drop shadow to each one.
Arrange them in Left top corner of our image
The white one should be in the corner and the other two below it.
4. Once happy with arrangement
layers palette click the eye to close off your background layer.
Merge/merge visible.
Duplicate 1 time Image/flip.
5. Select flower bow element 68, Edit/copy,
Edit/paste as new layer into your image.
Re-size it 30%.
Apply same drop shadow.
Move it over in the center of the other flowers.
6. Select Happy new year banner 19.
Using your selection tool
draw a rectangle around just the happy new year. Edit/copy,
Edit/paste as a new image.
Now resize it so that width is 300.
7. Still on the Happy new banner image you just re-sized, Edit/copy,
Edit/paste as new layer into your image.
Image/Free rotate 90 Left
Uncheck the following boxes
Rotate all layers
Rotate single layer around canvas
Arrange it next to your flowers.
Save your Image in the folder you made
by going to File/Export/Jpeg Optimizer Value set at 30
Thanks for trying my tutorial I hope you enjoyed it
If You use my tutorials in Stationary Please apply Credit Below
Tutorial by Babs C
HERE or HERE
You can copy and paste the above if that does not work use Links below
http://groups.yahoo.com/group/sassynsimple/
http://snsstats.blogspot.com/
My newer Stationary Tutorials are in Incredimail Letter form
in order to access them you must be a member of my group
Our PSP HideAway
©SassynSimple Tutorials