
©SassynSimple Tutorials
By Babs C
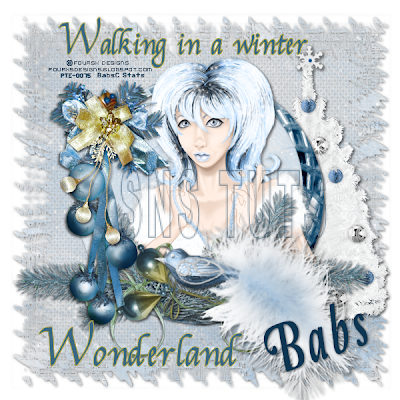
Name: WINTER WONDERLAND
Written: NOV 28, 2011

PROGRAMS YOU WILL NEED
You are responsible for providing the items needed to do my tutorials.
You need a good working knowledge of the programs I use.
Paintshop or Corel Program
ITEMS YOU WILL NEED
TUBE: Of your Choice, I used the artwork of Fourxs Designs PTU you must buy it at PTE I have a license for it
KIT: Nanly Designs FTU Blue Christmas Here
MASK: of Your choice I used my mask BBD_2011 Mask 83 Here
FONT: Of your choice
THINGS YOU NEED TO KNOW AND DO
Settings may differ slightly depending on Program and Kit used
Close original after you copy it unless I state otherwise.
RE-SIZE only one layer and sharpen once if needed
Left click and right click refers to mouse buttons.
Refer to my image for placement of items.
HEADER
1. Open your tube and mask Minimize them for now.
2. Open a new transparent Image 600x600
Selections/select all
Select Paper 03 from the Kit
Re-size it all layers 25%
Edit/copy Edit/paste into selection on your image
Selections/select none
Minimize paper we will use it 2 more times
3. Layers/new mask layer/from image
Select BBD_2011_Mask 83 in window
(settings below)
Click Ok
Layers palette/right click/merge/merge group
Now re-size mask 105%
By Babs C
Name: WINTER WONDERLAND
Written: NOV 28, 2011


PROGRAMS YOU WILL NEED
You are responsible for providing the items needed to do my tutorials.
You need a good working knowledge of the programs I use.
Paintshop or Corel Program
ITEMS YOU WILL NEED
TUBE: Of your Choice, I used the artwork of Fourxs Designs PTU you must buy it at PTE I have a license for it
KIT: Nanly Designs FTU Blue Christmas Here
MASK: of Your choice I used my mask BBD_2011 Mask 83 Here
FONT: Of your choice
THINGS YOU NEED TO KNOW AND DO
Settings may differ slightly depending on Program and Kit used
Close original after you copy it unless I state otherwise.
RE-SIZE only one layer and sharpen once if needed
Left click and right click refers to mouse buttons.
Refer to my image for placement of items.
HEADER
1. Open your tube and mask Minimize them for now.
2. Open a new transparent Image 600x600
Selections/select all
Select Paper 03 from the Kit
Re-size it all layers 25%
Edit/copy Edit/paste into selection on your image
Selections/select none
Minimize paper we will use it 2 more times
3. Layers/new mask layer/from image
Select BBD_2011_Mask 83 in window
(settings below)
Click Ok
Layers palette/right click/merge/merge group
Now re-size mask 105%

4. Effects/3D/Drop shadow
(settings below)
Click ok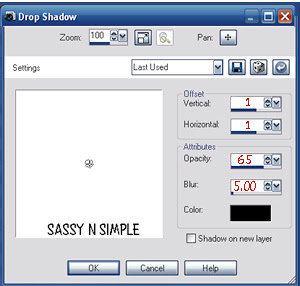
5. Select Element 30 (tree) Edit/copy
Edit/paste as new layer into image
Re-size it 20% one layer
Adjust/sharpness/sharpen
Apply same drop shadow
Move to the right side of image do not go off mask
6. Select Element 04 (frame) from the kit
Edit/copy, edit/paste as new layer into image
Re-size it 30%Adjust/sharpness/sharpen
Apply same drop shadow
Leave centered in image
7. Select magic wand (settings below)
Click inside the frame window
Selections/modify/expand 11
Keep selected
(settings below)
Click ok

5. Select Element 30 (tree) Edit/copy
Edit/paste as new layer into image
Re-size it 20% one layer
Adjust/sharpness/sharpen
Apply same drop shadow
Move to the right side of image do not go off mask
6. Select Element 04 (frame) from the kit
Edit/copy, edit/paste as new layer into image
Re-size it 30%Adjust/sharpness/sharpen
Apply same drop shadow
Leave centered in image
7. Select magic wand (settings below)
Click inside the frame window
Selections/modify/expand 11
Keep selected

8. Layers palette/right click raster 1(tree)/add new raster layer
Bring up paper 03 Edit/copy
Edit/paste into selection on your image
Selections/select none
Minimize paper again
9. Select your tube Edit/copy
Edit/paste as new layer into your image above frame
Re-size as needed I re-sized mine 75%
Apply same drop shadow
Center it in frame If to much overlaps the frames bottom erase it
10. Select Element 38 (pine branch) edit/copy
Edit/paste as new layer into image
Re-size it 20% then re-size it again 85%
Adjust/sharpness/sharpen
Apply same drop shadow
Move to right bottom side of the frame
11. Layers palette/right click/duplicate branch 1 time
Image mirror
12. Open Element 23 (baubles) edit/copy
Edit/paste as new layer into image
Re-size it 15% then again 85%
Adjust/sharpness/sharpen
13. Image/free rotate 115 right
Apply drop shadow
Place at bottom slightly to left of the center
14. Select Element 20 (ball cluster) Edit/copy
Edit/paste as new layer into image
Re-size 20% Adjust/sharpness/sharpen
Image/mirror
Apply same drop shadow
Move to the left side of frame
15. Select element 37 from the kit Edit/copy
Edit/paste as new layer into your image
Re-size 15% Adjust/sharpness/sharpen
Apply same drop shadow
Move on top of blue balls
16. Select Element 29 (ball cluster) Edit/copy
Edit/paste as new layer into image
Re-size 20% re-size again 90 %
Image/free rotate 20.00 right
Adjust/sharpness/sharpen
Apply same drop shadow
Move to the bottom of frame slightly to the right of center
17. Apply your text at this time
18. Add a new raster layer apply copyrights and watermarks
19. Layers/palette right click any layer/merge/merge visible
Save your image in png format
BACKGROUND

1. Open a new transparent image 1600x300
Selections/select all
Pull up paper 3 Edit undo re-size
Using your selection tool (settings below)
Draw a rectangle we only want the blue of the paper
Avoiding the white edges
Edit/copy Edit/paste into selection on your image
Selections/select none
 2. Effects /image effects/seamless tiling
default settings
3. Select Element 20 (ball cluster) edit copy
Edit/paste as new layer into your image
Re-size 15%Adjust/sharpness/sharpen
Apply same drop shadow
Move to left border centering it
4. Select Element 37 edit/copy
Edit/paste as new layer into image
Re-size 15% then re-size 85%Adjust/sharpness/sharpen
Apply same drop shadow
Move on top of blue balls
5. Layers/palette right click/merge/merge visible
6. Now lets save our image go to File/export/jpeg optimizer value set at 30
7. Save your image now
File/export/jpeg optimizer value 30
Thanks for Trying my Tutorial I hope you Enjoyed it.
I want to thank Marsha and Ruth for testing my tutorials.
If You use my tutorials Please include a credit and Link back to
My groups in your footer
http://groups.yahoo.com/group/sassynsimple/
http://groups.yahoo.com/group/ourpsphideaway/
My Tutorial Site is
http://sassynsimple.blogspot.com/
I also have some exclusive stationary Tutorials that I only share in My Groups
HERE or HERE
©SassynSimple Tutorials