
DATE WRITTEN: Aug 30,2009
THINGS NEEDED
PAINTSHOP PRO X2 OR SIMILAR PROGRAM.
You also need a good working knowledge of it.
TUBE: You will need 3 Gorjuss Art you have to purchase them HERE
KIT: Fantasy Moments Irresistible HERE
PLUGINS: Xenoflex 2 constellations
MY SUPPLIES: HERE
Not all kits are same sizes. Re-sizing may be different
Let's Begin
Once you set your drop shadow it will stay..
Always Close original image after you copy.
Always sharpen re-sized items one time.
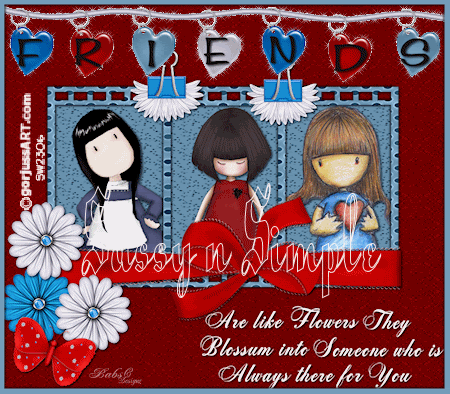
1. Open your tubes minimize for now. Open the sns_Friends_word art brush. Go to file/export/custom brush and put it into your brushes name it something that you can easily find.
2. Open a new transparent image 800X700 selections/select all. Select Paper 2 from the kit copy and paste into selection selections/select none.
3. Open the film strip from my supplies Copy and paste as new layer into your image. Click on it with your magic wand settings below. Select all/modify expand 1. Select paper 15 Copy and paste into selection. Selections select none.
Wand Settings
mode set add/shift and match mode is RGB,
Tolerance set to 20, Feather 0,
anti-alias checked and Outside selected.
4. With your magic wand click inside each rectangle window. Selections/modify expand 2. Add a New raster layer below your frame. Select Paper 23 from the Kit copy and paste into selection
. Selections/select none.
5. Click back on your frame Effects/3D drop shadow Vertical and Horizontal set at 2, Opacity 70 and blur 5.00. Go back and apply drop shadow again this time change vertical and horizontal to -2.
6, Copy and paste your tubes under your frame as new layers. Re-size if needed. Arrange them inside of your filmstrip windows. Erase any parts that are outside of the filmstrip. Apply Drop Shadow Vertical and Horizontal set at 2, Opacity 70 and blur 5.00.
7. Select element 65 wrap from the kit. Copy and paste into image as new layer. Re-size it 67%. Apply same drop shadow as before. Move it to the bottom of the film strip.
8. Select Element 31 from the kit copy and paste into image as new layer. Re-size it 30%. Duplicate it arrange them at the top of the filmstrip. Refer to my imageif you need to. Apply same drop shadow to both.
9. Select Flower elements 47 and 50 Copy and paste into your image as new layers. Re-size them 40%. Duplicate one of them. arrange them on the left bottom corner of filmstrip. Refer to my image if you need to. Apply same drop shadow as before.
10. Select Butterfly Element 45 from the kit. Copy and paste as new layer into image. Re-size it 30%. Apply same drop shadow as before. Arrange it near your flowers.
11. Add a new Raster Layer Click on your paint Brush Select the word art brush I had you export into your brushes. Set foreground and back ground colors to White. Apply your brush on the bottom right hand side of your image. Re-size the brush if you need to. You may have to click your mouse button a couple of times if you want it to look darker. I clicked mine 2 times.
12. Merge visible all layers.
13. Select Element 73 from the kit. Copy and paste into your image. Re-size 90%. Move one of the hearts outside of the image. So that only 7 hearts are visible in your image. Move it up to the top of image.
14. Select a Text Type out FRIENDS do each letter separately, convert each letter to a raster layer before starting your next letter. Place each letter on one of the hearts. Close off your Heart Layer and merged layer.
Merge visible. (only your Text layers should be seen)
Apply drop shadow same as before. Right click on your text layer in the layers palette merge down into your Hearts layer.
15. Select your rectangle tool. See settings below. Select a color from the image in your foreground color. Close off your background color and draw out rectangle around entire image. Apply drop same drop shadow as before. Go back and apply drop shadow again only this time change your Vertical and Horizontal to -2.


16. Apply your copyrights and watermark so they are under the hearts and frame layer. Once you apply them merge them down into your merged background layer. You should have 3 layers now your rectangle layer, hearts layer and merged background layer.
17. Re-size your image all layers checked so that width is 450, height will adjust.
ANIMATION
1. Duplicate your Heart Layer 2 times. Close off the top and middle heart layer.
2. Select your bottom heart Layer. Effects/Plugins/Xenoflex 2 Constellations. Apply the settings below. Close this Layer.

3, Select the middle heart Layer Apply the constellations again. Only this time click on the random seed button one time.
5. Open the top heart layer copy merged and paste into animation shop as new animation. You just right click anywhere inside the working area.
6. Close off the Middle heart layer. Open the bottom heart layer. Copy merged and paste into animation shop after current frame. Do this by right clicking on your first frame then cursor over paste and drop down menu will appear.
8. Save your animation..
BACKGROUND.
1. Open new transparent image. 1280x300. Selection select all. Select paper 2 from the kit Copy and paste into selection. Selections/ Select none.
2, Apply Seamless tiling see settings below.

3. Select flowers 47, 49 and 50 From the Kit. Copy and paste the flowers into your image as new layers in this order 49, 50 then 47. Re-size them 20%. Then place them over to the left border of your image horizontally. Flower 47 should be placed in the middle and halfway outside the image. Apply drop shadow. Vertical and Horizontal set at 2, Opacity 70 and blur 5.00 Refer to my image if you need to.
4. Duplicate Flowers 49 and 47 Pull them down below the other flowers arrange flower 49 halfway outside the image. Refer to my image if you need to.
5. Select Element 6 beetle bug from the kit. Copy and paste into your image as a new layer. Re-size it 20% Apply same drop shadow. Duplicate it one time pull the over to the left border place them in front of the two flowers that are halfway out of your image. Refer to my image if you need to.
6. Merge visible and save your image by clicking on file/export/jpeg optimizer value set at 30.