
DATE WRITTEN: August 11, 2009
THINGS NEEDED
PAINTSHOP PRO 9 OR SIMILAR PROGRAM. And a good working knowledge of the program, plugins and animation shop
TUBE: Keith Garvey it is a licensed tube you must buy it at MyPsPTubes
KIT: Bitzy Beez Designz Bitz of Country Tagger FTU HERE
PLUGINS: Xenoflex Constellations
Not all kits are same sizes. Re-sizing may be different
Let's Begin
Once you set your drop shadow it will stay..
Always Close original image after you copy.
Always sharpen re-sized items one time.
1. Open a new transparent image. 700x600 Selections/select all. Open Paper 9 from the kit copy and paste into selection. Selections/select none
2. Select frame 2 from the kit. Copy and paste it into your image as new layer. Re-size it 70%.
3. Add a new raster layer below your frame. Now with your magic wand selected click back on your frame layer and click inside the frame. Selections/modify expand 4.
4. Select Paper from the kit 17 from the kit Copy and paste into selection into the new raster layer. Selections/Select none. Click back on your frame layer and apply drop shadow Vertical and Horizontal set at 2, Opacity 70 and blur set 5.00.
5. Copy your Tube add it into your image as new layer. Re-size as needed so that it fits in your frame. Apply same drop shadow.
6, Select Doodle 2 from the kit Copy and paste it as a new layer above your bottom background layer. Re-size the doodle 70%. Duplicate it and mirror the duplicate. Right click on the top doodle layer in your layers palette select merge/merge down.
7. Now Duplicate your merged Doodle Layer and flip the duplicate. You do this under image on your tool bar. Right click on your this layer in your layers palette and merge/merge down.
8. Select Flowers 6 and 10 from the kit copy each of them and paste them in your image as a new layer. Re-size them 30%. Apply your same drop shadow. Arrange them around the bottom of you frame. Refer to my image for placement.
9. Select Candle 1 from the kit Copy and paste into your image as new layer. Re-size it 60% . Apply your drop shadow. Duplicate your candle and place the in the center for the frame at the bottom but space them apart. Refer to my image.
10. Select Flower 10 from the kit copy and paste into your image as new layer. Re-size it 30%. Center this in between the candles. Apply your drop shadow.
11. Select Charm 1from the kit copy and paste it as new layer. Re-size the charm 60%. Apply your Drop shadow. Place it on the right side of your frame.
12. Select Corner 1 copy and paste into your image as new layer. Re-size it 60%. Apply your drop shadow. Now duplicate the corner. Mirror your duplicate place them close to the borders on the image In your layers palette right click on the duplicated corner merge/merge down.
13. Duplicate your merged corners Layer and flip the duplicated copy. Arrange them so they meet on the sides. Refer to my image for placements. Once you have them placed. Right click on the top duplicated layer merge/merge down.
14, Select your eclipse tool select the oval shape. Have the line width set on 4. Close off your background color. Draw out an oval that is about the size of your frame. Do not convert but move this over to the left side so that it is outside of the frame
15. Select your text tool now. Select a dark color from your image and your foreground and background colors. With your mouse move your cursor onto the oval until you see an A icon see image below. Then type out your text. Adjust your text by pulling on the text box nodes. Until you are happy with the placement and size of the text you want it all on the side of the the oval do not go across the top at all.
16. Now in the Layers palette you will see a plus line on the text Layer click on it Now you see a layer with text and layer with oval. Click on the eye next to your oval. Click back on the minus to close it back up and convert to raster layer.
17. Repeat Steps 14, 15 and 16. Only this time move the oval to right outside of your frame.
18. You can add the other text if you wish I just added that for my own personal use.
19. Close off your corner Layer. And merge visible. Re-size all layers so that the width is not more than 425. Height will adjust. Apply your watermark and credits now.
ANIMATION
1. Duplicate the corner Layer 2 times. Close the top and middle layers
2. Select your bottom corner layer. Effects/plugins/Xenoflex Constellations Apply the settings below.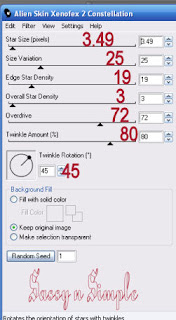

3, Close off the bottom corner layer. Open your middle corner layer.. Make sure it is selected in your layers palette. Apply the constellations again this time though click on the random seed button one time. Close this layer.
4. Open the top corner layer. Apply the constellations again. Click the random seed button one time. Close off this layer.
6. Open the bottom corner layer Copy Merged and paste into your Animation Shop as new layer. You do this by right clicking anywhere in side the workspace. (I always select a different layer so I do not have to click each layer each time I want to copy. I just have to open each one.)
7. Now Close off the bottom corner layer and open the middle corner layer Copy merge and paste into Animation Shop after current Layer (right click first frame). Now close the middle open the Top corner layer copy merged and paste into animation shop after current frame.
I did not change my speed but if you wish to you can go to edit select all then right click on the first frame select frame properties and change to the speed you like.
Now save your image.
BACKGROUND.
1. Open new transparent image. 1280x250. Selection select all. Select paper from the kit Copy and paste into selection. Selections/ Select none. Duplicate it and merge visible. This is because the seamless tiling will not look right.
2. Merge the two layers. Effects/image effects seamless tiling see settings below.
 3, Select Lace 2 from the elements folders copy and paste into image as new layer. Re-size it 80%. Move it to the left border move some outside the image. Refer to my image. Apply drop shadow Vertical and Horizontal set at 2, Opacity 70 and blur set 5.00.
4. Select Hope hanger 3 from the kit copy and paste into your image as new layer. Re-size it 25%. Apply same drop shadow and move onto the lace.
5. Select candle 1 copy and pasting your image as new layer. Re-size it 20%. Move it over onto the lace and apply drop shadow.
6. Select flowers 1 and 5 copy and paste into your image as new layer. Re-size them 15%. Move two behind your candle layer and the other above the candle. Apply same drop shadow. To move the flowers below candle just drag them down in your layers palette.
Now save your image by clicking on File/export/jpeg optimizer value set at 30.
PLEASE PLACE CREDIT ON ALL STATS
Tutorial by Babs C
Just copy and paste into your Stationary
I want to Thank Simply Classy n Sassy Group Testers for testing the Tutorial
I hope you enjoyed this tutorial..