
 NAME: Summer Fun Tutorial 16
DATE: June 24, 2009
THINGS NEEDED: Paintshop pro 9 or similar program and a good knowledge of the program
TUBE: DicVicBarnes Poser HERE
KIT: Summer Time Fun Tagger Lady Raven Scraps Tagger Kit 800x800 PTU HERE
PLUGINS: VM Natural Lakeside Reflections
Not all kits are same sizes.
So if you choose another kit, your re-sizing may be different..
Let's Begin
Please NOTE as I will not repeat in each step.
Once you set your drop shadow it will stay..
Always Close original image after you copy.
Always sharpen re-sized items one time.
Open your tube an minimize if for now.
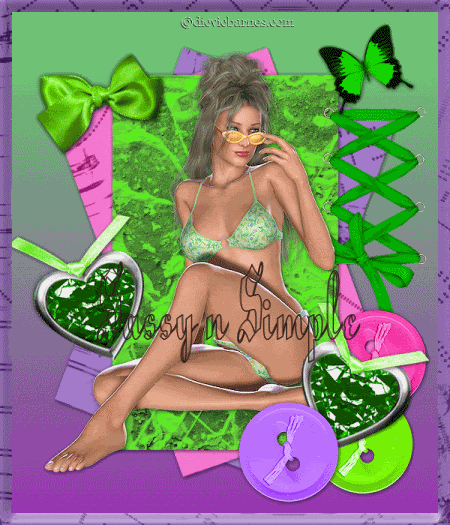
1. Open a new transparent image. 600x700. Flood fill with a color from your Tube.
2. Open 3 different papers from the kit I used. papers 6, 13, 14. minimize them.
2. Open 3 different papers from the kit I used. papers 6, 13, 14. minimize them.
Add three new raster layers.
3. Make your ruler viewable. this under View just click on ruler.
3. Make your ruler viewable. this under View just click on ruler.
Select your Selections tool. Starting at the 150 mark on top ruler
and 100 mark on your side ruler
draw out a rectangle to 450 on top and 600 on bottom.
4. Select starting with the bottom raster layer
4. Select starting with the bottom raster layer
select one of the papers in your foreground under patterns in your material palette
flood fill the selection. Change to your next paper and flood fill the middle layer.
Then flood fill the top layer with your last paper.
This one should be one that matches the colors in your tube.
Selections select none.
5. Image/free rotate 20.00 right Click on your bottom layer you filled with a pattern.
5. Image/free rotate 20.00 right Click on your bottom layer you filled with a pattern.
Click on your middle layer and Free rotate it left
apply drop shadow. to all three layers.
Close off your background and merge visible.
6. Open one of the lace ups I used 2.
Copy and paste into you image as new layer
re-size it 40% place to the right side.
Apply drop shadow.
Vertical and Horizontal set at 2, Opacity set at 70 and blur set at 8.00
7. Open your tube copy and paste into your image as new layer.
7. Open your tube copy and paste into your image as new layer.
Re-size as needed.
Apply drop shadow..
8. Open one of the bows I used 3.
8. Open one of the bows I used 3.
Copy and paste into your image as new layer
re-size it 30%.
Apply drop shadow.
Place on the left at the top of your rectangles.
9. Open a butterfly copy and paste into your image as new layer
9. Open a butterfly copy and paste into your image as new layer
re-size 15%.
Image/free rotate 20.00 left.
Place in the right hand corner.
10. Open three of the buttons copy and paste them into your image each as a new layer.
10. Open three of the buttons copy and paste them into your image each as a new layer.
Then re-size them 80%.
Apply your drop shadow.
I used 2, 3, and 4
arrange them on the bottom right hand side of your image.
11. Open one of the hearts I used. heart 2. Copy and paste into your image.
Re-size it 30%. Free rotate it 20.00 left.
place on the left side of your image.
Apply drop shadow.
Duplicate it and mirror your duplicate.
move it so that it is under one of the buttons on the right.
12. Open the Metal heart copy and paste into your image.
12. Open the Metal heart copy and paste into your image.
Re-size it 50%.
Do not apply drop shadow.
Move this so that it is over your heart.
Duplicate
image/mirror.
Pull it so that is over the duplicated heart.
Click on the duplicated heart
right click in the palette merge/merge down.
13. Open one of the ties, I used tie 2.
Copy and paste into your image as new layer.
Re-size if needed.
Apply drop shadow duplicate..
place them over your hearts.
14. Select your rectangle tool. line width 20 or to your likening.
foreground select a paper from the kit to use.
background closed off.
Now draw out your rectangle around image so that it is framed.
15. Re-size your image so that it is no more than 425 in length.
Apply copyrights and watermark..
16. Apply your copyrights and watermark.
Close of your background layer and merge visible.
ANIMATION
1. Duplicate your back ground layer 2 times. Close of the 2 duplicates.
Click on the original background layer (bottom).
2. Effects/Plugins VM Natural Lakeside reflections. The settings for all three layers are below.
After you do the bottom layer close it open the layer above it apply setting 2.
do the same for the top background layer duplicate settings three.
You only change the horizon, waves, and strenght in the top two layers.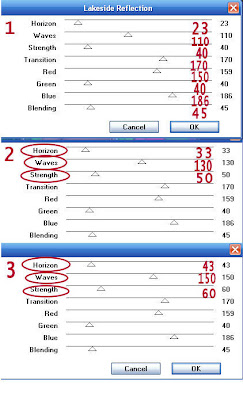 3. Close off the top two layers.
 3. Close off the top two layers.
Copy merged and paste into animation shop as new animation.
Close bottom layer. open the layer above that.
Copy merged and paste into animation shop after current frame.
Close of this layer open top layer copy merged and paste into animation shop after current frame.
Save your animation shop..
Background:
1. Open a new transparent image 1000x300 Floodfill with paper of your choice.
2. New raster layer. pick a color from your paper in your foreground.
1. Open a new transparent image 1000x300 Floodfill with paper of your choice.
2. New raster layer. pick a color from your paper in your foreground.
flood fill the raster layer
take opacity down to 69.
3. New Raster Layer.
3. New Raster Layer.
With your selection tool staring at the 150 top ruler line draw out a rectangle
towards your left border and the entire length of the image.
4. Flood fill your selection with a paper from the kit.
4. Flood fill your selection with a paper from the kit.
I scaled mine down 50%.
Merge all Layers.
Effects/image effects/seamless tiling see image below for settings.
 5. Open two of the buttons copy and paste into image as new layers.
Re-size 50%
apply same drop shadow.
6. Open one of the butterflies copy and paste into your image as new layer.
6. Open one of the butterflies copy and paste into your image as new layer.
re-size it 15%.
Free rotate it 20.00 to the left.
Apply drop shadow.
7. Open one of the hearts
7. Open one of the hearts
Re-size it 15%
then copy and paste into your image as new layer.
duplicate it place one at the top and one at the bottom
. Free rotate the top one 20.00 to the right
Free rotate the bottom 20.00 to the left.
Apply same drop shadow.
When you close out the original do not save changes.
8. Open the floral and Lace border.
8. Open the floral and Lace border.
Re-size it so that the width is 300 copy and paste into your image as new layer..
Free rotate 90.00 to the left
move over on the edge of your border.
apply same drop shadow.
9. Save image by clicking file export jpeg optimizer 25 compression.
9. Save image by clicking file export jpeg optimizer 25 compression.
Just copy and paste into your Stationary
I want to thank Simply Classy n Sassy Group Testers for testing the Tutorial
I hope you enjoyed the tutorial.