
Date Written: July 2, 2009
THINGS NEEDED:
PaintShop Pro 9 or similar program.
TUBE: Elias Chatzoudis this is a Licensed Tube you can Buy Here MyPSPTUBES
MASK: Zuzzanna Mask34 HERE
KIT: Fantasy Moments Sweet Tempation 700x 700 HERE
PLUGINS: Eye Candy 4, Xenoflex 2
MY SUPPLIES: HERE
Not all kits are the same size. So if you choose different kit re-sizing may change.
Let's Begin
Please NOTE the following as I will not repeat it in steps
Once you set drop shadow it will stay
Always Close original image after you copy.
Always Sharpen Items you re-size one Time..
1. Open you mask and Tube minimize. Open a New Image transparent 600x600. Select a paper from the kit I used 15. remember this will be your Stat background also. I scale mine down to 50%.
2. Add a New layer above your background. Select a paper from the kit. I used 8. now Flood fill your image.
3. Layers/new mask Layer/From image. Source luminance checked and invert mask data Checked. Click ok. Right click on the black mask layer in your layers palette click delete. When it ask do you want to merge this into the layer below select yes. Now right click and merge/merge group. Re-size mask 90%
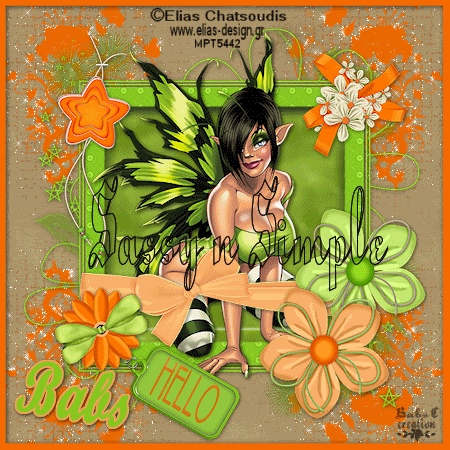
4. With your selection tool Draw a rectangle around the center square of your mask. You want to leave some if so it looks like a frame. refer to my image above. Now Click delete and your center should be transparent. Leave selected
5. Selections/modify expand 4. Click add new layer below your mask. select a paper from the kit I used 20, flood fill the selection. Selection/select none.
6. Effects/Plugins/Eye Candy 4000 Bevel Boss. Use settings below.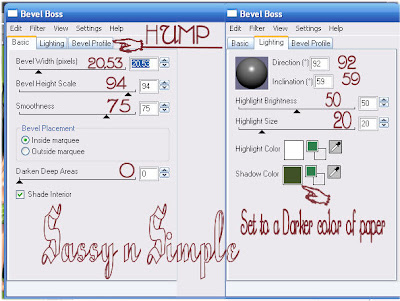 7. Click on your mask layer. Apply Drop shadow Vertical and Horizontal set at 1 Opacity 65, and blur 8.00
4. With your selection tool Draw a rectangle around the center square of your mask. You want to leave some if so it looks like a frame. refer to my image above. Now Click delete and your center should be transparent. Leave selected
5. Selections/modify expand 4. Click add new layer below your mask. select a paper from the kit I used 20, flood fill the selection. Selection/select none.
6. Effects/Plugins/Eye Candy 4000 Bevel Boss. Use settings below.
 7. Click on your mask layer. Apply Drop shadow Vertical and Horizontal set at 1 Opacity 65, and blur 8.00
8. Copy your tube close and paste into your image as new layer. Place it so that it looks like it coming out of the framed image boxed. refer to my image. Apply drop shadow Vertical and Horizontal set at 2 Opacity 65 and blur 8.00 or one of your choice.
9.. Select a wrap 43 copy and paste as new layer into your image. Apply Drop shadow Vertical and Horizontal set at 1 Opacity 65, and blur 8.00 we will use this for the rest of the elements we add.
10. Select element 25 or a tag that you like it. Copy and paste into your image as new layer. Re-size it 40%.. Mirror and place so that it is towards the center bottom.
11 Select two flowers 34 and 36 copy and paste into image as new layer. Re-size them 40%.
12. Select Element 72 Copy and paste into your image as new layer. Then re-size it 40%. Apply same drop shadow as before.
11 Select two flowers 34 and 36 copy and paste into image as new layer. Re-size them 40%.
12. Select Element 72 Copy and paste into your image as new layer. Then re-size it 40%. Apply same drop shadow as before.
13. Select element 1 Copy and paste into your image as new layer. Re-size it 70%. apply same drop shadow as before. I place it on the right bottom of my mask.
14.Apply your text, watemarks and copyrights. Then close your background layer and merge visible. Re-size your image so that it is no more than 450 in height. width will adjust.
15. Select one of the doodles in my supplies. Go to File export custom brush and add it to your brushes.. Then you can close it out.
16. Now add a New Raster layer above your Background Layer. Select the doodle brush you just exported. Select a color from your image that will stand out. I used orange from one of the flowers. Set brush size to 255 and apply brush in the top left corner of image. You may have to click mouse a couple of times to get it dark enough.
17. Choose a color from your image in your foreground. Close off your background layer. Chose your rectangle tool and draw our a border around your image line width 11.00. Apply same drop shadow as before.
17. Choose a color from your image in your foreground. Close off your background layer. Chose your rectangle tool and draw our a border around your image line width 11.00. Apply same drop shadow as before.
18. Duplicate your doodle layer and go to the image tab on your tool bar and mirror the duplicate.. Right click on the duplicated copy of doodle and merge/merge down. Now duplicate your doodle layer. Go to the image tab and flip. Merge both doodle layers together.
19. Duplicate your merged doodle layer. Make sure you have the bottom doodle layer selected. Effects/texture apply mosaic antique. See settings below.
19. Duplicate your merged doodle layer. Make sure you have the bottom doodle layer selected. Effects/texture apply mosaic antique. See settings below.

ANIMATION
2. Now Click on the middle mosaic layer and apply Xenoflex again
change the random seed only once.
3.Now click on the top mosaic layer and again apply the Xenoflex
3.Now click on the top mosaic layer and again apply the Xenoflex
change the random seed one time.
4.Open your animation shop. Close of the top tow layers of your mosaic doodles.
Click on any layer besides your mosaic layers.
Copy merged and paste into animation shop as new image.
5. Close your bottom mosaic layer open the middle layer
copy merged paste into animation shop after current frame.
6. Close bottom layer and open your top mosaic doodle layer
copy merged and paste into animation shop after current frame.
7.To change speeds of your animation you just click on the first layer edit select all.
Right click on the frame and select frame properties then change to desired speed.
I did not change my speed.
Save your animation.
Background:
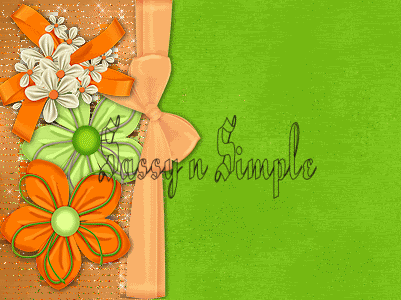
1. Open and image 1000x300 Flood fill with a paper from the kit. I used 2.
2. Add a new raster Layer.
1. Open and image 1000x300 Flood fill with a paper from the kit. I used 2.
2. Add a new raster Layer.
With your selection tool draw out a rectangle from the 150 mark on your top ruler all the way to left image edge and the full length of the image.
Flood fill selection with another paper from the kit..
merge visible.
3. Apply seamless tiling see settings below.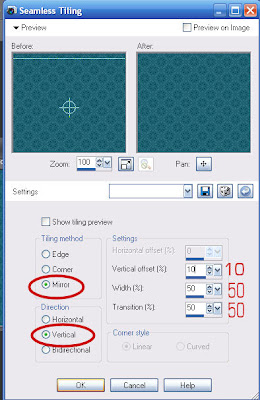 4. Open up Element 4. Copy and paste into image as new layer. Re-size it 30%. Apply drop shadow. vertical and horizontal 1, Opacity 65 and blur 8.00. arrange to the left side.
3. Apply seamless tiling see settings below.
 4. Open up Element 4. Copy and paste into image as new layer. Re-size it 30%. Apply drop shadow. vertical and horizontal 1, Opacity 65 and blur 8.00. arrange to the left side.
5. Open two flowers I 35 and 36. copy and paste into your image as new layer. Re-size it 30% apply drop shadow arrange to the left side.
6. Open a Wrap 43. Re-size the wrap so that the width is 310 height will adjust. Copy and paste into image as new layer free rotate it 90 degrees right. apply same drop shadow.
7. Close off background merge visible. Duplicate your merged layer.. Apply the mosaic settings in step 20 above.
9. Open your back ground layer. Take your eraser and erase any mosaic that is past your bow on all mosaic layers.. then Scroll back up and do steps 20 through 23.
7. Close off background merge visible. Duplicate your merged layer.. Apply the mosaic settings in step 20 above.
9. Open your back ground layer. Take your eraser and erase any mosaic that is past your bow on all mosaic layers.. then Scroll back up and do steps 20 through 23.
Just copy and paste into your Stationary
I want to Thank Simply Classy n Sassy Group Testers for testing the Tutorial
I hope you enjoyed this tutorial..