


©SassynSimple Tutorials
DATE WRITTEN: Nov 1, 2009
THINGS NEEDED
Jasc Paintshop Pro or Corel Paint Program Settings may vary slightly.
You must have a good working knowledge of the programs I use.
TUBE: Creddy World under flower greetings Page 4 last tube FTU HERE
MASK: WeescotsLass WSL_MASK251 HERE
PLUGINS: Filter Factory H Alias Blur, Filters Unlimited Paper Textures
MY SUPPLIES: HERE
If you choose a different kit re-sizing may change.
Let's Begin
The below steps must be done and will not be repeated.
We will use same drop shadow unless I state otherwise.
Always Close original image after you copy unless stated otherwise.
Always sharpen re-sized items one time.
1. Open your Tube Using your dropper tool, left click/Foreground color light color, Right click background color dark color. Minimize tube for now.
2. Flood fill your image with your background color. Selections/Select all (keep selected
3. Bring up your Tube,
Edit/copy, Edit/paste into selection.
Selections Select none.
Effects/Image Effects/Seamless Tiling Default settings.
Adjust/Blur/Gaussian Blur 25.00
4. Effects/plugins/Filter Factory H/ Alias Blur X and Y both set on 28. Effects/Edge Effects/Enhance.
4. Add a New Raster Layer Flood Fill with your Light/foreground color Layers New Mask Layer/from Image Select the mask
in the window. source luminance/checked Invert mask data/unchecked.
5. Still on the Mask layer In your layers palette do the following
Right click black/white mask layer Delete/click yes. When the next pop up window comes up select Yes Right click mask layer Merge/merge group.
6. Still on your mask Layer Effects/Plugins/Filters Unlimited/Paper Textures/Canvas Fine Intensity set on 156 Lightness 87
Effects/3D/drop shadow
Vertical and horizontal 2
Opacity 70
Blur 5.00
color black
Shadow on new layer not checked
7. Bring up your Tube Edit/copy, Edit/paste as new layer into your image.
Re-size your tube. I re-sized mine 85%. Move it to the bottom Left corner. Apply Same Drop shadow.
8. Using your dropper tool Left click/foreground, Right click/background choose a dark color from your image.
9. Select your text tool (settings below) a fat font works best I used Lakeshore Drive NF. Type out WELCOME size it with your nodes. Then Right click in the text layer in your layers palette convert to raster layer.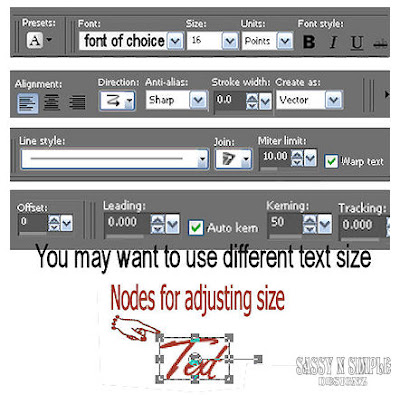
10. Still on text layer Toolbar under selections tab do all of the following..
A. select all,
B. select float.
C. Select defloat.
D modify expand 2
Now add new Raster Layer under your Text Layer. Use your dropper tool to Pick a dark color left click/foreground color. Now flood fill the selection with your color. Selections/select none.
11. Effects/Plugins/Filters Unlimited/Paper Textures/Canvas Fine Intensity set on 156 Lightness 87
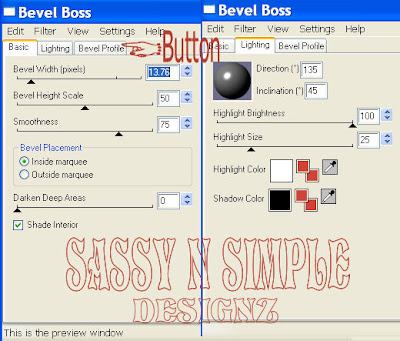
12. Still on your Text Layer Effects/Plugins/Eye Candy 4000 Bevel Boss settings below. Apply same drop shadow.
13. Repeat Steps 9 through 11 for the words To The and then the word Group.
14. Select your dropper tool once again left click/foreground color and choose the light color you used for mask. Keep background color the same.
15. Image Add border 3 Select it with your magic wand (settings below) Flood fill with your foreground color. Selections/select none.
16. Effects/Plugins/Filters Unlimited/Paper Textures/Canvas Fine Intensity set on 156 Lightness 87
17. Apply your drop shadow, Change Vertical and Horizontal to 1. Apply drop shadow again but change the Vertical and horizontal to -1 Selections/select none.
18. Image/add border 15. Select with magic wand. Flood fill with your dark/background color. Apply steps 15 and 16. (drop shadow will be reversed)
19. Repeat Steps 14 through 16.
20. Add your water mark and copyrights. Right click any layer and merge visible. Re-size your image so that the height is 420.
Save your image as a jpeg in a folder where you can find it.
BACKGROUND.
1. Open new transparent image. 1280x300. Flood fill your image with your background color. Selections/Select all (keep selected
2. Bring up your Tube,
Edit/copy, Edit/paste into selection.
Selections Select none.
Effects/Image Effects/Seamless Tiling Default settings.
Adjust/Blur/Gaussian Blur 25.00
3. Effects/plugins/Filter Factory H/ Alias Blur X and Y both set on 28. Effects/Edge Effects/Enhance more.
4. Add a new Raster Layer Flood fill with your light/foreground color take Opacity down to 40. In your layers palette right click merge/merge visible.
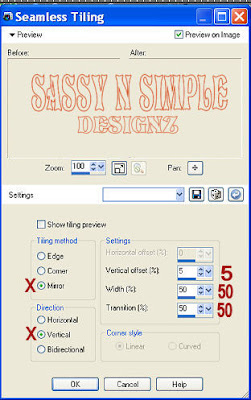
5. Effects/Image Effects/seamless tiling settings below.
6. Open the Border in my supplies. Select the border Layer, Edit/copy, Edit/paste as new layer into your image. Move it to the Left border of your image. Click on it with your magic wand. Flood Fill with your foreground color/light
7. Effects/Plugins/Filters Unlimited/Paper Textures/Canvas Fine Intensity set on 156 Lightness 87
8. Open the Border in my supplies. Select the Lace Trim Layer, Edit/copy, Edit/paste as new layer into your image. Move it to the Left border of your image. Click on it with your magic wand. Flood Fill with your background color/dark color. Repeat Step 7. Apply drop shadow. Make sure Vertical and Horizontal are on 2
9. Right click the Lace Trim layer in your layers palette merge/merge down.
10 Re-size the merged border layer 101%. Click on your mover tool with your Keyboard right arrow move the border back out till you see the other dark border. Now Merge Visible.
Save your Image in the folder you made, by going to File/Export/Jpeg Optimizer Value set at 30
DATE WRITTEN: Nov 1, 2009
THINGS NEEDED
Jasc Paintshop Pro or Corel Paint Program Settings may vary slightly.
You must have a good working knowledge of the programs I use.
TUBE: Creddy World under flower greetings Page 4 last tube FTU HERE
MASK: WeescotsLass WSL_MASK251 HERE
PLUGINS: Filter Factory H Alias Blur, Filters Unlimited Paper Textures
MY SUPPLIES: HERE
If you choose a different kit re-sizing may change.
Let's Begin
The below steps must be done and will not be repeated.
We will use same drop shadow unless I state otherwise.
Always Close original image after you copy unless stated otherwise.
Always sharpen re-sized items one time.
1. Open your Tube Using your dropper tool, left click/Foreground color light color, Right click background color dark color. Minimize tube for now.
2. Flood fill your image with your background color. Selections/Select all (keep selected
3. Bring up your Tube,
Edit/copy, Edit/paste into selection.
Selections Select none.
Effects/Image Effects/Seamless Tiling Default settings.
Adjust/Blur/Gaussian Blur 25.00
4. Effects/plugins/Filter Factory H/ Alias Blur X and Y both set on 28. Effects/Edge Effects/Enhance.
4. Add a New Raster Layer Flood Fill with your Light/foreground color Layers New Mask Layer/from Image Select the mask
in the window. source luminance/checked Invert mask data/unchecked.
5. Still on the Mask layer In your layers palette do the following
Right click black/white mask layer Delete/click yes. When the next pop up window comes up select Yes Right click mask layer Merge/merge group.
6. Still on your mask Layer Effects/Plugins/Filters Unlimited/Paper Textures/Canvas Fine Intensity set on 156 Lightness 87
Effects/3D/drop shadow
Vertical and horizontal 2
Opacity 70
Blur 5.00
color black
Shadow on new layer not checked
7. Bring up your Tube Edit/copy, Edit/paste as new layer into your image.
Re-size your tube. I re-sized mine 85%. Move it to the bottom Left corner. Apply Same Drop shadow.
8. Using your dropper tool Left click/foreground, Right click/background choose a dark color from your image.
9. Select your text tool (settings below) a fat font works best I used Lakeshore Drive NF. Type out WELCOME size it with your nodes. Then Right click in the text layer in your layers palette convert to raster layer.

10. Still on text layer Toolbar under selections tab do all of the following..
A. select all,
B. select float.
C. Select defloat.
D modify expand 2
Now add new Raster Layer under your Text Layer. Use your dropper tool to Pick a dark color left click/foreground color. Now flood fill the selection with your color. Selections/select none.
11. Effects/Plugins/Filters Unlimited/Paper Textures/Canvas Fine Intensity set on 156 Lightness 87
12. Still on your Text Layer Effects/Plugins/Eye Candy 4000 Bevel Boss settings below. Apply same drop shadow.

13. Repeat Steps 9 through 11 for the words To The and then the word Group.
14. Select your dropper tool once again left click/foreground color and choose the light color you used for mask. Keep background color the same.
15. Image Add border 3 Select it with your magic wand (settings below) Flood fill with your foreground color. Selections/select none.

16. Effects/Plugins/Filters Unlimited/Paper Textures/Canvas Fine Intensity set on 156 Lightness 87
17. Apply your drop shadow, Change Vertical and Horizontal to 1. Apply drop shadow again but change the Vertical and horizontal to -1 Selections/select none.
18. Image/add border 15. Select with magic wand. Flood fill with your dark/background color. Apply steps 15 and 16. (drop shadow will be reversed)
19. Repeat Steps 14 through 16.
20. Add your water mark and copyrights. Right click any layer and merge visible. Re-size your image so that the height is 420.
Save your image as a jpeg in a folder where you can find it.
BACKGROUND.
1. Open new transparent image. 1280x300. Flood fill your image with your background color. Selections/Select all (keep selected
2. Bring up your Tube,
Edit/copy, Edit/paste into selection.
Selections Select none.
Effects/Image Effects/Seamless Tiling Default settings.
Adjust/Blur/Gaussian Blur 25.00
3. Effects/plugins/Filter Factory H/ Alias Blur X and Y both set on 28. Effects/Edge Effects/Enhance more.
4. Add a new Raster Layer Flood fill with your light/foreground color take Opacity down to 40. In your layers palette right click merge/merge visible.
5. Effects/Image Effects/seamless tiling settings below.

6. Open the Border in my supplies. Select the border Layer, Edit/copy, Edit/paste as new layer into your image. Move it to the Left border of your image. Click on it with your magic wand. Flood Fill with your foreground color/light
7. Effects/Plugins/Filters Unlimited/Paper Textures/Canvas Fine Intensity set on 156 Lightness 87
8. Open the Border in my supplies. Select the Lace Trim Layer, Edit/copy, Edit/paste as new layer into your image. Move it to the Left border of your image. Click on it with your magic wand. Flood Fill with your background color/dark color. Repeat Step 7. Apply drop shadow. Make sure Vertical and Horizontal are on 2
9. Right click the Lace Trim layer in your layers palette merge/merge down.
10 Re-size the merged border layer 101%. Click on your mover tool with your Keyboard right arrow move the border back out till you see the other dark border. Now Merge Visible.
Save your Image in the folder you made, by going to File/Export/Jpeg Optimizer Value set at 30
If You use my tutorials in Stationary Please apply Credit Below
Tutorial by Babs C
HERE or HERE
You can copy and paste the above if that does not work use Links below
http://groups.yahoo.com/group/sassynsimple/
http://snsstats.blogspot.com/
My newer Stationary Tutorials are in Incredimail Letter form
in order to access them you must be a member of my group
Our PSP HideAway
I want to Thank Simply Classy n Sassy Group Testers for testing the Tutorial
I hope you enjoyed this tutorial
©SassynSimple Tutorials