
 ©SassynSimple Tutorials
DATE WRITTEN: Oct 30, 2009
THINGS NEEDED Jasc Paintshop Pro or Corel Paint Program Settings may vary slightly. You must have a good working knowledge of the programs I use.
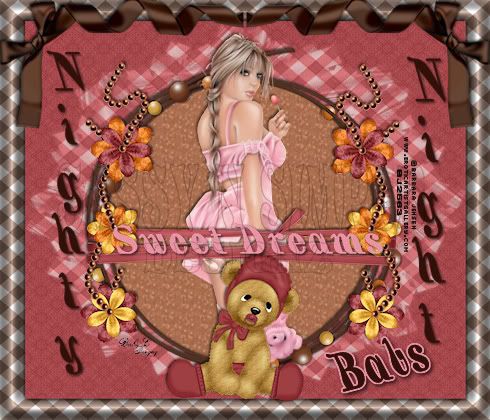
TUBE: Barbara Jensen you must Purchase this tube HERE
KIT: Fantasy Moments FTU Teddy Time Tagger HERE
MASK: WeeScotsLass WSL_Mask143 HERE (included in supplies)
PLUGINS: Eye Candy 4000 Bevel Boss
MY SUPPLIES: HERE
If you choose a different kit re-sizing may change.
Let's Begin
The below steps must be done and will not be repeated.
We will use same drop shadow unless I state otherwise.
Always Close original image after you copy unless stated otherwise.
Always sharpen re-sized items one time.
1. Open a new transparent image 700X600
Selections/select all
Select Paper 1 from the kit edit/copy
edit/paste into selection in your image
Selections/select none
2. Effects/Plugins/Eye Candy 4000/Bevel Boss
(settings below)
THINGS NEEDED Jasc Paintshop Pro or Corel Paint Program Settings may vary slightly. You must have a good working knowledge of the programs I use.
TUBE: Barbara Jensen you must Purchase this tube HERE
KIT: Fantasy Moments FTU Teddy Time Tagger HERE
MASK: WeeScotsLass WSL_Mask143 HERE (included in supplies)
PLUGINS: Eye Candy 4000 Bevel Boss
MY SUPPLIES: HERE
If you choose a different kit re-sizing may change.
Let's Begin
The below steps must be done and will not be repeated.
We will use same drop shadow unless I state otherwise.
Always Close original image after you copy unless stated otherwise.
Always sharpen re-sized items one time.
1. Open a new transparent image 700X600
Selections/select all
Select Paper 1 from the kit edit/copy
edit/paste into selection in your image
Selections/select none
2. Effects/Plugins/Eye Candy 4000/Bevel Boss
(settings below)

3. Add a New Raster Layer Selections/select all.
Select Paper 18 from the kit edit/copy
edit/paste into selection on your image
Selections/select none.
Re-size it 90%. Smart Size and all Layers unchecked.
4. Effects/3D/drop shadow
Vertical and horizontal 2
Opacity 70 Blur 5.00
color black
Shadow on new layer not checked
apply drop shadow again, change your Vertical and horizontal to -2
5. Layers palette/right click add a new raster Layer
Selections/select all. Select Paper 3 from the kit edit/copy
edit/paste into selection on your image
Selections/select none
6. Layers/New Mask Layer/from Image
Select WSL_Mask143 in the window.
source luminance/checked Invert mask data/unchecked.
7.Layers palette/right click black/white mask/merge/merge group
8. Select Element 16 From the kit, Edit/copy
Edit/paste as new layer into your image
Re-size it 70%
Apply drop shadow remember to change vertical and horizontal back to 2
9. Select your magic wand
(settings below) Click inside the frame
Selections/modify Expand 6
Keep Selected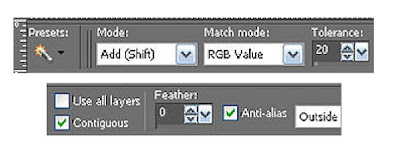
10. Add a New raster layer under your frame
Select Paper 24 from the Kit Edit/copy
Edit/paste into selection on your image
Selections/Select None
11. Select your Tube Edit/copy
Edit/paste as new layer into your image under your frame
Re-size if needed
Apply same Drop Shadow
Use eraser tool erase any parts showing outside the frame
12. Layers palette/right click Duplicate Tube 1 time
drag this layer above your frame
13. Select Element 58 from the Kit Edit/copy
Edit/paste as new layer into your image as your top Layer
Re-size it 45%
Apply same drop shadow
Center it over your frame
14. Select Element 25 From the kit, Edit/copy
Edit/paste as new layer into your image
Re-size it 40%. Apply same drop shadow
Place it on the right side of your frame
Layers palette/right click Duplicate 1 time
Image/mirror
15. Select Element 13 from the Kit, Edit/copy
Edit/paste as new layer into your image
Re-size it 40%
Apply same drop shadow
Center this at The bottom of your frame
16. Select Element 23 from the kit, Edit/copy
Edit/paste as new layer into your image
Re-size it 35%
Move it to the Left Top Corner of your Image
Layers palette right click Duplicate 1 time
Image/mirror
17. With your Dropper Tool select a dark color from image
Left Click/foreground color
right click/background color
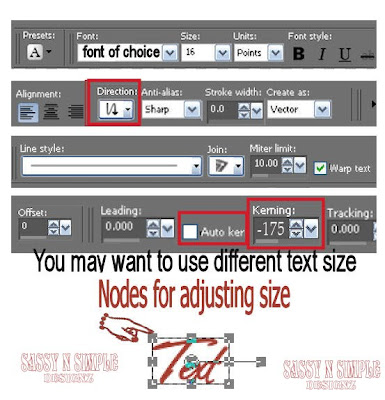
18. Select your Text tool (settings below)
Type Out Nighty
Size it with your nodes
layers palette right click the layer/convert to raster layer.
Apply your drop shadow
Do the same for the word Night
Add your name the same way also
19. Layers palette/right click add a new raster layer
use dropper tool select a color that will show good
l Left click/foreground color
Under your brushes find the brush and apply it
You may need to click mouse several times to get it dark enough
20. Layers palette/add a new raster layer
Add your watermarks and copyrights
Re-size your image so that height is 420. Width will adjust
All layers checked/smart size
Make a folder and save your image in it.
BACKGROUND
1. Open new transparent image. 1280x300.
Selection select all.
Select paper 22 from the kit Edit/Copy
edit/paste into selection in your image
Selections/ Select none
2. Layers palette/right click add a new Raster Layer
Select the Selection Tool
Draw out a rectangle starting at the 150 mark all the way to left border
and entire height(see example below)
Keep Selected

3. Select Paper 1 from the Kit Edit/copy
Edit/paste into selection
Selections/select none
Apply same drop shadow
layers Palette/right click merge/merge visible
(I did not use seamless tiling)
4. Select Element 25 from the kit, Edit/copy
Edit/paste as new layer into your image
Re-size it 30%
Apply same drop shadowMove it To the Left Border
5. Select element 13 from the kit, Edit/copy
Edit/paste as new layer into your image
Re-size 30%
Apply same drop shadowmove it to the Left Border
6. Layers palette/right click add a New Raster Layer
Use your Dropper Tool select dark color from image
left click/foreground color
Select your Brush tool Fine the sns_Sweet Dreams brush Brush
brush size 290
Apply your Brush.
Image/free rotate Right 90.00
all boxes unchecked Apply same drop shadow
Put on the Edge of Border Paper
Save your Image File/Export/Jpeg Optimizer Value set at 30
Thanks for trying my tutorial hope you enjoyed it.
Select Paper 18 from the kit edit/copy
edit/paste into selection on your image
Selections/select none.
Re-size it 90%. Smart Size and all Layers unchecked.
4. Effects/3D/drop shadow
Vertical and horizontal 2
Opacity 70 Blur 5.00
color black
Shadow on new layer not checked
apply drop shadow again, change your Vertical and horizontal to -2
5. Layers palette/right click add a new raster Layer
Selections/select all. Select Paper 3 from the kit edit/copy
edit/paste into selection on your image
Selections/select none
6. Layers/New Mask Layer/from Image
Select WSL_Mask143 in the window.
source luminance/checked Invert mask data/unchecked.
7.Layers palette/right click black/white mask/merge/merge group
8. Select Element 16 From the kit, Edit/copy
Edit/paste as new layer into your image
Re-size it 70%
Apply drop shadow remember to change vertical and horizontal back to 2
9. Select your magic wand
(settings below) Click inside the frame
Selections/modify Expand 6
Keep Selected

10. Add a New raster layer under your frame
Select Paper 24 from the Kit Edit/copy
Edit/paste into selection on your image
Selections/Select None
11. Select your Tube Edit/copy
Edit/paste as new layer into your image under your frame
Re-size if needed
Apply same Drop Shadow
Use eraser tool erase any parts showing outside the frame
12. Layers palette/right click Duplicate Tube 1 time
drag this layer above your frame
13. Select Element 58 from the Kit Edit/copy
Edit/paste as new layer into your image as your top Layer
Re-size it 45%
Apply same drop shadow
Center it over your frame
14. Select Element 25 From the kit, Edit/copy
Edit/paste as new layer into your image
Re-size it 40%. Apply same drop shadow
Place it on the right side of your frame
Layers palette/right click Duplicate 1 time
Image/mirror
15. Select Element 13 from the Kit, Edit/copy
Edit/paste as new layer into your image
Re-size it 40%
Apply same drop shadow
Center this at The bottom of your frame
16. Select Element 23 from the kit, Edit/copy
Edit/paste as new layer into your image
Re-size it 35%
Move it to the Left Top Corner of your Image
Layers palette right click Duplicate 1 time
Image/mirror
17. With your Dropper Tool select a dark color from image
Left Click/foreground color
right click/background color
18. Select your Text tool (settings below)
Type Out Nighty
Size it with your nodes
layers palette right click the layer/convert to raster layer.
Apply your drop shadow
Do the same for the word Night
Add your name the same way also

19. Layers palette/right click add a new raster layer
use dropper tool select a color that will show good
l Left click/foreground color
Under your brushes find the brush and apply it
You may need to click mouse several times to get it dark enough
20. Layers palette/add a new raster layer
Add your watermarks and copyrights
Re-size your image so that height is 420. Width will adjust
All layers checked/smart size
Make a folder and save your image in it.
BACKGROUND
1. Open new transparent image. 1280x300.
Selection select all.
Select paper 22 from the kit Edit/Copy
edit/paste into selection in your image
Selections/ Select none
2. Layers palette/right click add a new Raster Layer
Select the Selection Tool
Draw out a rectangle starting at the 150 mark all the way to left border
and entire height(see example below)
Keep Selected

3. Select Paper 1 from the Kit Edit/copy
Edit/paste into selection
Selections/select none
Apply same drop shadow
layers Palette/right click merge/merge visible
(I did not use seamless tiling)
4. Select Element 25 from the kit, Edit/copy
Edit/paste as new layer into your image
Re-size it 30%
Apply same drop shadowMove it To the Left Border
5. Select element 13 from the kit, Edit/copy
Edit/paste as new layer into your image
Re-size 30%
Apply same drop shadowmove it to the Left Border
6. Layers palette/right click add a New Raster Layer
Use your Dropper Tool select dark color from image
left click/foreground color
Select your Brush tool Fine the sns_Sweet Dreams brush Brush
brush size 290
Apply your Brush.
Image/free rotate Right 90.00
all boxes unchecked Apply same drop shadow
Put on the Edge of Border Paper
Save your Image File/Export/Jpeg Optimizer Value set at 30
Thanks for trying my tutorial hope you enjoyed it.
If You use my tutorials in Stationary Please apply Credit Below
Tutorial by Babs C
HERE or HERE
You can copy and paste the above if that does not work use Links below
http://groups.yahoo.com/group/sassynsimple/
http://snsstats.blogspot.com/
My newer Stationary Tutorials are in Incredimail Letter form
in order to access them you must be a member of my group
Our PSP HideAway
©SassynSimple Tutorials