
©SassynSimple Tutorials
DATE WRITTEN: Oct 21, 2009
THINGS NEEDED
Jasc Paintshop Pro or Corel Paint Program Settings may vary slightly.
You must have a good working knowledge of the programs I use.
You must have a good working knowledge of the programs I use.
TUBE: Outlaw by Design is FTU Poser Page 2 HERE
KIT: Is By Bea’s Creations Drama Queen FTU tagger you can get it HERE
If you choose a different kit re-sizing may change.
Let's Begin
The below steps must be done and will not be repeated.We will use same drop shadow unless I state otherwise.
Always Close original image after you copy unless stated otherwise.
Always sharpen re-sized items one time.Refer to my image if you need to for placement.
Open your tube minimize for now. A sitting tube will work better.
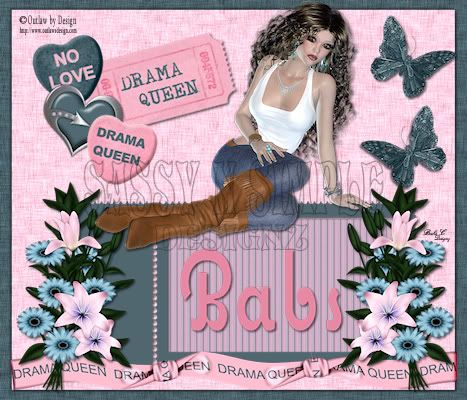
1. Open a new transparent image 700X600 Selections/select all. Select Paper 8 from the kit edit/copy, edit/paste into selection. Selections/select none
2. Add a New Raster Layer Selections/Select All Select Paper 10 from the kit, Edit/copy, Edit/Paste into Selection. Selections/Select None. Re-size 95%. Effects/3D/drop shadow Vertical and horizontal 2, Opacity 70, Blur 5.00, color black, Shadow on new layer not checked Now Apply the drop shadow again but Change the Vertical and Horizontal to -2. Minimize paper 10 for now you will need it again.
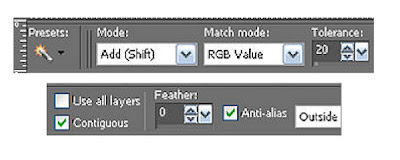
3. Select frame 02 from the kit Edit/copy, Edit/paste as new layer into your image. D0 Not Re-size. Move it towards the bottom of you image. Apply Drop Shadow. Make sure you change Vertical and Horizontal back to 2.4. Select your magic wand tool (settings below) Click inside the frame window. Selections/modify Expand 8. Keep selected.

5. Add a New raster Layer below your frame Layer. Select Paper 3 from the kit. Edit/copy, Edit/paste into Selection. Selections/select none.6. Select Ribbon 01 From the Kit, Edit/copy, Edit/paste as new layer into your image. Re-size it 95%. Apply Drop Shadow and move to the bottom of your image.
7. Select Butterfly 02 from the kit. Edit/copy, Edit/paste as new layer into your image. In your layers palette lower Opacity to 65..Re-size it 50%. Apply same drop shadow. Move it to the top right hand corner of your Image
8. Still on your Butterfly Layer duplicate it One time. Image/mirror.. Move this one back over to the right and below your original butterfly.
9. Select your tube Edit/copy, Edit/paste as new layer into your image. Re-size as needed If using the one I used Re-size it 25%. Apply same drop shadow. Arrange the tube so that it is sitting on your frame
10. Select ticket 01 from the kit Edit/copy, Edit/paste as new layer into your image. Do not re-size. Image/free rotate it 15.00 left. Apply same drop shadow. Move to the top Left corner centered in the open space.
11. Select Candy heart 02 from the kit Edit/copy, Edit/paste as new layer into your image. Image/Free Rotate it 15.00 right. Do not Re-size it. Apply same drop shadow. Move it to sit just above the left top corner of your ticket. Minimize the heart for now.
12. Select heart 02 from the kit Edit/copy, Edit/paste as new layer into your image. Image/Free Rotate it 15.00 right Do not re-size. Apply same drop shadow. Move this below your first heart. Minimize the heart for now.
13. Select Candy heart 01 from the kit Edit/copy, Edit/paste as new layer into your image. Image/Free Rotate it 15.00 right. Do not Re-size it. Apply same drop shadow. Move it to the bottom of your previous heart. Minimize the heart for now.
14. Select flower 01 from the kit Edit/copy, Edit/paste as new layer into your image. Do not re-size Apply same drop shadow. Place it on the right side of your frame’s edge.
15. Still on your flower layer duplicate it One time. Image/mirror.16. With your Dropper tool left click foreground for foreground color and right click for background color. Choose a dark color from your image.
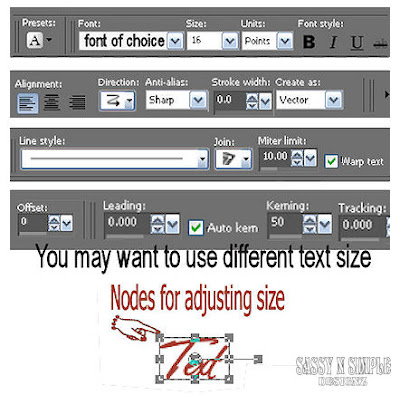
17. Select your text tool (settings below) Type out your name. Using nodes size it to fit inside of your Frame window. Right click on the layer in layers palette convert to raster layer and apply same drop shadow.

18. Apply watermarks and copyrights Re-size image so that height is 400. Width will adjust.
Make a folder and save your image in it. When you hit "save as" there I will be an options button click on it and set your compression factor to 4. This will take away the grainy look that you get sometimes.
BACKGROUND.
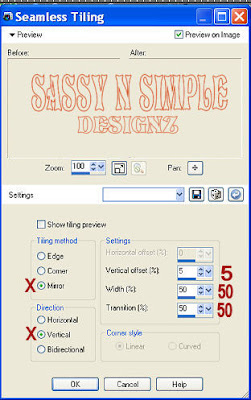
1. Open new transparent image. 1280x300. Selection select all. Select paper 10 from the kit. Edit/Copy, Edit/paste into selection. Selections/ Select none.2, Effects/Image Effects/seamless tiling see settings below.

3. Select flower 01 from the kit Edit/copy, Edit/paste as new layer into your image. Do not re-size, Apply same drop shadow. Move it to the left Border of your image.
4. Select Candy heart 01 from the Kit. Edit/copy, Edit/paste as new layer into your image. under your Flower Layer. Re-size it 80%. Image/free rotate 15.00 right. move it slightly under the top part of your flower.
5. Select heart 02 from the Kit. Edit/copy, Edit/paste as new layer into your image. above your Flower Layer. Re-size it 80%. Image/free rotate 15.00 left. move it slightly over the center of your flower. .
6. Select Candy heart 02 from the Kit. Edit/copy, Edit/paste as new layer into your image. under your Flower Layer. Re-size it 80%. Image/free rotate 15.00 right. move it so that it is slightly under the bottom part of your flower. Save your Image in the folder you made, by going to File/Export/Jpeg Optimizer Value set at 30
