

BACKGROUND IMAGE LOST DUE TO PHOTOBUCKET LOSING IT
Date Written: June 11, 2009
THINGS NEEDED
THINGS NEEDED
Paint Shop Pro 9 or similar program and a good working knowledge of it.
TUBE: Erica Currey You need a License you must Purchase it at MYPSPTUBES
MY SUPPLIES: HERE Includes mask and word art for background.
KIT: FTU Love bug by BlueDreams
PLUGINS: Eye Candy 4000
You might want to check out might Quick Tips before starting. HERE
Not all kits are same sizes.
So if you choose another kit, your re-sizing may be different..
Not all elements are the same size either..
Okay Lets Start
Please NOTE as I will not repeat in each step
Once set your drop shadow will stay
Always Close original image after you copy.
Always sharpen once after your re-size
1. Open your mask and tube minimize for now. Open the word art brush. Install the word art brush into your brushes by clicking on File Export Custom brush.
2. Open a new transparent 700x500 Flood Fill with paper of your choice. I used #5.
3. New Raster layer Flood fill with paper of your choice I used #2 scale 50.
4. Layers/New Mask Layer from image Source Luminance checked Invert mask Checked. Click Ok. Layers/Delete. Right Click on mask layer merge group. Re-size the mask 85%..
5. Copy you tube close Paste into your image as new layer. Re-size as needed. Apply Drop Shadow settings below.
 6. Open a Paper to use for your font Select a fat font I am using AS Happy Jack. I re-sized my paper to 900 then scaled it to 50% so it would look better. Type out your font.
7. Effects/plugins/eye candy 4000 bevel boss see settings below.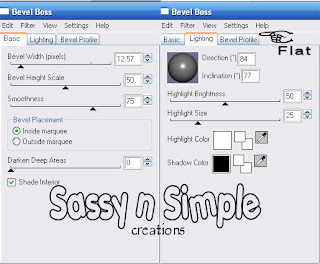 8. Add a new raster layer below your text layer
 8. Add a new raster layer below your text layer
9. Highlight your Font Layer Selections/select all, float, defloat, modify expand 3. Now click back on layer below your tube and flood fill with a color that will make the text stand out I used white. Selections/select none. Apply same drop shadow as before.
10. Right click on Text layer and merge down into the text background layer.
11. Repeat steps 6 through 10 adding a different Text saying.
12. Select your rectangle tool. width line settings 20. close off background layer draw a rectangle around your image. Use same bevel boss as before.. Apply same drop shadow as before.
13. Open one of the word charms copy and paste into your image as new layer. Then re-sized mine 30% then 60% to get it the size I wanted. Place where you would like it. I placed mine on the right side. Apply the same drop shadow as before.
14. Open a butterfly copy and paste into your image as new layer. Then re-size it to 25% then 80%. Image/mirror. Place where you would like it. I placed mine over my text. Apply same drop shadow as before.
15. Open a Ribbon copy and paste it into image as new layer. then re-size to 30%. Apply same drop shadow.
16. Re-size your image all layers so that is no more than 400 in height width will adjust.
17. Add your watermarks and copyrights at this time.
ANIMATION:
1. Close off your top text layer Copy merged and paste into Animation shop as new animation. I always click on a different layer that way I can just click on the eye to open my next Layer instead of having to click on each layer.
2. Now close of bottom text layer Open your top text layer copy merged paste after current frame in Animation shop.
3. Now we need to change the frame speed. So highlight your first frame. Edit/select all. Now right click on frame select frame properties and change your speed to 120.
Save your animation.. I always make a folder to put everything in..
Background..
1. New image 1000x200 flood fill with paper of your choice. Seamless tiling see image below for settings.

2. New raster layer. Select a paper. If using a full sized re-size it to 900x900 then select it scale set to 25. Select your brush. Set Rotation of the brush in your toolbar settings to 90. View/ruler click on it to make it viewable in your image. Starting at the 100 mark apply your brush. applying it in at the top next apply lower do this till it is covering your entire background.
3. Click on your brush layer take opacity down to about 50 merge down into your background.
4. Select frame 7 from the kit copy and paste into image as new layer. then re-size it 25% and then it again re-size it 30% Now move to the left side of your image.
5. Select an element of your choice. I am using a butterfly. Then re-size 35% then once again 25%.. Copy and paste into your image under your frame layer as new layer. Duplicate it 2 times. Mirror one. Arrange them so that they are inside a window of the frame. see my image for reference.
6. Merge all layers File/Export compression value set at 25. save where you can find it..
Just copy and paste into your Stationary
I want to Thank Simply Classy n Sassy Group Testers for testing the Tutorial
I hope you enjoyed this tutorial..
I hope you enjoyed this tutorial..