
BACKGROUND IMAGE LOST
Date Written: June 11, 2009
You need a working knowledge of PSP to do this tutorial.
THINGS NEEDED
Paint Shop Pro 9 or similar program and a good knowledge of the program,
TUBE: Barbara Jensen Tube you need a Licesne to use her work. Get one HERE
KIT: Fantasy Moments Morning Glory FTU HERE
PLUGINS: Eye Candy 4000 Bevel Boss. Vm natural sparkle. Filters Unlimited
Not all kits are same sizes.
So if you choose another kit, your re-sizing may be different..
Let's Begin
Please NOTE as I will not repeat in each step
Once you set your drop shadow it will stay.
Always Close original image after you copy.
Always sharpen once after your re-size
1. Open your tube and minimize for now. New transparent image 600x700.
2. Select a paper from the kit. Add a New raster layer flood fill with your paper. I scaled mine down to 50%.
3. Effects/Plugins/Filters Unlimited Select Edges square and apply to your paper Layer. Re-size 85%.
4. Copy Your Tube Paste above your paper Layer as a new layer. Apply drop shadow see settings below.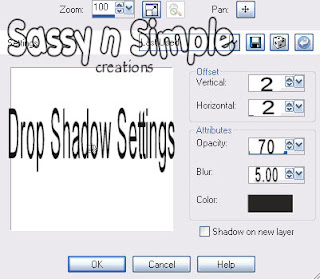 5. Open a Flower copy and close Paste above your tube frame as new layer.. Resize it about 80% or to your likening. Apply same drop shadow.
2. Select a paper from the kit. Add a New raster layer flood fill with your paper. I scaled mine down to 50%.
3. Effects/Plugins/Filters Unlimited Select Edges square and apply to your paper Layer. Re-size 85%.
4. Copy Your Tube Paste above your paper Layer as a new layer. Apply drop shadow see settings below.
 5. Open a Flower copy and close Paste above your tube frame as new layer.. Resize it about 80% or to your likening. Apply same drop shadow.
6. Open some of the flowers from the Kits copy and paste them into your image as new layer. I re-sized Flower element 16 50% and all others 20% Except for my two light green flowers I wanted them smaller so I re-sized them down 85% more. Arrange them to your likening. I moved some of my flowers below my square. Now apply your same drop shadow as before.
7. Open The broom element copy close it then paste it below your tube layer as new layer. Re-size 75%/ Arrange it to the left of your fairy.
8. Open The butterfly elements copy and paste into your image as new layer. I re-sized mine 30%. And Then Image Free rotate 30.00 towards which every way you have your facing. I mirrored one of mine so that it was facing the other way. Apply same drop shadow as before.
9. If you are happy with how everything is arranged now. Close off your background layer. Merge Visible. I then resized my merged layer 90%.
10. Now flood fill your background with paper of your choice. A Darker color will be better.
11. Now we are going to make a frame around our Image. Select a paper in your foreground. close off your background. Select your rectangle tool.
Make your line width 40.00 now draw out a frame around your image. Objects Align center in canvas convert to raster layer. The reason we want to align is to insure that all sides are even..
12. Effects/plugins/eye candy bevel boss see settings below..Apply same drop shadow as before.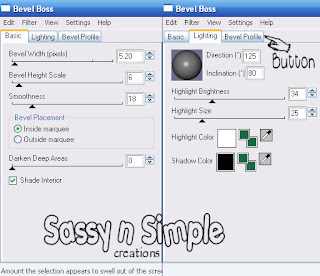 13. Apply your Text. I used a pattern paper. And Speedscript Normal Font. Then I added a new raster layer under my font. Clicked on my Text layer Selections Select all, float, defloat then Selections modify expanded 2. Then click back on the layer you added and flood fill with white. Apply same drop shadow as before.
11. Now we are going to make a frame around our Image. Select a paper in your foreground. close off your background. Select your rectangle tool.
Make your line width 40.00 now draw out a frame around your image. Objects Align center in canvas convert to raster layer. The reason we want to align is to insure that all sides are even..
12. Effects/plugins/eye candy bevel boss see settings below..Apply same drop shadow as before.
 13. Apply your Text. I used a pattern paper. And Speedscript Normal Font. Then I added a new raster layer under my font. Clicked on my Text layer Selections Select all, float, defloat then Selections modify expanded 2. Then click back on the layer you added and flood fill with white. Apply same drop shadow as before.
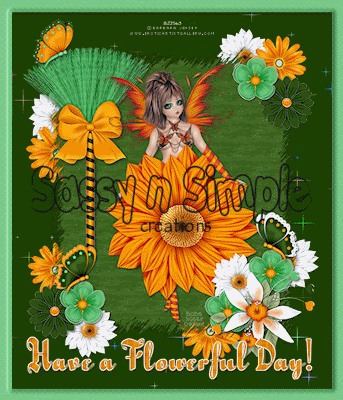
14. Apply your watermark and copyrights Then re-size your image so that it is 400 in height width will adjust.
ANIMATION:
1. Duplicate your background layer 2 times you should have a total of 3.
2. Select the bottom background layer. Effects/Plugins/Vm Sparkle. see settings below.
3.Now close off that layer open the background layer above it Apply your sparkle again but change the random seed to 140.
ANIMATION:
1. Duplicate your background layer 2 times you should have a total of 3.
2. Select the bottom background layer. Effects/Plugins/Vm Sparkle. see settings below.
3.Now close off that layer open the background layer above it Apply your sparkle again but change the random seed to 140.
4.Close that layer and open the top background layer. Apply the sparkle again this time change the random seed to 160.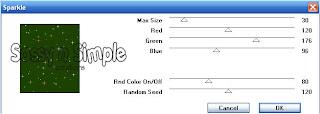 5. Close off the top two background layers. I always click on a different layer and highlight. So I do have to keep highlighting every layer. Edit copy merged. Paste in animation shop as new animation. Close off bottom background layer open background layer above it Copy merged paste in animation shop after current frame. Now close that layer open the top background layer copy merged paste in animation shop after current frame.
 5. Close off the top two background layers. I always click on a different layer and highlight. So I do have to keep highlighting every layer. Edit copy merged. Paste in animation shop as new animation. Close off bottom background layer open background layer above it Copy merged paste in animation shop after current frame. Now close that layer open the top background layer copy merged paste in animation shop after current frame.
Save animation where you can find it.
Background.
1, Open new image 1000x200 flood fill with paper of your choice.
2. Effects/Image/effects seamless tiling. see settings below.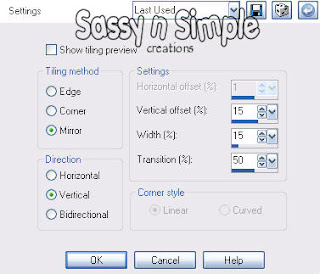 3. Open some elements from the kit copy and paste into the image as new layer. Resize and arrange on the left side of your image. Apply drop shadow that you used before. Once you are happy with the arrangement merge visible.
Background.
1, Open new image 1000x200 flood fill with paper of your choice.
2. Effects/Image/effects seamless tiling. see settings below.
 3. Open some elements from the kit copy and paste into the image as new layer. Resize and arrange on the left side of your image. Apply drop shadow that you used before. Once you are happy with the arrangement merge visible.
4. File Export jpeg optimizer compression value set at 25.
Just copy and paste into your Stationary
I want to Thank Simply Classy n Sassy Group Testers for testing the Tutorial
I hope you enjoyed this tutorial.. thanks for trying it...
I hope you enjoyed this tutorial.. thanks for trying it...