


Paintshop pro 9 or similar program
TUBE: Poser by PAnne HERE
MASK: WSM mask 245 Here site is HERE
KIT: Included in supplies
PLUGINS: Eye Candy 4000 and Xenoflex 2
MY SUPPLIES: HERE
MASK: WSM mask 245 Here site is HERE
KIT: Included in supplies
PLUGINS: Eye Candy 4000 and Xenoflex 2
MY SUPPLIES: HERE
Before we start you might want to check out my Quick Tips.. HERE
Not all kits are same sizes.
So if you choose another kit, your re-sizing may be different..
So if you choose another kit, your re-sizing may be different..
Let's Begin
Please NOTE as I will not repeat in each step.
Once you set your drop shadow it will stay..
Always Close original image after you copy.
Always sharpen re-sized items one time.
Please NOTE as I will not repeat in each step.
Once you set your drop shadow it will stay..
Always Close original image after you copy.
Always sharpen re-sized items one time.
l. Open you tube and mask minimize it.
Open a New image Transparent 700x600.
Select a paper or color from your tube in your foreground/under patterns.
Flood fill.
I used Paper 8.
Remember to choose one that is suitable for a letter background.
2. New raster Layer flood with a paper or color from you tube.
2. New raster Layer flood with a paper or color from you tube.
. Layers/New mask/ from Image.
Select your mask
source luminance checked..Invert unchecked
Apply.
Layers/delete when it ask do you want to merge say say yes.
Apply drop Shadow. 3. Select a Fat Font..
 3. Select a Fat Font..
I am using AS Brushwacker. Create as Vector.
Foreground and Background set to pattern of your choice.
.I scaled my pattern to 50%.
Type out your text.
Size your Font so that it is 250 in height/ 500 in width.
Now right click on font Layer change to raster.
4. Add a new raster layer under your font layer.
highlight your font layer.
Selections/select all,
Selections/float,
Selections/defloat,
Selections/modify/expand 3.
Select a light color from your tube in your foreground.
Highlight the empty raster and flood fill selection with that color.
Selections/select none. Highlight the font layer and merge down.
Selections/select none. Highlight the font layer and merge down.
5. Effects/plugins/eye candy 4000 Bevel boss bevel choose button.
Apply settings below..
apply same drop shadow as before.
 6. Copy and paste your Tube as new layer. re-size if needed. Place your tube so that it is sitting on your font. Apply same drop shadow as before.
7. Re-size your font, mask and tube Layers 75%.
8. Select the same paper or color you used for your font in your foreground. I scaled mine down to 50% Select your rectangle tool. line solid width 25. background closed. Draw out a rectangle around your image. Objects/align/center of canvas. convert to raster layer and apply same bevel you used with your font..
9. Add a new raster Layer below your mask layer. Now with your magic Wand click inside of your Frame. Selections/modify/ expand 3. make sure your empty layer is highlighted and flood fill with a pattern paper. Selections/select none.
9. Add a new raster Layer below your mask layer. Now with your magic Wand click inside of your Frame. Selections/modify/ expand 3. make sure your empty layer is highlighted and flood fill with a pattern paper. Selections/select none.
10. Open Charm Copy close original and paste as new layer. Re-size 65%. Apply drop shadow.
11. Open up two flowers. Copy them and paste as new layer close originals. Re-size both flowers 30% adjust sharpen one time. . Apply same drop shadow as before to each one. Arrange them where you want them.
12. Duplicate each of your flowers 3 times and drag one of each below your frame background but above your background layer. for arrangement see my image or place where you would like them.
13. Select the brushes in the supplies export them in to your brushes. Size up the You should to 450 and the within your heart to 400.. Add a new raster layer. Apply brushes. You may have to apply several times to darken it so it can be seen.
14. Apply your watermark and copy right info at this time.
15. Re-size your image so that the height is 350 width will adjust.
ANIMATION
1. Duplicate your Font and frame layer once each..
2. Highlight your bottom frame layer Effects/Plugins/Xenoflex/constellations see image below for settings.
15. Re-size your image so that the height is 350 width will adjust.
ANIMATION
1. Duplicate your Font and frame layer once each..
2. Highlight your bottom frame layer Effects/Plugins/Xenoflex/constellations see image below for settings.
 3. Select the top Frame layer, Effects/Plugins/Xenoflex/constellations change random seed.
4. Select your bottom Font Layer. Xenoflex/constellations apply
5. Select your top font Layer Effects/Plugins/Xenoflex/constellations change random seed.
6. Close off Your Top Frame layer and your Top Font layer edit/copy merged paste into Animation shop as new animation. Now close of these layers Open the top frame layer and top font layer paste into animation shop after current layer.
Save your animation in a folder where you can find it..
Background.
1. New image 1000x182. Choose the same paper you used in your Header/tag. Flood Fill.
2. Open the border in the supplies Copy and paste into image. Selections/select all, selections/float, selections/defloat Select a paper in foreground and fill. Selections/select none. Move the border over to far left.. Merge into background Effects/image effects/seamless tiling see image below for settings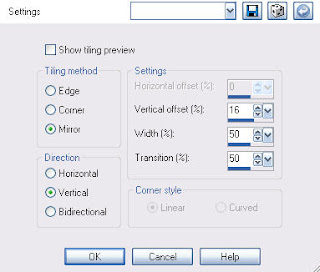 3. Open two of the flowers Re-size 30% copy and paste into image. duplicate them and arrange.
1. New image 1000x182. Choose the same paper you used in your Header/tag. Flood Fill.
2. Open the border in the supplies Copy and paste into image. Selections/select all, selections/float, selections/defloat Select a paper in foreground and fill. Selections/select none. Move the border over to far left.. Merge into background Effects/image effects/seamless tiling see image below for settings
 3. Open two of the flowers Re-size 30% copy and paste into image. duplicate them and arrange.
4. Open a bow copy it close original and paste into image. Re-size it 30%. copy and paste into image.
5. Merge all and export it with your jpeg optimizer save it to where you can find it.
Just copy and paste into your Stationary
I want to Thank Simply Classy n Sassy Group Testers for testing the Tutorial
I hope you enjoyed this tutorial..
I want to Thank Simply Classy n Sassy Group Testers for testing the Tutorial
I hope you enjoyed this tutorial..