


Date Written:May 29, 2009
Things Needed
Things Needed
Paintshop 9 or similar program and a good working knowledge of the program.
TUBE: By Cris Ortega
MASK: WSL 178 /weescotslasscreationsKIT: My Dreams Fantasy Moments
PLUGINS: Eye Candy 4000 and VM Natural
MY SUPPLIES: HERE
TUBE: By Cris Ortega
MASK: WSL 178 /weescotslasscreationsKIT: My Dreams Fantasy Moments
PLUGINS: Eye Candy 4000 and VM Natural
MY SUPPLIES: HERE
Not all kits are same sizes. So your re-sizing may be different..
Let's Begin
Please NOTE as I will not repeat in each step.
Once you set your drop shadow it will stay..
Always Close original image after you copy.
Always sharpen re-sized items one time.
Please NOTE as I will not repeat in each step.
Once you set your drop shadow it will stay..
Always Close original image after you copy.
Always sharpen re-sized items one time.
1. Open your tube and mask minimize for now.
2. Open New image 600x700 transparent. Select paper 21.
In the materials palette select the paper for your foreground and background.
With your Eclipse tool draw out a larger circle so that
it is almost touching the sides of your image.
Go to Objects Align align in center.
Now change it to a raster layer. Delete the empty Layer below your circle.
3. Select a new paper different color. select it in your foreground color.
3. Select a new paper different color. select it in your foreground color.
Close off your background color
Select your eclipse tool, Line width setting at 5.00. draw out a circle as wide as your frame again.
4. Add a new Layer Selections/select all
4. Add a new Layer Selections/select all
select paper15 edit/copy edit/paste into selection
selections/select none
Layers/New Mask layer/ from image.
Select your mask,
Settings are Source luminance checked and invert mask unchecked..
Apply. Layers/Delete.
When it ask you would like to merge say yes..
Right click on the top mask layer and merge group.
5. Open patterned paper. In the materials Palette select it under patterns
I am using paper 19 from the kit.
Close off your background.
Select your ellipse tool and draw out a circle
make sure that you don't go out side of the solid part of the mask.
6. Effects/plugins/eye candy 4000 bevel boss. apply the setting below..
6. Effects/plugins/eye candy 4000 bevel boss. apply the setting below..
 7. Effects/3D/drop shadow. Vertical 1 and Horizontal 1 opacity 70 blur 5.00
8. Select your edit/copy edit/Paste as new layer under your frame layer.
Re-size it so that it is inside of your circle frame.
Apply same drop shadow as before.
9. Open 4 of flowers edit/copy paste as new layer.
9. Open 4 of flowers edit/copy paste as new layer.
Re-size 30% Adjust sharpen once.
Apply the same drop shadow as before.
Close original tube..
Repeat these steps for all of your flowers.
10. Open a bow Copy and paste as new layer into your image.
10. Open a bow Copy and paste as new layer into your image.
Re-size 40% adjust/sharpen one time.
I used flower 39. a
free rotated it 45.00 to the Left.
Apply step 5
drop shadow again.
11. Now re-size your image so that the height is no more than 350 the width will automatically adjust.
12. Apply your text and watermarks and copyrights
11. Now re-size your image so that the height is no more than 350 the width will automatically adjust.
12. Apply your text and watermarks and copyrights
ANIMATION
1. Duplicate your mask layer two times.

2. Select the bottom layer Effects/Plugins/VM Natural sparkle..
See settings above..
3, Close that layer and go to your second mask layer
Effects/Plugins/Vm Natural sparkle. this time change the random seed to 215.
Repeat this for the top mask layer changing random seed to 230
4. Now close off the top two mask Layers.
Copy and paste merged as new animation in Animation shop.
Close off the bottom mask layer open the mask layer above it
copy merged and paste after current frame.
Close of that layer and open top mask Layer copy merged and paste after current frame.
Now save your animation to a file.
Background.
1. Open the border template and the ribbon template minimize for now.
2. Open new transparent layer 1000x 200 fill with a paper of your choice.
1. Open the border template and the ribbon template minimize for now.
2. Open new transparent layer 1000x 200 fill with a paper of your choice.
Effects/image effects/seamless tiling see image below for settings.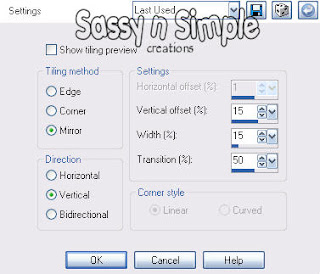 3. Copy and paste border into your image as new layer.
 3. Copy and paste border into your image as new layer.
Click on it with your magic wand.
Selections/modify Expand 1.
New Raster layer.
Flood fill the selection with a paper of your choice.
Selections/select none.
2. Copy and paste ribbon template into your image as new layer
Click on it with your magic wand.
Selections modify Expand 1.
Flood fill with paper.
Selections/select none Duplicate your ribbon one time.
4. Place the ribbons over the lines .
Using your selection tool draw a rectangle around one of the outer lines.
Copy and paste as new layer On top..
duplicate it 4 times. Place two over the ribbon on the right side.
Take the other two and mirror them and place them over the ribbon on the left side.
refer to my image.
3, Choose a flower Copy and paste it into the image as new layer close out the original.
3, Choose a flower Copy and paste it into the image as new layer close out the original.
Re-size one 20% adjust sharpen one time.
Apply same drop shadow you used before.
Duplicate Image/Flip it.
4. Open another flower copy and close original .
4. Open another flower copy and close original .
Paste into your image as new layer and Re-size it 15%. P
lace this one in the center of the other two.
Apply same drop shadow as before.
5. Now merge all and apply seamless tiling again. Save your border to a file..
5. Now merge all and apply seamless tiling again. Save your border to a file..
PLEASE PLACE CREDIT ON ALL STATS
I would Like to thank Simply Classy n Sassy Group Testers for testing the tutorial
I hope you enjoyed the Tutorial