


NAME: Bubbles, Bubbles
DATE: July 9, 2009
THINGS NEEDED
PAINTSHOP PRO 9 or similar program and a good knowledge of the program.
TUBE: PINUPTOONS Licensed Tube you can buy it at CILM
KIT: It's A Pink Thing Tagger kit 800x800 HERE
1. Open a New transparent image 800x700. Open a paper from the kit I used 2. Select it in your foreground color under patterns on your material palette. Flood fill your image.
2. Open a frame from the kit copy and paste it into your image as new layer. I used 2 Apply drop shadow vertical and horizontal 2. Opacity 65, blur 5.00
3. Open element 83. Copy and paste into image as new layer. Do not re-size. Duplicate it and mirror. Right click the duplicated layer and merge down. Again Duplicate and flip your image. You should now have hearts on all 4 corners apply drop shadow to both layers.
4. Open Element 55 Copy and paste into image as new layer Re-size 90%. Apply drop shadow duplicate and flip. Again paste this element into your image. Re-size it 75%. Apply drop shadow. Duplicate it and mirror it Arranging them all on the border of your image.
5. Add a new raster layer below your frame choose a paper from the kit put it in your foreground and background colors.
6 Select your eclipse tool circle and draw out a circle so that is is not over the frame centers but just a little all the way around… convert to raster layer.
7. Open element 83 copy and paste into your image as new layer. No re-size needed. Apply drop shadow. duplicate it and mirror it merge it down into original. Duplicate the merged layer and flip it..
8. Open element 9 copy and paste into image as new layer. No re-size needed. Apply drop shadow. Arrange it around your frame
9. Open element 91 copy and paste into your image as new layer. Re-size 60%. Apply drop shadow and mirror. Arrange it on the right side.
10. Apply your text, Right click on any layer merge visible. Re-size the image so that the height is 450 width will adjust. Add your watermark and copy right and merge them also.
Animated Bubbles.
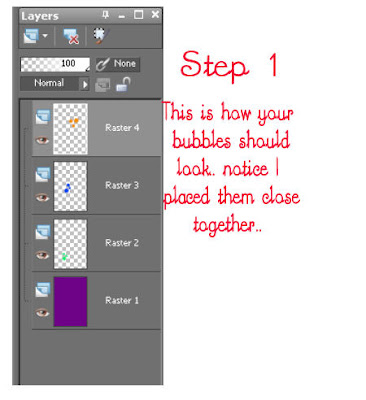
1. First select a light color in your foreground and background. Select your eclipse tool and draw out 3 circles.. Close together as I have done in the image below.. You need three layers. Each time place the circles just above the ones you done before.. see image below.
2. Add a new raster Layer above each of your circle layers. see image below.. Now select the top layer with your circles on it .. Take your magic wand and click on all the circles. Now click back on the empty layer above it select your flood fill tool and take the opacity down to 35 flood fill the selections on the layer.. Now Selections select none.. Delete the original solid layer under your your new transparent filled balls.. Continue to this until you have filled the other two layers above the remaining solid circles. remember to delete the original solid layers..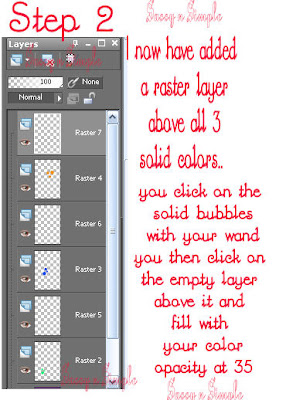
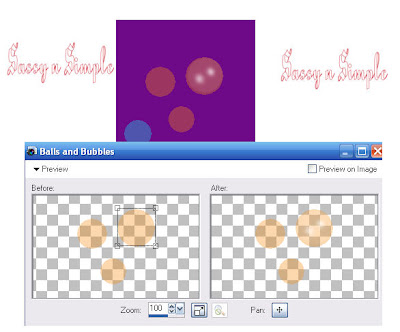
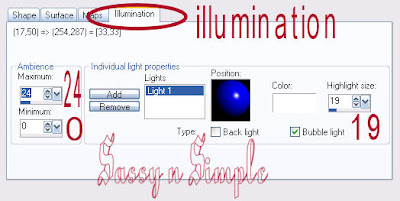
3..Select your bottom layer of circles. Effects/Artistic Effects/ balls and bubbles. Settings below. Hold your left mouse button down drag out the box around your ball. See the second image also It shows a better view of your box..
and what you should have now..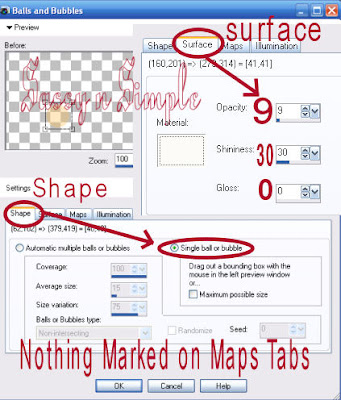
 4. Now select select the middle layer and make them into bubbles. Then do your top layer..
5. Now close off the middle and bottom layer bubbles. Click on your back ground layer in your layers palette.
6. Copy merged paste into Animation Shop as new animation. Close this the top layer open your middle bubble layer. Copy merged paste after current frame in AS.
Close the middle layer open the bottom bubble layer copy merged paste into AS after current frame.
7. Now duplicate frame 3 one time. Go back to PsP copy on your merged background layer. Paste it after current frame duplicate it two times. You should have a total of 7 frames now. Frame 3 and 4 should look exactly alike. 3 frames with no bubbles. Highlight frame 1 Edit/ select all.. Minimize this or make It smaller for now. So we have room for next step.
8. Go back and copy the bottom bubbles layer only Paste as new animation in AS.
9. Effects Insert Image Effect. See settings below only change what you see do not mess with any other settings. Once applied click on frame 1 Edit Select all. Mpve it over to one side.. Of your screen..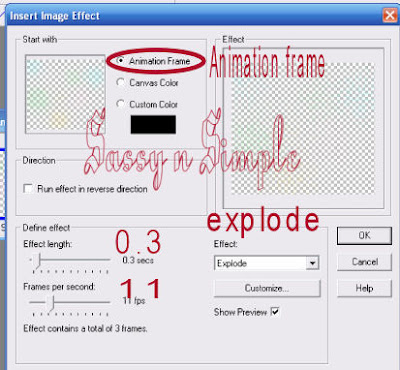
10. Open your First animation Beside of it.. Make this big enough so that you can see Only Frame 4. I suggest picking one of the larger balls to click on with your mouse. Make sure you are clicking on the first frame layer of balls. You must hold your left mouse button down to drag them into the other aniation.and keep holding it till they are place where you want the balls. until you have the balls. If you do not place the balls in the. right place Go to edit click undrag.. Click back on the bubble animation and do it there to.. Now you can go back and try to place them again.
11. Satisfied with the way it looks Delete Frame 4. Click on frame one go to edit select all right click on frame 1 select frame properties and change speed to 50. Now your bubbles will burst.. Save your image where you can find it..
Background:
1 Open a New image 1000x300 Select a paper from the kit in your foreground color and flood fill it..
2. Add a new raster Layer. With your selection tool start at the 150 top ruler mark and draw out a rectangle to the left border and the entire length or the image. Select a paper and flood fill the selection. Apply your Drop Shadow.. Vertical and Horizontal set at 2 Opacity 65 and blur 5.00
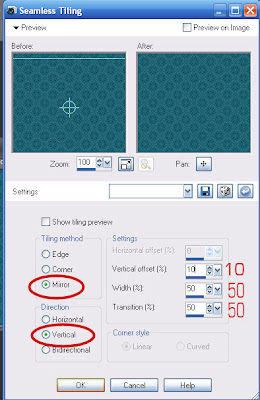
3. Merge visible apply Effects/image effects/seamless tiling see settings below.
4, Open Element 14 copy and paste into image as new layer re-size it 70%. Apply same drop shadow. move to the left over your border.
5. Open Element 69 copy and paste into image. Re-size it 50%. Apply drop shadow move to the left over your border.
6. Open Element 55 I resized it to 300 width then copied and paste it into my image as new layer. Apply same drop shadow. Move to the left border Merge Visible. Save Under File Export Jpeg optimizer value 25.
DATE: July 9, 2009
THINGS NEEDED
PAINTSHOP PRO 9 or similar program and a good knowledge of the program.
TUBE: PINUPTOONS Licensed Tube you can buy it at CILM
KIT: It's A Pink Thing Tagger kit 800x800 HERE
1. Open a New transparent image 800x700. Open a paper from the kit I used 2. Select it in your foreground color under patterns on your material palette. Flood fill your image.
2. Open a frame from the kit copy and paste it into your image as new layer. I used 2 Apply drop shadow vertical and horizontal 2. Opacity 65, blur 5.00
3. Open element 83. Copy and paste into image as new layer. Do not re-size. Duplicate it and mirror. Right click the duplicated layer and merge down. Again Duplicate and flip your image. You should now have hearts on all 4 corners apply drop shadow to both layers.
4. Open Element 55 Copy and paste into image as new layer Re-size 90%. Apply drop shadow duplicate and flip. Again paste this element into your image. Re-size it 75%. Apply drop shadow. Duplicate it and mirror it Arranging them all on the border of your image.
5. Add a new raster layer below your frame choose a paper from the kit put it in your foreground and background colors.
6 Select your eclipse tool circle and draw out a circle so that is is not over the frame centers but just a little all the way around… convert to raster layer.
7. Open element 83 copy and paste into your image as new layer. No re-size needed. Apply drop shadow. duplicate it and mirror it merge it down into original. Duplicate the merged layer and flip it..
8. Open element 9 copy and paste into image as new layer. No re-size needed. Apply drop shadow. Arrange it around your frame
9. Open element 91 copy and paste into your image as new layer. Re-size 60%. Apply drop shadow and mirror. Arrange it on the right side.
10. Apply your text, Right click on any layer merge visible. Re-size the image so that the height is 450 width will adjust. Add your watermark and copy right and merge them also.
Animated Bubbles.
1. First select a light color in your foreground and background. Select your eclipse tool and draw out 3 circles.. Close together as I have done in the image below.. You need three layers. Each time place the circles just above the ones you done before.. see image below.

2. Add a new raster Layer above each of your circle layers. see image below.. Now select the top layer with your circles on it .. Take your magic wand and click on all the circles. Now click back on the empty layer above it select your flood fill tool and take the opacity down to 35 flood fill the selections on the layer.. Now Selections select none.. Delete the original solid layer under your your new transparent filled balls.. Continue to this until you have filled the other two layers above the remaining solid circles. remember to delete the original solid layers..

3..Select your bottom layer of circles. Effects/Artistic Effects/ balls and bubbles. Settings below. Hold your left mouse button down drag out the box around your ball. See the second image also It shows a better view of your box..
and what you should have now..


 4. Now select select the middle layer and make them into bubbles. Then do your top layer..
5. Now close off the middle and bottom layer bubbles. Click on your back ground layer in your layers palette.
6. Copy merged paste into Animation Shop as new animation. Close this the top layer open your middle bubble layer. Copy merged paste after current frame in AS.
Close the middle layer open the bottom bubble layer copy merged paste into AS after current frame.
7. Now duplicate frame 3 one time. Go back to PsP copy on your merged background layer. Paste it after current frame duplicate it two times. You should have a total of 7 frames now. Frame 3 and 4 should look exactly alike. 3 frames with no bubbles. Highlight frame 1 Edit/ select all.. Minimize this or make It smaller for now. So we have room for next step.
8. Go back and copy the bottom bubbles layer only Paste as new animation in AS.
9. Effects Insert Image Effect. See settings below only change what you see do not mess with any other settings. Once applied click on frame 1 Edit Select all. Mpve it over to one side.. Of your screen..

10. Open your First animation Beside of it.. Make this big enough so that you can see Only Frame 4. I suggest picking one of the larger balls to click on with your mouse. Make sure you are clicking on the first frame layer of balls. You must hold your left mouse button down to drag them into the other aniation.and keep holding it till they are place where you want the balls. until you have the balls. If you do not place the balls in the. right place Go to edit click undrag.. Click back on the bubble animation and do it there to.. Now you can go back and try to place them again.
11. Satisfied with the way it looks Delete Frame 4. Click on frame one go to edit select all right click on frame 1 select frame properties and change speed to 50. Now your bubbles will burst.. Save your image where you can find it..
Background:
1 Open a New image 1000x300 Select a paper from the kit in your foreground color and flood fill it..
2. Add a new raster Layer. With your selection tool start at the 150 top ruler mark and draw out a rectangle to the left border and the entire length or the image. Select a paper and flood fill the selection. Apply your Drop Shadow.. Vertical and Horizontal set at 2 Opacity 65 and blur 5.00
3. Merge visible apply Effects/image effects/seamless tiling see settings below.

4, Open Element 14 copy and paste into image as new layer re-size it 70%. Apply same drop shadow. move to the left over your border.
5. Open Element 69 copy and paste into image. Re-size it 50%. Apply drop shadow move to the left over your border.
6. Open Element 55 I resized it to 300 width then copied and paste it into my image as new layer. Apply same drop shadow. Move to the left border Merge Visible. Save Under File Export Jpeg optimizer value 25.