
BACKGROUND IMAGE GOT LOST SORRY
DATE WRITTEN:JULY 14, 2009
THINGS NEEDED
PAINTSHOP PRO 9 OR SIMILAR PROGRAM.
TUBE: Elias Chatzoudis Licensed Tube purchase it at MYPSPTUBES
MASK: WSL Mask 327 HERE
KIT: Creations by Sanie FTU LOVE ME Tagger 700x700 HERE
Not all kits are same sizes.
So if you choose another kit, your re-sizing may be different..
THINGS NEEDED
PAINTSHOP PRO 9 OR SIMILAR PROGRAM.
TUBE: Elias Chatzoudis Licensed Tube purchase it at MYPSPTUBES
MASK: WSL Mask 327 HERE
KIT: Creations by Sanie FTU LOVE ME Tagger 700x700 HERE
Not all kits are same sizes.
So if you choose another kit, your re-sizing may be different..
Let's Begin
Please note as I will not repeat the following things.
Once you set your drop shadow it will stay..
Always Close original image after you copy.
Always sharpen re-sized items one time.
Always Close original image after you copy.
Always sharpen re-sized items one time.
1. Open your tube and mask. Minimize it for now.
2. Open a new transparent image. 700x700. Select a paper from the kit I used paper 3. Select the paper in your foreground color under the pattern tab. Change the angle to 45. Flood fill you layer.
3. New raster layer. Select a paper from the kit flood fill your layer. I used paper 5.
4. Layers. New mask layer from image. Source luminance checked and invert mask data unchecked. Click ok. Right click on the black mask layer in your layers palette select delete. When it ask if you want to merge into layer below select yes. Right click the top mask layer and merge/merge group. Re-size mask layer 95%
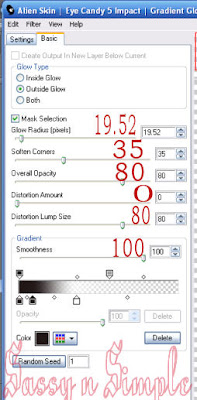
5. Effects/Plugins/Eye Candy 5 Impact Gradient Glow use the settings below. Change your colors to a dark color from you tube and a very light color.you just click on the arrows to change the colors. I used black and white. Apply.
2. Open a new transparent image. 700x700. Select a paper from the kit I used paper 3. Select the paper in your foreground color under the pattern tab. Change the angle to 45. Flood fill you layer.
3. New raster layer. Select a paper from the kit flood fill your layer. I used paper 5.
4. Layers. New mask layer from image. Source luminance checked and invert mask data unchecked. Click ok. Right click on the black mask layer in your layers palette select delete. When it ask if you want to merge into layer below select yes. Right click the top mask layer and merge/merge group. Re-size mask layer 95%
5. Effects/Plugins/Eye Candy 5 Impact Gradient Glow use the settings below. Change your colors to a dark color from you tube and a very light color.you just click on the arrows to change the colors. I used black and white. Apply.

6. Open Element 73. Copy and paste it into your image as new layer. Do not close the original element. Re-size it 90% Apply drop shadow Vertical and Horizontal set at 2, Opacity 65 and blur 5.00 this is the drop shadow we use unless I state otherwise..
7. Cop and paste your tube paste into image as new layer. Then re-size it as needed sot that it is not outside the mask layer. Apply your dorp shadow. Do not close out original tube.
8. Now Copy and paste element 73 into your image again as new layer. Re-size it 50%. Apply your same drop shadow.
9. Select your Eclipse Tool select circle, line width set to.5.00 select a color from you tube in foreground color. Close off background color. Now draw out a circle that will fit inside element 73’s flower shape. Refer to my image. Convert it to a raster layer.
10. Add a new raster Layer below your circle layer. Click on circle layer using your magic wand click inside of the circle. Selections/modify expand 3. Now open your tube and with your selection tool select the head area only copy it make sure to click back on your new layer under the circle. And paste into the selection. Selections Select none
Apply drop shadow. Go back and apply drop shadow on the circle.
11 Right Click circle layer merge down into the head tube layer. Now right click on this mereged layer and
merge it down into the flower element. Free rotate the merged layer 20.00 left make sure rotate all layers is not checked.
12.Open Element 57 from the kit. Copy and paste into your image as new layer. Then re-size it 80%. Apply drop shadow. Arrange it to at the bottom of your tube.
13.Open Flowers 53 and 54 copy and paste them into your image as new layer. Re-size them 40%. Apply drop shadow. Arrange them to the right side towards the bottom.
14. Open element 51 I want this to go in between my flowers So I took and clicked on my bottom flower layer. Copy and paste it into your image as new layer. Re-size it 40% and apply drop shadow. Arrange it between the flower.
15. Open bow 60 copy and paste it into your image as new layer. Free rotate right 20.00 now re-size it 40%. And place it on top of element 51. Apply drop shadow.
16. Open up Element 4 copy and paste as new layer below your wrap layer.Free rotate it 20.00 right. Apply drop shadow.
17. Image add border of 15. Use your magic wand click on the border fill with light color from image. Effects/Plugins/Simple apply diamonds default settings. Keep selected.
18. Effects/Plugins Eye candy 4000 bevel boss. settings below. Or if you perfer to use PSP built in inner bevel that is fine also.. Selections/select none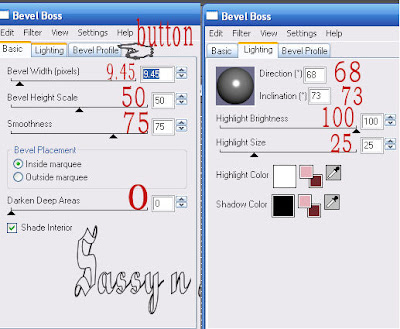
18. Effects/Plugins Eye candy 4000 bevel boss. settings below. Or if you perfer to use PSP built in inner bevel that is fine also.. Selections/select none

19. Select your text and type out trouble. Size it so that it fits inside the tag.. Refer to my image. Apply drop shadow. .
20. Apply your watermark and copyrights. merge visible. Re-size it so that height is no more than 450.
ANIMATION
1. Select your text and type out the word double. You want to place it that the top right side. Once placed and sized as you would like them to be right click on text layer and convert it to a raster layer. Duplicate the text layer 5 times you should now have 6 layers. Close off all layers but the bottom layer. If you choose to use another word you need to duplicate different. You need to have as many layers as number of letters are in the word. Double has 6 letters so I need 5 duplicates.
2. Click on the bottom layer. Select your free hand tool. Starting with the O.. very carefully start where the O attaches to the d. You want to take your free hand tool around all the letters after ouble.. Make sure you are around the drop shadow also. See my image below. Hit delete Selections/select none.

3. Now Continue to this on all the other layers in this order UBLE, BLE, LE, E Do not Erase anything on the last layer. which is your top layer. that should contain the whole word.
5. Now Close off all the layers Make sure to click on your background (merged image) and keep as your active layer. Now open the Layer with the d on it. Copy merged and paste into animation shop as new animation. Close your D layer.
5. Open the Layer with DO on it. Copy merged and paste into animation shop after current frame. Now that you have the idea continue to this until you have copied each layer into Animation Shop. You last frame should be the complete spelling of your word.
6, Click on the first Frame go to edit select all. Then right click on the frame select frame properties and change frame speed to 60.
7. Save your animation now.
Background
1. Open a new transparent background.1000x300 Selections/select all . Open a paper from the kit copy and paste into selection. I used paper 3
2. Add a new raster layer. With your selection tool draw out a rectangle starting at the top 150 mark and go all the way to the left border and the entire length of the image. Select a second paper from the kit, Select it in your foreground color under patterns and flood fill the selection on your new raster layer. Apply drop shadow . Vertical and Horizontal set at 2, Opacity 65 and blur 5.00 I used paper 4.
3. Merge visible. Image/image effects/seamless tiling see settings below.

4. Open Element 73 copy and paste into image as new layer. Then re-size it 30%. Apply drop shadow and move it over onto your border center it.
5. Open Element 21 Copy and paste into your image as new layer. Re-size 50%. Apply drop shadow move it over to the border center it in Element 73.
6. Open Element 72 copy and paste into image as new layer. Then re-size it 20%. Apply drop shadow and flip it. Arrange over the bow on element 73 if any ribbon is showing use your eraser and remove it.. Make sure you click on element 73 layer before erasing it.
Merge visible. And save your image file/export/jpeg optimizer value set at
Just copy and paste into your Stationary
I want to Thank Simply Classy n Sassy Group Testers for testing the Tutorial
I hope you enjoyed this tutorial..
I want to Thank Simply Classy n Sassy Group Testers for testing the Tutorial
I hope you enjoyed this tutorial..