
BACKGROUND IMAGE GOT LOST SORRY
Date Written: July 8. 2009
THINGS NEEDED
THINGS NEEDED
Paintshop Pro 9 or similar program. You need a good knowledge of the programs
TUBE: Posers by OutLaw you can get them HERE.
MASK: weescotslass Mask299 HERE
KIT: ZiggyFan Scraps Cinnamon Spice Tagger 600x600 FTU HERE Tagger kit.
Plugins Eye Candy 4000 and Xenoflex 2Remember not all kits are the same so re-sizing may be different.
Let's Begin
Set your drop shadow. Once set it will Stay.. unless I state otherwise.
Vertical and Horizontal 1. Opacity 65 and Blur 5.00 Always Close original image after you copy.
Always Sharpen Items you re-size one Time..
1. Open your tubes minimize for now.
2. Open a New transparent image. 700x600 Select it in your foreground color under patterns in your material pallette flood fill with a paper from the kit I used 2.
3. New Raster layer Choose another paper from the kit I used 1. Select it in your foreground color under patterns in your material pallette and flood fill you layer
4. Open the mask. Layers/new mask Layer/from Image. Select your mask uncheck invert mask data if it is checked. And source luminance should be checked. Click Ok. Now right click on the black mask layer and delete it. When it ask do you want to merge into layer below select yes. Now right click top mask layer then merge/merge group.
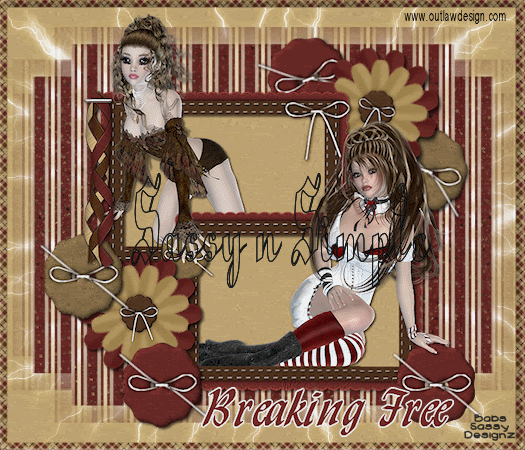
5. Open The Frame 1 Copy and paste it into your image as new layer. It should be place so the bottom is near the 500 mark on your ruler.
6. Add a New raster layer under your frame. With your magic wand click inside the frames windows. The go Selection/modify expand 4. Keep it selected.
7. Open a paper from the kit. Select it in your foreground color under patterns on your material palette. Now Flood fill the selections on you new layer. Selection/select none.
8. Open your Tubes copy and paste into your image as a new layer you will want the top one behind your frame. If you use the same posers I resized my top one 35% and my bottom one 30% And you want to place yours like my you will need to use your freehand tool and copy the areas you want to bring to the front on the top tube.. Her hand will have to be redone to remove the extra around it. For the bottom I was able to just copy part of the frame.
9. Once you have your tubes set. Apply the following drop shadow Vertical and Horizontal 2, Opacity 65 and Blur set to 5.00. Apply it to both tubes and the frame. Not the selection part of the tube..
10. Now close your background layer and mask layer. merge visible. Re-size your merged Layer 90%. Move it to the top some but leave room for framing.
11. Open the flower up copy and paste into your image as a new layer. Re-size it 40%. Apply same drop shadow as before. Duplicate it pull one layer under your merged tube and frame layer.
12. Open the buttons Choose 2 of them. Using your freehand tool draw around the first one you want to use. Copy and paste it into image Selections/select none then select your second button the same way. Copy and paste into image. Apply your drop shadow same as before.. Then duplicate one two times. And one 1 time. Pulled two of them under my frame same as I did with my flower. Refer to my image if you need to.. No re-sizing needed..
12. Open the buttons Choose 2 of them. Using your freehand tool draw around the first one you want to use. Copy and paste it into image Selections/select none then select your second button the same way. Copy and paste into image. Apply your drop shadow same as before.. Then duplicate one two times. And one 1 time. Pulled two of them under my frame same as I did with my flower. Refer to my image if you need to.. No re-sizing needed..
13. Open the ribbon copy and paste it into your image as a new layer. Re-size it 50%. Apply you same drop shadow. I arranged on my left side of my frame. Close your back ground layer and mask layer and merge visible.
14. Now Select a paper in your foreground color. Close off your background color and with your rectangle tool set line width to 20 and draw out your frame around your image. I used 5. Scaled it 50 and angled it 45. Convert it to a raster Layer.
15.. Effects/Plugins/eye candy 4000 Bevel Boss. See settings below. Or you can use your PsP Bevel if you wish. I just perfer eye candy as it gives it a better look to me.
 16. Now choose a color from your image for you text and type it out. Add a raster layer below it. Click on your text Layer. Selections/ Select all, float then defloat it. Selections modify expand 2. Now choose a color that will help your text stand out. And flood fill the selections in your new layer. Right click your text layer and merge it down into your flood filled layer. . Apply your same drop shadow as before.
17. Re-size your image so that the height is no more than 450. Width will adjust. Apply your copyrights and your watermark.
ANIMATION
1. Duplicate your mask Layer 2 times.
2. Select the bottom mask layer Effects/Plugins/Xenoflex 2/electrify see settings below..
1. Duplicate your mask Layer 2 times.
2. Select the bottom mask layer Effects/Plugins/Xenoflex 2/electrify see settings below..

3. Select your Middle Mask Layer apply the xenoflex2 again but this time change your random seed one time. Then select your top mask layer and again apply your xenoflex 2 again change the random seed one time.
4. Close off the top 2 mask layers. Highlight your background Layer. Edit/copy merged and paste into animation shop as new animation. Close off bottom mask layer Open the middle mask layer again copy merged paste into animation shop after current frame. Close off middle mask layer open top mask Layer. Copy merged and paste into animation shop after current layer.
Save your image..
Background:
1. Open a new transparent image 1000x300 Flood fill with a paper from the kit I used paper 2.
3. Open the ribbons Select two you like and with your selections too select a width of 300 Copy and paste it into your image and Free rotate it 90 Right. Apply Drop shadow. Vertical and Horizontal 2, Opacity 65 and Blur set to 5.00.
4. Merge visible and apply seamless back ground. See settings below.
 5. Open the flower Copy and paste into image as a new layer and re-size it 25% Apply drop shadow same as before and duplicate arrange it to the left border.
6. Open the buttons Copy and paste into your image as new layer. Re-size 70% apply same drop shadow and duplicate one arrange them to the left border see my image for placement.
7, Now merge layers and save by going to file export jpeg optimizer at 25 value.
Just copy and paste into your Stationary
I want to Thank Simply Classy n Sassy Group Testers for testing the Tutorial
I hope you enjoyed this tutorial..
I hope you enjoyed this tutorial..