

DATE: July 6, 2009
THINGS NEEDED: Paintshop pro 9 or similar program
TUBE: Keith Garvey Licensed Tube MPT Buy HERE
KIT: Blue Dreams Kit Sweet Nothing 600x600 Tagger Kit HERE
PLUGINS: Eye Candy 4000
Not all kits are same sizes. So your re-sizing may be different if you use a different kit..Check out my tips on the sidebar.
Let's Begin
Please NOTE as I will not repeat in each step.
Once you set your drop shadow it will stay..
Always Close original image after you copy.
Always sharpen re-sized items one time.
1. Open New image 700x600. Open paper 4. Select it in your foreground color under patterns. Flood fill your image.
2. Open frame 4. Copy and paste into Image as new layer. Re-size it 85%.
3. Add a New Raster layer under your frame. Select your frame layer. With your magic wand click inside of the frame. Selections/modify expand 2. Keep selected.
4. Select paper 3 from the kit. Select it in your foreground color under patterns. Flood fill the selections on your new layer. Selections/select none.
5. Copy and paste your tube as new layer. Re-size your tube so that some of it is outside the frame. Effects/3D/drop shadow Vertical and Horizontal 2, Opacity 65 and blur 8.00.
6. In your layers palette select your frame layer. Select the Selection tool. Draw a rectangle around the bottom part or the frame if any of your tube is over it. Copy and paste as new layer above your tube. Arrange so that it blends in with original frame.
7. Close off your Background layer merge visible. You can open your back ground layer back up now.
8. Open the Doodle Copy and paste into image as new layer. Re-size it 40%. Arrange it to the right so that it is not under your frame. Duplicate it Image/mirror. Now right click the duplicate select merge/merge down into the original doodle layer. Now duplicate your merged image/flip. Now merge down the duplicated doodle layer.
9. Click on the merged Doodle layer and take your opacity down to around 59.
10. Open wrap 4 or one you like. Copy and paste into your image as new layer. Go to image/free rotate make sure all layers is not checked. Rotate 20.00 Now re-size 85%. Apply same drop shadow as before.
11. Open flower 1. Copy and paste into your image as new layer and arrange it to the right side of your frame so that it is over your wrap. Apply same drop shadow.
12. Open flowers 1, 2 and 4. Copy and paste as new layers in to your image. . Re-size them 40%. Arrange them on the left side of your frame. Apply same drop shadow. Duplicate 2 of the flower and pull down under your frame layer. Refer to my image for placement..
13. Open buttons 1 and 4. Copy and paste as new layers into your image. Re-size 50%. Apply same drop shadow. Duplicate teach one and place some on your flowers on the bottom and top..
14. Open the Lock. Copy and paste into your image as new layer, Re-size it 30%.. Place it so that it is over one of the holes on the frame. Apply your drop shadow.
15. Select your lasso tool. Settings Selection type set to point to point and mode set to add(shift. Select the part top part of the lock and trace around the frame Once you have your marching ants hit delete.. . Selections/select none. Refer to my image if you have trouble understanding this part and see what I took out.
16. Open bow 3. Copy and paste into image as new layer. Re-size it 50%. Flip arrange it on the left side of your frame so that it does not cover your lock. Apply same drop shadow
17. Select a paper in your foreground color under patterns. Select your rectangle tool. Line width set to 30. Starting at the left Corner of you image draw out your rectangle so that you have framed the whole image. Convert to raster.
18. Effects/Plugins/Eye Candy 4000 Bevel Boss. See settings below.. Apply same drop shadow..

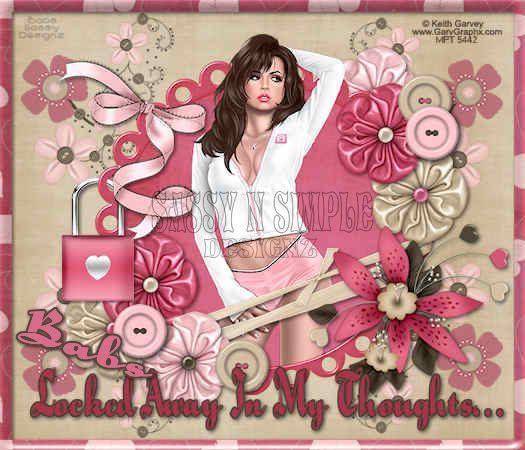
19. Apply Text. I used a Font called Speedscript.. Then add a new raster below it. I then Click back on your text layer in your layers palette. Selections/select all, float, then defloat and then go modify/expand 2. Click on the layer you added under your text layer. Flood fill the selection in the empty layer with a color that will make your text stand out.
20. Now apply your watermark and copy rights. Then merge visible and re-size your image so that the height is no more than 450 width will adjust its self.
Background.
1 Open a New Transparent Image. 1000x300 Select all. Select Paper 6 from the kit Copy and paste into selection.
2. New raster Layer. Take your selection tool and draw a rectangle from the top 150 ruler mark to left border and entire height of your image.Now Select a paper from the kit and flood fill the selection. Now merge visible.
3. Effects/image effects/seamless tiling see settings below.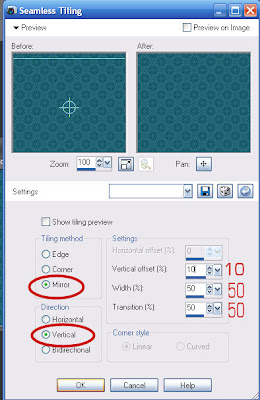 4. Open wrap 2 I Resize the width to 310. Copy and paste into image as new layer. Free rotate them 90 to the left. Move it over so that it overlaps your border. Apply drop shadow. Vertical and Horizontal 2, Opacity 65 and blur 8.00.
20. Now apply your watermark and copy rights. Then merge visible and re-size your image so that the height is no more than 450 width will adjust its self.
Background.
1 Open a New Transparent Image. 1000x300 Select all. Select Paper 6 from the kit Copy and paste into selection.
2. New raster Layer. Take your selection tool and draw a rectangle from the top 150 ruler mark to left border and entire height of your image.Now Select a paper from the kit and flood fill the selection. Now merge visible.
3. Effects/image effects/seamless tiling see settings below.
 4. Open wrap 2 I Resize the width to 310. Copy and paste into image as new layer. Free rotate them 90 to the left. Move it over so that it overlaps your border. Apply drop shadow. Vertical and Horizontal 2, Opacity 65 and blur 8.00.
5. Open Ribbon 3 Copy and paste into image as new layer and re-size it 40%. Place it to the left border Apply drop shadow same as before.
6. Open the Lock Copy and paste as new layer into image. Re-size it 30%. Apply your drop shadow same as before. Place the lock so that it looks like the lock is hanging from ribbon. Then take your lasso and follow the ribbon around the part of the lock you want to remove. Once selected hit delete button. Selections/select none.
7. Open flowers 2 and 4. Copy and paste as new layer into your image re-size 30%. Place over your lock and ribbon. Apply same drop shadow as before. Pull one flower layers down under the ribbon and lock layers.
8. Open buttons 3 and 4. Copy and paste as new layer into your image. Apply same drop shadow. Re-size the buttons 50%. Pull one of the button Layers down under the top flower.
9. Now Merge all and Save your background by clicking on File Export Image value set at 25.
PLEASE PLACE CREDIT ON ALL STATS
Tutorial by Babs C
Thanks to all the Simply Classy n Sassy Group Testers for testing the Tutorial
I Hope you enjoyed the tutorial.