
Date Written: June 18, 2009
THINGS NEEDED: Paintshop pro 9 or similar program.
TUBE: used included in kit.
KIT: PTU EAL Full size kit HERE
PLUGINS: Eye Candy 4000, Simple diamonds
Not all kits are same sizes.
So if you choose another kit, your re-sizing may be different..
Let's Begin
Please NOTE as I will not repeat in each step.
Once you set your drop shadow it will stay..
Always Close original image after you copy.
Always sharpen re-sized items one time.
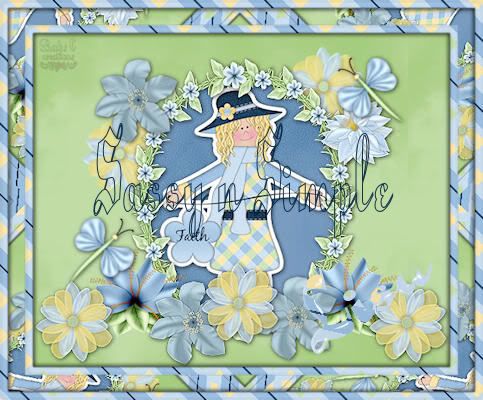
1. Open a New Image 400x500 Select a paper in your foreground color under patterns on you material palette. Flood fill you image with it.. I re-sized my paper 25% to start with then scaled it to 50.as the kit I am working with is a full size kit.
2. Open a The Girl Element or a tube, Copy and paste it into your image as new layer. re-size as needed. I re-sized her to 15% then 90%. Effects/3D/Drop shadow. Settings below
Vertical 1 Horizontal 1 Opacity 60 Blur 5.00
3. Open flower 1 frist re-size it to 1006 in width as it is a very large flower. Then re-size it. 10%. Copy andPaste into your image as new layer Apply same Drop Shadow as before.
4. Open flower 2 re-sized it to 10%. Copy and Paste into your image as new layer. Apply the same drop shadow as before.
5. Open flower 3 re-sized it to 10%. copy and Paste into your image as new layer. Apply same drop shadow as before.
6. Open Flower 4 re-size it to 10%. Copy and paste into your image as new layer .
7. Duplicate your flowers and arrange them refer to image for placement.
Bring some to the top. You do that by right clicking on the one you want to move in your Layers Palette the Right Click select arrange and bring to the top.
9, Open the dragonfly re-size it 10% copy and paste int0 your image as new layer. Duplicate it one time. Image/free rotate 45,00 to the right and then rotate the other to left. arrange it refer to image for placement.
10, Image add border/ 10 make sure symmetric is checked. Does not matter what color as we will change it in the next step.
11. With you magic wand click on the border you added you should now have blinking lines all around it. Select a paper in your foreground and flood fill the border. Keep Selected. I used paper 10 re-sized 25% and angle it 45, scale 30.
12. Effects/plugins/eye candy 4000 bevel boss see settings below. Apply drop shadow. Vertical 1 Horizontal 1 Opacity 70 Blur 5.00 repeat this only change the Vertical to -1 and Horizontal -1 Selections/select none.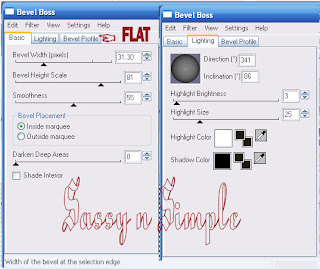

13. Image/apply border 20. Click on it with your magic wand. keep selected
14. Effects/simple diamonds. flood fill with your paper. Effects/plugins/simple diamonds. Selections/select none.
14. Effects/simple diamonds. flood fill with your paper. Effects/plugins/simple diamonds. Selections/select none.
15. Repeat steps 10 through 12.
16 Apply your watermark and copyrights.
Background:
Arrange all things on the left side border. see image for reference.
1. Open a new image 1000x300. Selections select all,
2 Select a paper I used paper 7. re-size it 25%. Now copy paste into selection. selections/select none.
16 Apply your watermark and copyrights.
Background:
Arrange all things on the left side border. see image for reference.
1. Open a new image 1000x300. Selections select all,
2 Select a paper I used paper 7. re-size it 25%. Now copy paste into selection. selections/select none.
3. New raster layer with your selections tool draw out a rectangle on the left starting at 200 all the way to edge and the entire length. Select a paper select it in your material palette under patterns in your foreground color. flood fill I re-sized my paper 25%. Selections/select none.
4. Open 5 re-size 10%. Copy and paste as new layer into your image as new layer. Apply same drop shadow as before.
5. Open bow 2 I resize it 20% copy and paste it into image as new layer. apply same drop shadow as before.
6, Open a dragon fly 1 then re-size it 10%. Copy and paste into image as new layer. Apply same drop shadow as before. Duplicate it free rotate one 45.00 right and one 45.00 left. .
7. Open a flower branch 1. re-size it 10% copy and paste it into image as new layer. Apply same drop shadow as before.
Just copy and paste into your Stationary
I want to Thank Simply Classy n Sassy Group Testers for testing the Tutorial
I hope you enjoyed this tutorial..
I want to Thank Simply Classy n Sassy Group Testers for testing the Tutorial
I hope you enjoyed this tutorial..