Images are not actual size
PROGRAMS YOU WILL NEED
You are responsible for providing the items needed to do my tutorials.
You need a good working knowledge of the programs I use.
Paintshop or Corel Program
ITEMS YOU WILL NEED
TUBE: Of your choice I used Pinuptoons which is licensed at CILM
Pinutoons is now at CDO
KIT: Seashells FTU Splish Splash Kit here
MASK: Insatiable Dreams Mask130 under resources here
THINGS YOU NEED TO KNOW AND DO
Settings may differ slightly depending on Program and Kit used
Close original after you copy it unless I state otherwise.
RE-SIZE only one layer and sharpen once if needed
Left click and right click refers to mouse buttons.
Refer to my image for placement of items.
HEADER
1. Open your tube and mask Minimize them for now.
2. Open a new transparent Image 600x550
Selections/select all
Select paper 4 from the kit edit/copy
Edit/paste into selection on your image
Keep selected
3. Layers palette right click raster 1 add a new raster layer
Select paper 2 from the kit Edit/copy
Edit/paste into selection on your image
Selections/select none
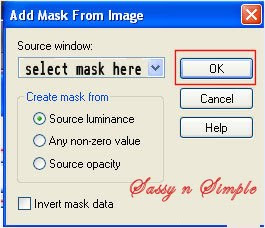
4. Layers/New Mask Layer/from image
Select Insatiable mask 130 in window
(settings below)
Click ok
Layers palette/right click mask/merge/merge group
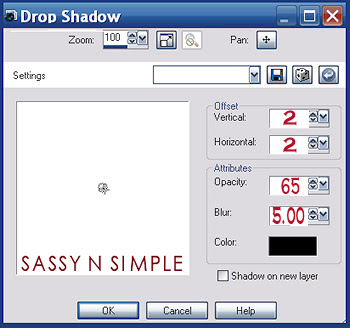
5. Effects/3D/drop shadow
(settings below)
PROGRAMS YOU WILL NEED
You are responsible for providing the items needed to do my tutorials.
You need a good working knowledge of the programs I use.
Paintshop or Corel Program
ITEMS YOU WILL NEED
TUBE: Of your choice I used Pinuptoons which is licensed at CILM
Pinutoons is now at CDO
KIT: Seashells FTU Splish Splash Kit here
MASK: Insatiable Dreams Mask130 under resources here
THINGS YOU NEED TO KNOW AND DO
Settings may differ slightly depending on Program and Kit used
Close original after you copy it unless I state otherwise.
RE-SIZE only one layer and sharpen once if needed
Left click and right click refers to mouse buttons.
Refer to my image for placement of items.
HEADER
1. Open your tube and mask Minimize them for now.
2. Open a new transparent Image 600x550
Selections/select all
Select paper 4 from the kit edit/copy
Edit/paste into selection on your image
Keep selected
3. Layers palette right click raster 1 add a new raster layer
Select paper 2 from the kit Edit/copy
Edit/paste into selection on your image
Selections/select none
4. Layers/New Mask Layer/from image
Select Insatiable mask 130 in window
(settings below)
Click ok
Layers palette/right click mask/merge/merge group

5. Effects/3D/drop shadow
(settings below)

6. Select waves element 20 from the Kit Edit/copy
Edit/paste as new layer into image
Re-size it 60%
Apply same drop shadow
Move down to the bottom of your image
7. Select whale element 1 from kit edit/copy
Edit/paste as new layer into your image
Re-size it 35%
Apply same drop shadow
8. Select frame element 57 from kit edit/copy
Edit/paste as new layer into your image
Re-size it 45%
Apply same drop shadow
9. Image/free rotate 15.00 left boxes unchecked
10. Select net element 13 from the kit edit/copy
Edit/paste as new layer into your image
Re-size it 50%
Apply same drop shadow
Move to top right side of frame
11. Select ribbon element 29 from the kit edit/copy
Edit/paste as new layer into your image
Re-size 50%
Apply same drop shadow
Place on top left side of frame
12. Select crab element 9 from kit edit/copy
Edit/paste as new layer into your image
Re-size it 30%
Apply same drop shadow
Place on bottom left side of frame
13. Select umbrella element 39 from the kit edit/copy
Edit/paste as new layer into image
Re-size it 40%
Apply same drop shadow
Image/free rotate 15.00 right
Move to top right side of frame
14. Select your tube edit/copy
Edit/paste as new layer into your image
Re-size as needed, I re-sized 85%
I also mirrored my tube
Apply same drop shadow
Move to right side of image onto net
15. Apply your text now.
16. Re-size all layers so that width is 500
Height will adjust
17. Image/add border
3 symmetric checked
Use dropper tool select color from image
Image/add border 3
Use dropper tool select different color from image
Image add border 3 same color you used firs time
18. Layers palette/right click promote to background layer
Now add a new raster layer apply copyrights and watermark
19. Save your image.
BACKGROUND
Edit/paste as new layer into image
Re-size it 60%
Apply same drop shadow
Move down to the bottom of your image
7. Select whale element 1 from kit edit/copy
Edit/paste as new layer into your image
Re-size it 35%
Apply same drop shadow
8. Select frame element 57 from kit edit/copy
Edit/paste as new layer into your image
Re-size it 45%
Apply same drop shadow
9. Image/free rotate 15.00 left boxes unchecked
10. Select net element 13 from the kit edit/copy
Edit/paste as new layer into your image
Re-size it 50%
Apply same drop shadow
Move to top right side of frame
11. Select ribbon element 29 from the kit edit/copy
Edit/paste as new layer into your image
Re-size 50%
Apply same drop shadow
Place on top left side of frame
12. Select crab element 9 from kit edit/copy
Edit/paste as new layer into your image
Re-size it 30%
Apply same drop shadow
Place on bottom left side of frame
13. Select umbrella element 39 from the kit edit/copy
Edit/paste as new layer into image
Re-size it 40%
Apply same drop shadow
Image/free rotate 15.00 right
Move to top right side of frame
14. Select your tube edit/copy
Edit/paste as new layer into your image
Re-size as needed, I re-sized 85%
I also mirrored my tube
Apply same drop shadow
Move to right side of image onto net
15. Apply your text now.
16. Re-size all layers so that width is 500
Height will adjust
17. Image/add border
3 symmetric checked
Use dropper tool select color from image
Image/add border 3
Use dropper tool select different color from image
Image add border 3 same color you used firs time
18. Layers palette/right click promote to background layer
Now add a new raster layer apply copyrights and watermark
19. Save your image.
BACKGROUND

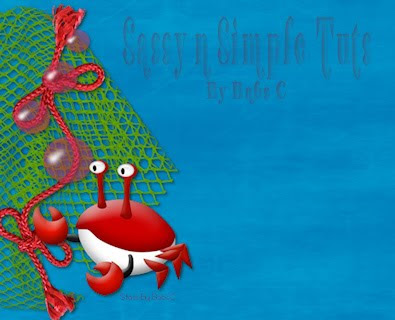
1. Open a new transparent image 1600x400
Or your own desired width
Selections/select all
Select paper 2 from the Kit edit/copy
Edit/paste into selection on your image
Selections/select none
2. Effects/Image effects/seamless tiling
Default settings.
3. Select net element 13 Edit/copy
Edit/paste as new layer into image
Re-size it 50%
Apply same drop shadow
Move to left border of image moving some outside of image
4. Select ribbon element 29 Edit/copy
Edit/paste as new layer into image
Re-size it 50%
Apply same drop shadow
Move to left border of image
5. Select bubbles element 43 edit/copy
Edit/paste as new layer into image
Re-size 30%
Apply same drop shadow
Move onto the net
6. Select crab element 9 edit/copy
Edit/paste as new layer into your image
Re-size it 25%
Apply same drop shadow
Move to left bottom side onto net
7. Save your image
file/export/jpeg optimizer value 30
Thanks for Trying my Tutorial I hope you Enjoyed it.
I want to thank Marsha and Ruth for testing my tutorials.
If You use my tutorials in Stationary Please apply Credit Below
Tutorial by Babs C
HERE or HERE
You can copy and paste the above if that does not work use Links below
http://groups.yahoo.com/group/sassynsimple/
http://sassynsimple.blogspot.com/
©SassynSimple Tutorials
I put most of my Stationary tutorials on Incredimail Letter forms. Once in a while I will
place some on my blog. If you wish to access my Other stationary tutorials
you would have to join one of my yahoo groups. Links are on my blog

