DATE WRITTEN: July 25, 2009
You need a good knowledge of PSP in order to do this tutorial.
THINGS NEEDED PAINTSHOP PRO 9 OR SIMILAR PROGRAM.
TUBE: Michael LandeFeld is a licensed tube get it at CILM
KIT: Fantasy Moments Camouflage FTU Tagger HERE
MASK: Babs BitzyBeez Designz HERE
PLUGINS: MuRa's seamless, Eye Candy 4000
Not all kits are same sizes. So if you choose another kit, your re-sizing may be different..
Let's Begin
Please NOTE as I will not repeat in each step.
Once you set your drop shadow it will stay..
Always Close original image after you copy.
Always sharpen re-sized items one time.
1. Open New Image 800x700. Under selections select all. Open paper 10 in the kit Copy and paste into selection.
2. Add a New Raster. Select paper 16 from the kit. Select it under your patterns tab in your material palette. Flood fill your layer.
3. Under Layers choose Layers/new mask layer/from image. Select the mask in the window. Make sure source Luminance is checked and invert mask data is checked. Click ok.
4. Right click on the black mask layer in your layers palette and select delete. When it ask “Would you like this mask merged into the layer below it.” Select yes. Right click top mask and merge visible. Apply Drop shadow Vertical and Horizontal set at 2, Opacity 65 and blur 5.00.
5. Open bow element 1 copy and paste into your image as new layer. Re-size it 20%. Apply drop shadow. Duplicate it 3 times and arrange in the middle of the frame. Two on each side where the spaces are. See my image.
6. Open your tube copy and paste into your image as new layer. Duplicate it 1 time mirror. Apply your drop shadow. Place in front of the center of your mask.
7. Open element 22 copy and paste into your image as new layer. Re-size it 35%. Duplicate it place one on each side of the mask at the top. Apply same drop shadow.
8. Open flower 31 Copy and paste into your image as new layer. Re-size it 35%. Apply your drop shadow and duplicate it 2 times arrange at the bottom of the mask. Leave a space between them.. See my image.
9. Open Flower 14 Copy and paste into your image as new layer. Re-size it 35%. Apply your drop shadow and duplicate it 3 times and arrange them around the bottom of the mask. Two should be on the outside and two inside between your first flower.
10.Open element 26 Copy and paste into your image as new layer. Re-size it 35%. Apply your drop shadow. Move it over your Heart element on the right. Select your selection tool rectangle. Draw out a rectangle where you want to remove part of rope. Then hit delete. Selections Select none. See my image.
11. Now type out your text. Do not make it to small or large when sizing it It should be where there is a good space between the top and the mask. 12. Effects/Plugins/MuRa’s Seamless/shift at wave. See settings below. Apply your drop shadow.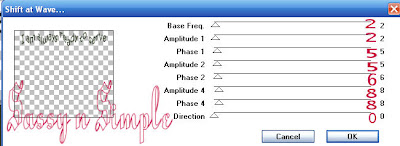 13. Apply your watermark and copyrights. Re-size the image so that height is no more than 425. Width will adjust.
14. Open paper 21 Select it in your foreground color under patterns in your material palette. Close background color. Select your rectangle tool line width set to 8.00. Draw out a rectangle around your image. Convert to raster layer.
15. Close off your text layer and merge visible.
ANIMATION
1. Duplicate your text Layer 2 times. Close off the two duplicated text layers. You should now have 3 text layers. Top, middle and bottom. 2. Select your bottom text layer. original layer) Effects/Plugins/Eye Candy 4000 Jiggle see settings below.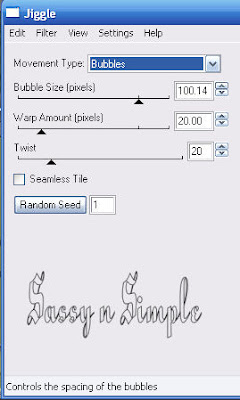 3. Close off the bottom text layer. Select the layer above the original text layer (middle text layer), Apply your Jiggle again this time click on the random seed button one time.
4. Close of your middle layer and open the top text layer. Apply your jiggle again, Click on the random seed button one time.
6. Close the top and middle layers of your text. Open your bottom text layer. Copy merged. I always click on my background layer this way I don’t have to keep clicking on the layers as I change them.
7. Close the bottom text layer. Open the middle text layer. Copy merged and paste into animation shop after current frame. Repeat this for the top layer. Remember to close off the middle layer though.
8. Click on the first frame then go to edit and select all. Right click on your frame and select frame properties now change the speed to 90. Save your animation.
BACKGROUND
1. Open a new transparent image 1000x250 Selections/select all. Select paper 10 from the Kit copy and paste into selections. Selections/select none.
2. Add a new raster Layer. Make sure you have your ruler showing. Select your selection tool and draw out a rectangle starting at the 150 mark. Draw it out all the way to the left border and the entire length of the image. See image below. Keep selections selected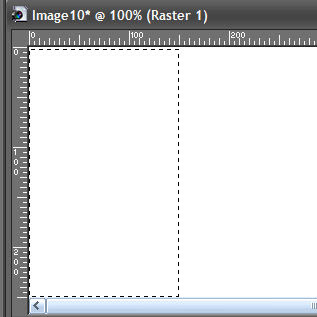 3. Select paper 16 from the kit in your foreground color under patterns. Flood fill the selection. Selections Select none.
4. Select your warp brush set the size to 250. Take and push in on your rectangle you just made so that it indented some.. See image. Apply your drop shadow.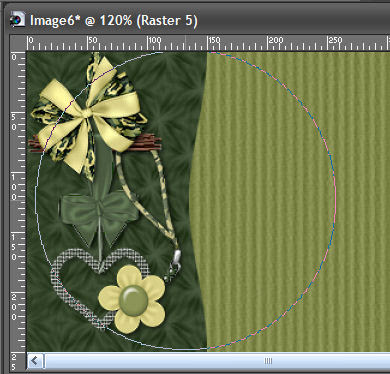
5. Merge the two layers. Effects/image effects seamless tiling. apply seamless tiling see image below for settings.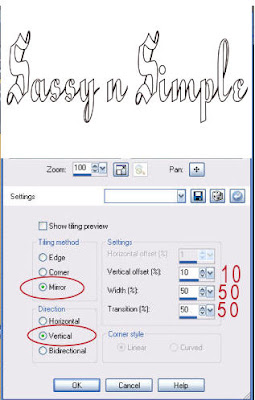
You need a good knowledge of PSP in order to do this tutorial.
THINGS NEEDED PAINTSHOP PRO 9 OR SIMILAR PROGRAM.
TUBE: Michael LandeFeld is a licensed tube get it at CILM
KIT: Fantasy Moments Camouflage FTU Tagger HERE
MASK: Babs BitzyBeez Designz HERE
PLUGINS: MuRa's seamless, Eye Candy 4000
Not all kits are same sizes. So if you choose another kit, your re-sizing may be different..
Let's Begin
Please NOTE as I will not repeat in each step.
Once you set your drop shadow it will stay..
Always Close original image after you copy.
Always sharpen re-sized items one time.
1. Open New Image 800x700. Under selections select all. Open paper 10 in the kit Copy and paste into selection.
2. Add a New Raster. Select paper 16 from the kit. Select it under your patterns tab in your material palette. Flood fill your layer.
3. Under Layers choose Layers/new mask layer/from image. Select the mask in the window. Make sure source Luminance is checked and invert mask data is checked. Click ok.
4. Right click on the black mask layer in your layers palette and select delete. When it ask “Would you like this mask merged into the layer below it.” Select yes. Right click top mask and merge visible. Apply Drop shadow Vertical and Horizontal set at 2, Opacity 65 and blur 5.00.
5. Open bow element 1 copy and paste into your image as new layer. Re-size it 20%. Apply drop shadow. Duplicate it 3 times and arrange in the middle of the frame. Two on each side where the spaces are. See my image.
6. Open your tube copy and paste into your image as new layer. Duplicate it 1 time mirror. Apply your drop shadow. Place in front of the center of your mask.
7. Open element 22 copy and paste into your image as new layer. Re-size it 35%. Duplicate it place one on each side of the mask at the top. Apply same drop shadow.
8. Open flower 31 Copy and paste into your image as new layer. Re-size it 35%. Apply your drop shadow and duplicate it 2 times arrange at the bottom of the mask. Leave a space between them.. See my image.
9. Open Flower 14 Copy and paste into your image as new layer. Re-size it 35%. Apply your drop shadow and duplicate it 3 times and arrange them around the bottom of the mask. Two should be on the outside and two inside between your first flower.
10.Open element 26 Copy and paste into your image as new layer. Re-size it 35%. Apply your drop shadow. Move it over your Heart element on the right. Select your selection tool rectangle. Draw out a rectangle where you want to remove part of rope. Then hit delete. Selections Select none. See my image.
11. Now type out your text. Do not make it to small or large when sizing it It should be where there is a good space between the top and the mask. 12. Effects/Plugins/MuRa’s Seamless/shift at wave. See settings below. Apply your drop shadow.
 13. Apply your watermark and copyrights. Re-size the image so that height is no more than 425. Width will adjust.
 14. Open paper 21 Select it in your foreground color under patterns in your material palette. Close background color. Select your rectangle tool line width set to 8.00. Draw out a rectangle around your image. Convert to raster layer.
15. Close off your text layer and merge visible.
ANIMATION
1. Duplicate your text Layer 2 times. Close off the two duplicated text layers. You should now have 3 text layers. Top, middle and bottom. 2. Select your bottom text layer. original layer) Effects/Plugins/Eye Candy 4000 Jiggle see settings below.
 3. Close off the bottom text layer. Select the layer above the original text layer (middle text layer), Apply your Jiggle again this time click on the random seed button one time.
 4. Close of your middle layer and open the top text layer. Apply your jiggle again, Click on the random seed button one time.
6. Close the top and middle layers of your text. Open your bottom text layer. Copy merged. I always click on my background layer this way I don’t have to keep clicking on the layers as I change them.
7. Close the bottom text layer. Open the middle text layer. Copy merged and paste into animation shop after current frame. Repeat this for the top layer. Remember to close off the middle layer though.
8. Click on the first frame then go to edit and select all. Right click on your frame and select frame properties now change the speed to 90. Save your animation.
BACKGROUND
1. Open a new transparent image 1000x250 Selections/select all. Select paper 10 from the Kit copy and paste into selections. Selections/select none.
2. Add a new raster Layer. Make sure you have your ruler showing. Select your selection tool and draw out a rectangle starting at the 150 mark. Draw it out all the way to the left border and the entire length of the image. See image below. Keep selections selected
 3. Select paper 16 from the kit in your foreground color under patterns. Flood fill the selection. Selections Select none.
 4. Select your warp brush set the size to 250. Take and push in on your rectangle you just made so that it indented some.. See image. Apply your drop shadow.

5. Merge the two layers. Effects/image effects seamless tiling. apply seamless tiling see image below for settings.

|
6. Open Element 24 from the kit, Copy and paste it into your image as new layer. Re-size it 25%. Apply drop shadow. Drop shadow Vertical and Horizontal set at 2, Opacity 65 and blur 5.00.
7, Open element 26 Copy and paste it into your image as new layer. Re-size it 25%. Move it to your left border. Apply your drop shadow.
8. Open element 43 bow. Copy and paste into your image as new layer. Re-size it 20% Apply your drop Shadow.
9, Save your image by going to file export/jpeg optimizer value set at 25.
PLEASE PLACE CREDIT ON ALL STATS
Tutorial by Babs C
Just copy and paste into your Stationary
I want to Thank Simply Classy n Sassy Group Testers for testing the Tutorial
I hope you enjoyed this tutorial..
