
©SassynSimple TutorialsWRITTEN: March 6, 2010THINGS NEEDED
Corel or Paintshop Program and a good working knowledge of it.
TUBE: Elias Chatzoudis PTU you must purchase at MPT I have a license.
KIT: Bizty Beez Designz FTU Tagger Passion Delights HERE
MASK: Essex Girl sg_fern_flower-Frame mask page 23 HERE
FONT: DaFonts FTU Dragonwick HERE
Read the below before starting
A few things you need to know and will not repeated.
Always Close original image after you copy unless stated otherwise.
Always sharpen re-sized items one time.
Right click Left click refers to mouse buttons.
HEADER
1. Open a new transparent image 500x400
Selections/Select All.
Keep selected
2. Select Paper 6 from the kit Edit/Copy
Edit/paste into selection
Selections/select none
3. Add a new raster Layer.
Selections/select all
Select Paper 5 from the kit Edit/copy
Edit/paste into selections
Selections/Select none
4. Layers New Mask Layer/from Image
Select sg_fern_flower-Frame mask in the window.
Source luminance/checked
Invert mask data/checked click ok.
5. Layers palette/Right click black/white mask
Delete/click yes.
Next pop up window comes up select Yes
Right click mask layer Merge/merge group.
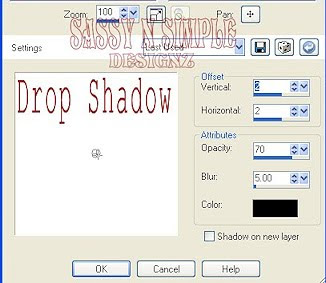
Apply drop shadow (settings Below)

6. Select Frame 5 from the kit Edit/copy
Edit/paste as new layer into your working image
Re-size it 40%
Apply same Drop shadow
7. Select the Magic wand (settings below)
Click inside the frame window
Selections/modify/expand 15
Keep selected

8. Add a new raster layer below your frame
Select Paper 2 from the kit Edit/copy
Edit/paste into selection on your working image.
Selections/Select none
Select Paper 2 from the kit Edit/copy
Edit/paste into selection on your working image.
Selections/Select none
9. Select your tube Edit/copy
Edit/paste as new layer into your working image
Re-size as needed I re-sized 55%
Apply Same drop shadow.
Center in frame
Edit/paste as new layer into your working image
Re-size as needed I re-sized 55%
Apply Same drop shadow.
Center in frame
10. Select charm 4 from the kit Edit/copy
Edit/paste as new layer into your working image
Re-size it 30%
Move it the left side of frame
Use the selection tool rectangle to remove the right side of charm
Edit/paste as new layer into your working image
Re-size it 30%
Move it the left side of frame
Use the selection tool rectangle to remove the right side of charm
11. Select Flower 5 from the kit Edit/copy
Edit/paste as new layer into your working image
Re-size it 25%
Apply same drop shadow.
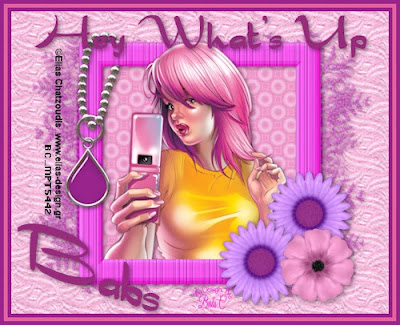
Place on bottom right side of frame (see image)
Edit/paste as new layer into your working image
Re-size it 25%
Apply same drop shadow.
Place on bottom right side of frame (see image)
12. Still on flower 5 Layers palette/right click/duplicate 1 time
Move it to the bottom right side of frame (see image)
13. Select flower 3 from the kit Edit/copy
Edit/paste as new layer into your working image
Re-size it 35%
Apply same drop shadow
Move it between the other two flowers (see image)
Move it to the bottom right side of frame (see image)
13. Select flower 3 from the kit Edit/copy
Edit/paste as new layer into your working image
Re-size it 35%
Apply same drop shadow
Move it between the other two flowers (see image)
14. Using dropper tool select a color from image
Left click/foreground color
Right click/background color
15. Apply your text at this timeLeft click/foreground color
Right click/background color
16. Image/add border 5 Use dropper to select color from image
Image/add border 5 Use dropper to select a different color
Image/add border 5 Use dropper to select the same first color
Image/add border 5 Use dropper to select a different color
Image/add border 5 Use dropper to select the same first color
17. Apply your copyrights and watermark I add a new layer to do this.
18. Layers palette/right click merge visible
18. Layers palette/right click merge visible
19. Re-size your image if you wish I resized mine back to 500x406
20. Save your image in a folder where you can find it.
Border around image not in tutorial.
1. Open a new image 1280x300
Selections/select all
Keep selected
2. Select Paper 6 from the kit Edit/copy
Edit/paste into selection
Selections/select none
3. Add a new raster Layer
Selection tool (settings below)
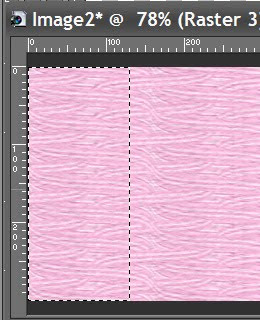
Draw out rectangle 120 in width entire length (see image below)
Keep Selected

 4. Select paper 12 from the kit Edit/copy
Edit/paste into selection
Selections/select none
Layers palette/right click/merge/merge visible
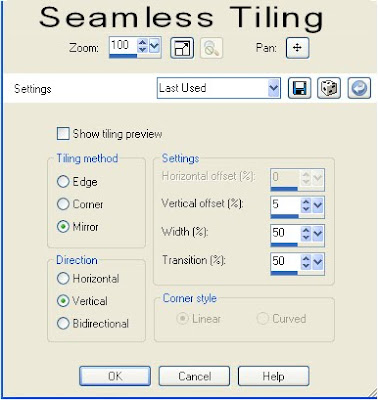
5. Effects/image effects/seamless tiling (settings below)

6. Select Beads 1 from the Kit
Re-size them 310 in width
Edit/copy Edit/paste as new layer into your working image
Image/free rotate 90 right
Move to the edge of your selection paper border (see image)
Apply same drop shadow
7. Select flower 5 from the Kit Edit/copy
Edit/paste as new layer into your working image
Re-size it 20%
Apply same drop shadow
Move on to the selection border at the top near edge (see image)
8. Still on flower 5
Layers palette/right click/ duplicate 2 times
Arrange them slight apart below first one
9. Select Flower 3 from kit Edit/copy
Edit/paste as new layer into your working image
Re-size it 20%.
Apply same drop shadow
Layers palette/right click/duplicate 2 times
Arrange them between other flowers (see my image)
10. Select Flower 1 from kit Edit/copy
Edit/paste as new layer into your working image
Re-size it 20%.
Apply same drop shadow
Layers palette/right click/duplicate 2 times
Arrange them between other flowers (see my image)
11. Select charm 4 from the kit Edit/copy
Edit/paste as new layer into your working image
Re-size it 25%
Apply same drop shadow
Move over on top of flowers
Selection tool draw out rectangle and remove part of the right side of chain.
Now save your image by going to File/Export/JPEG optimizer 30
Thanks for trying my tutorial I hope you enjoyed it
If You use my tutorials in Stationary Please apply Credit Below
Tutorial by Babs C
HERE or HEREYou can copy and paste the above if that does not work use Links below
http://groups.yahoo.com/group/sassynsimple/
http://snsstats.blogspot.com/
My newer Stationary Tutorials are in Incredimail Letter form
in order to access them you must be a member of my group
Our PSP HideAway
I want to thank all the testers that helped make this mistake free.
©SassynSimple Tutorials
