
BACKGROUND IMAGE LOST SORRY
Date Written: June 13,2009
THINGS NEEDED: Paintshop pro 9 or similar program.
TUBE: Barbara Jensen Licensed Tube purchase HERE
KIT: Bel Vidotti Chocalate FTU tagger size kit. HERE
PLUGINS: Lokas Gel, Xenoflex 2
MY SUPPLIES: Template HERE
THINGS NEEDED: Paintshop pro 9 or similar program.
TUBE: Barbara Jensen Licensed Tube purchase HERE
KIT: Bel Vidotti Chocalate FTU tagger size kit. HERE
PLUGINS: Lokas Gel, Xenoflex 2
MY SUPPLIES: Template HERE
Not all kits are same sizes.
So if you choose another kit, your re-sizing may be different..
Not all elements are the same size either..
So if you choose another kit, your re-sizing may be different..
Not all elements are the same size either..
Let's Begin
Please NOTE as I will not repeat in each step.
Once you set your drop shadow it will stay..
Always Close original image after you copy.
Always sharpen re-sized items one time.
Please NOTE as I will not repeat in each step.
Once you set your drop shadow it will stay..
Always Close original image after you copy.
Always sharpen re-sized items one time.
1. Open a new transparent image 600x500.
2. Open the template in my supplies copy and paste into image.
3. Selections/Select All, Selections float, Selections Defloat, Now open a paper of your choice copy and paste into Selection. If using a full size kit you might want to re-size your paper to 900x900. Close out your paper.Selections/select none Re-size the template 85%.
4. Click anywhere inside the template that is transparent. Selections/modify expand 3. Now select a light paper select it in your material palette. Flood fill the layer below the template Layer with your paper. Selections/select none. Now go back and apply drop shadow to your template layer. see settings below.
 5. Copy your Tube close original and Paste as new layer into your image. Apply Drop shadow same as before.
6. Select a color from your tube in your foreground and background. I made a paper for my text since my tube had red shoes with white dots. I wanted my text to match that. Select a font fat is better. Type out your text. Size it to your likening.
7, Now add a new raster layer under your text layer. Click on your text layer. Selections/select all, selections/float, selections/defloat. then selection/modify expand 2. Fill the new layer inside the selection area with paper that will make your text stand out. Selections/select none. Apply drop shadow.. same as before.
8.Go Back to your Text Layer Effects/Plugins/Lokas Gel See settings below, Make sure to click back on your text layer.. Notice I used colors matching the color of my text.
 9. Now open some flowers . Copy and paste each of them into your image as new layer. Re-size to 25%. Arrange them. I duplicated Mine in order to make a border across the top of my text. Apply drop shadow same as before.
10. Open Leave 1. copy and paste into your image. Re-size 25%. Duplicate it and paste behind your flowers
11. Open one of the fasteners copy and paste into image as new layer.then re-size 60% duplicate and place at the top of your image on both sides. Do not add drop shadow.
12. Open two flowers, copy each of them and paste into your image as new layer. Re-size 30%, Arrange them on each corner duplicate them as you would like. Again do not add a drop shadow.
13. Now Re-size all layers so that it is no more than 400 in height width will adjust.
14. Apply your copyrights and watermarks.
ANIMATION
1. Go to your Layer that is under your template. duplicate it 2 times. close off the top two layers.
2. Highlight your bottom layer. Selections/select all, selections float, selections defloat, Selections/modify contract 2 keep selected.
2. Highlight your bottom layer. Selections/select all, selections float, selections defloat, Selections/modify contract 2 keep selected.
3. Effects/ Plugins/ Xenoflex2 constellations. See settings below.. Make sure under settings you select small star constellations. Repeat this for the layer above it changing the random seed. Repeat for top layer changing random seed. Selections select none.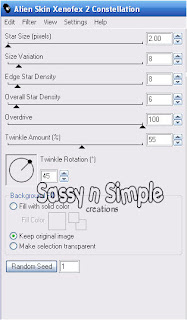 4. Close off the top layers. your duplicated background. click on any layer other than your backgrounds. Make sure bottom layer is open. Edit/Copy Merged paste into animation shop as new animation. Close this layer then open layer above it, Edit/copy merged paste in animation shop after current frame. Close off this layer open top Layer Edit/copy merged paste in animation shop after current frame.
19. Save your animation..
Background.
1. open new image 1000x250 Select all. take a paper copy and paste into selection. selections/select none.
2. New raster layer. In your foreground select a light color from your tube. flood fill layer now change blend to color legacy. Merge Layers Effects/image effects/seamless tiling see image below for settings.
 4. Close off the top layers. your duplicated background. click on any layer other than your backgrounds. Make sure bottom layer is open. Edit/Copy Merged paste into animation shop as new animation. Close this layer then open layer above it, Edit/copy merged paste in animation shop after current frame. Close off this layer open top Layer Edit/copy merged paste in animation shop after current frame.
19. Save your animation..
Background.
1. open new image 1000x250 Select all. take a paper copy and paste into selection. selections/select none.
2. New raster layer. In your foreground select a light color from your tube. flood fill layer now change blend to color legacy. Merge Layers Effects/image effects/seamless tiling see image below for settings.
 4. Now take some elements copy and paste them as new layer and decorate your left border. I re-sized my elements to 30%. With exception of the vine and the fastener those are 40% . Apply a drop shadow same that you used in your header.
5. Save your image by going to file export and jpeg optimizers with value set at 25.
Just copy and paste into your Stationary
I want to Thank Simply Classy n Sassy Group Testers for testing the Tutorial
I hope you enjoyed this tutorial..
I want to Thank Simply Classy n Sassy Group Testers for testing the Tutorial
I hope you enjoyed this tutorial..