DATE WRITTEN: August 13, 2009
THINGS NEEDED
PAINTSHOP PRO 9 OR SIMILAR PROGRAM.
TUBE: Lynne’s Designs PTU HERE
PLUGINS: Eye Candy 4000 Bevel Boss, Funhouse Emission Mirror, Xenoflex 2 constellations
MY SUPPLIES: HERE
Not all kits are same sizes. Re-sizing may be diffrent
Let's Begin
Once you set your drop shadow it will stay..
Always Close original image after you copy.
Always sharpen re-sized items one time.
1. Open a new transparent image. 700x600. Open your Tube and select a dark color from it in your foreground and a Light color in your background color.
2. Fill your Image with the dark color.
3. Now Select your foreground/background Gradient in your foreground color Angle 45 and repeats 4. Add a new raster layer and flood fill it.
4. Effects/Plugins/Funhouse Emission Mirror wavelength setting at 150 apply. Now Copy this and paste as new image and minimize for now. Back to your image. Re-size this Layer 90%.
5. Effects/3D/Drop Shadow Vertical and Horizontal set at 2 Opacity set at 50 and blur 5.00. Go back and reapply this drop shadow but change the Vertical and Horizontal to -2.
6, Open the floral png from my Supplies Copy and paste it into your image. Apply Drops shadow Vertical and Horizontal set at 2 Opacity set at 50 and blur 5.00 Duplicate it and mirror the duplicate. Right click on the duplicate merge/merge down. Apply drop shadow Vertical and Horizontal set at 2 Opacity set at 50 and blur 5.00
7. Copy and paste your tube in as new layer into your image apply same drop shadow.
8. Apply Text your Text. I used AS Jiggy Roman. Size it so that it is as wide as your image. Refer to my image.
9. Effects/Plugins/Eye Candy 4000 Bevel Boss. See settings below. Select Button as Bevel of choice. Apply
10. . Add a new Raster layer under your text. Now Click back on your Text Layer and do the following under Selections. A. Select all, B. Float, C. Defloat, D modify and expand 2.
11. Click back on the new layer you added Select Black in your foreground color and flood fill the selection. Selection/select none Click back on your text Layer Right click on the duplicate merge/merge down. Apply your same drop shadow.
12. Re-Size your image all layers checked so that the width is 400. Height will adjust.
13. Apply your copyrights and your watermark.
13. Close off your background layer and merge visible. Once merged you should have 2 layers.
ANIMATION
1. Duplicate your merged layer Close off the Duplicate copy for now name Copy of merged.
2. Click back on the bottom Original merged Layer. Effects/textures/mosaic antique. Apply the settings below.

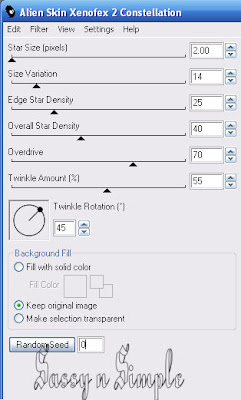
3, Now Duplicate Your merged Mosaic Layer one time. Effects/Plugins./Xenoflex/Constellations Under settings select small star constellations and apply the settings below. Close off this layer

4. Click back on the bottom Mosaic Layer (named merged) Apply The Xenoflex Constellation only this time Click on your random seed button one time.
5. Open the top merged Layer you closed off This is your Tube layer in it original form.
6. Copy merged and paste into animation shop as new animation.
7. Close the bottom mosaic layer. Copy merged and paste into animation shop after current frame. You do this by right clicking on first frame.
8. Save your animation..
BACKGROUND.
1. Open new transparent image. 1280x250. Selections/Select all. Now open the image that you saved of the Funhouse Emission Image. Copy and paste into selection. Selections/select none
2, Add a new Raster Layer select a light color from your tube in your foreground color and flood fill the layer. . I used my same color as in my header. Lower Opacity to 40. Merge visible
3. Effects/image effects/seamless tiling use settings below.
4. Open the border from my supplies copy and paste into your image. With your magic wand click on it.
5. Add a New raster Layer. Select a dark color from your tube in your foreground and flood fill the selection on your new layer. Selections/select none. Delete the greyscale border.
6. Save your Image. By Clicking on File/Export/jpeg Optimizer value set at 30
PLEASE PLACE CREDIT ON ALL STATS
Tutorial by Babs C
Just copy and paste into your Stationary
I want to Thank Simply Classy n Sassy Group Testers for testing the Tutorial
I hope you enjoyed this tutorial..


